27
MAINTENANCE
CHECKING/ADJUSTING DRIVE CHAIN
The drive chain must be adjusted to maintain 1/8 of
an inch deflection at mid span between transmission
and differential sprockets. Check chain deflection
after the first 5 hours of operation and after every 25
hours of operation.
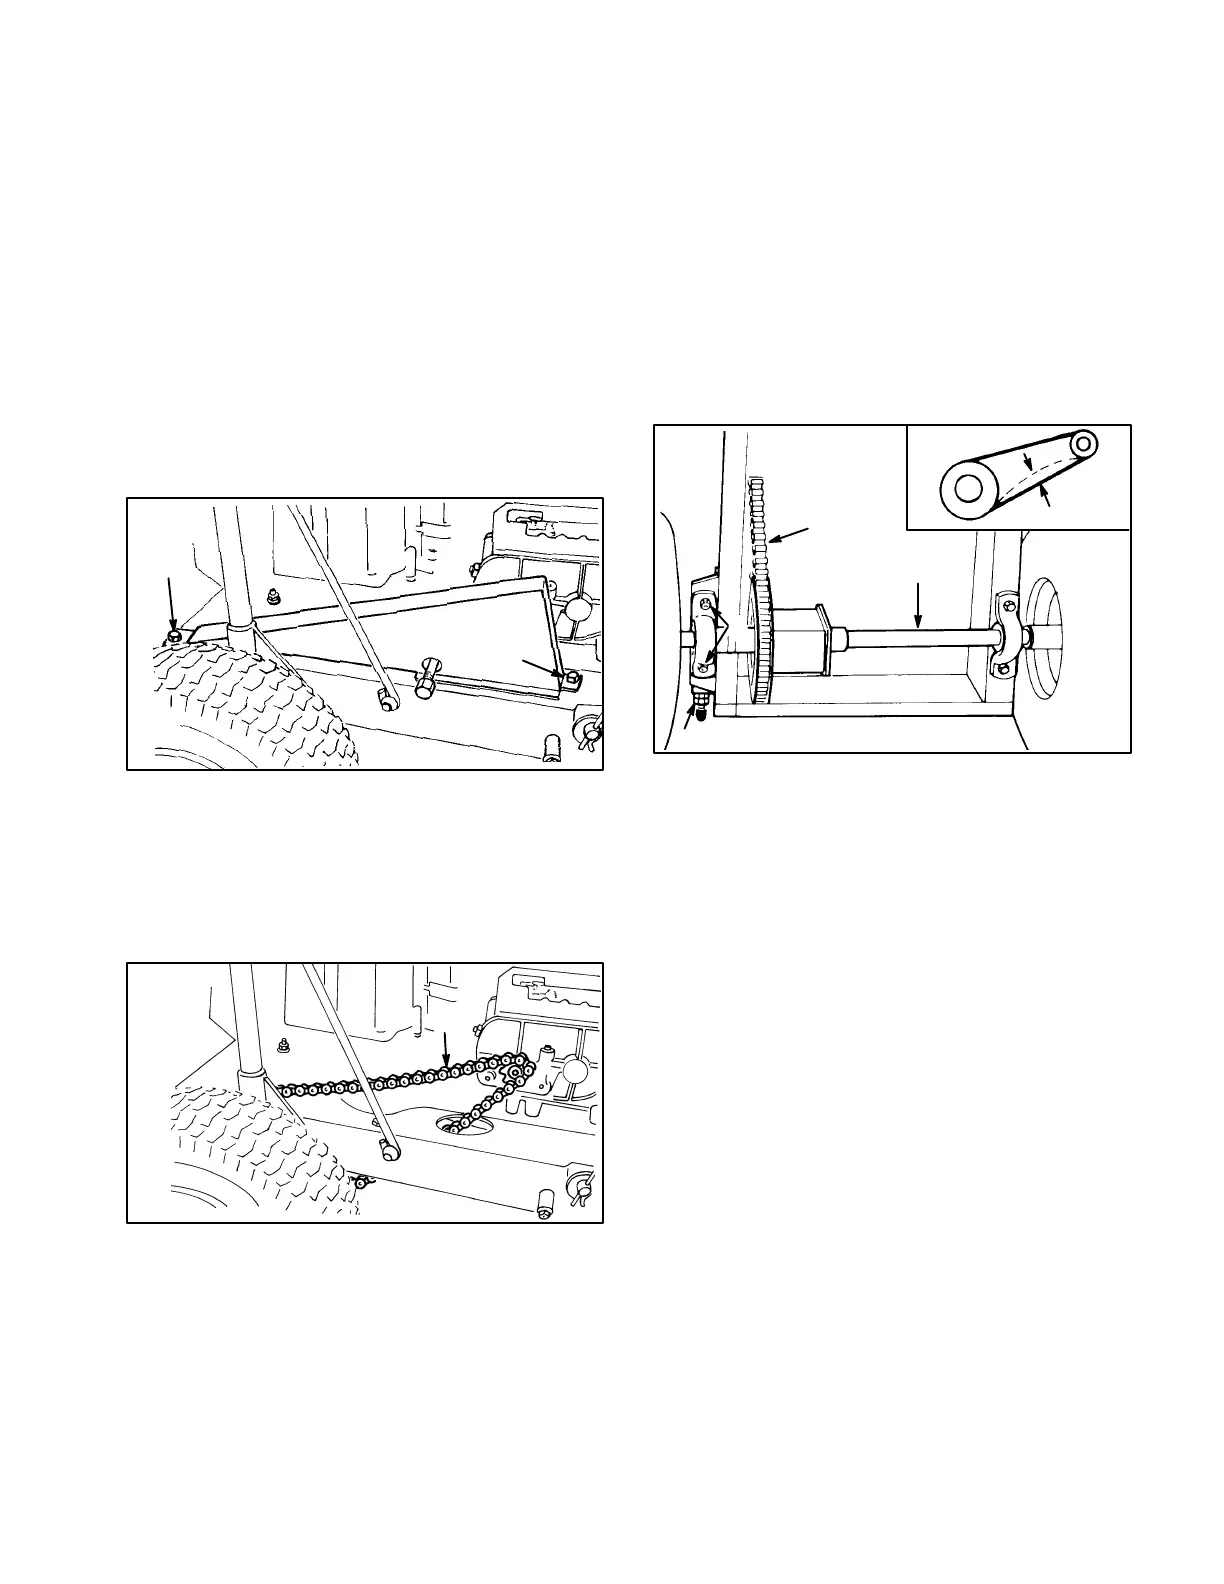
1. Remove two screws securing chain cover to ridĆ
er chassis and lift off chain cover (Fig. 22).
IMPORTANT: If chain is worn, loose or adjusted
incorrectly, chain will make a popping" sound as
it moves over the sprockets, which indicates
chain needs adjusting to prevent sprocket damĆ
age. If assistance is needed, contact your local
authorized Toro Dealer.
Figure 22
1. Screws
392
1
1
2. Check deflection of drive chain by lifting up and
pressing down on chain with moderate pressure at
mid span (Fig. 23). There should be 1/8 of an inch
(3 mm) total deflection (Fig. 24). If deflection is not
as specified, an adjustment is requiredĊsteps 3Ć13.
Figure 23
1. Drive chain
1587
1
IMPORTANT: To adjust drive chain, the rider must
be tipped on its rear end. Before the rider is
tipped, drain all gasoline from fuel tank and oil
from crankcase. Also remove the battery so acid
does not spill onto the rider. (ALL BAGGING ATĆ
TACHMENTS MUST BE REMOVED BEFORE TIPĆ
PING RIDER.)
3. Drain gasoline from fuel tank: refer to Draining
Gasoline From Fuel Tank, page 21.
4. Drain oil from crankcase: refer to Changing
Crankcase Oil, page 20.
5. Remove battery from chassis: refer to Activating
and Charging Battery, page 11 .
6. Shift transmission into 1st gear and engage the
parking brake. Tip rider onto its rear end so chassis
is on top of 2" x 4"
wood blocks. Wheels must be off
the floor so axle can be moved.
7. Loosen four flange nuts securing pillow blocks
w/differential axle to the rider frame (Fig. 24).
Figure 24
1. 1/8 inch (3mm)
2. Drive chain
3. Locknuts
4. Axle
5. Chain tensioner
1592
2
1593
1
4
5
3
8. Loosen rear jam nut on chain tensioner
(Fig. 24).
9. Rotate inside nut on chain tensioner until desired
chain deflection is attained.
10. Tighten flange nuts securing right pillow block
(chain side) to rider frame.
11. Since axle must be parallel to rear of chassis,
measure distance from center of pillow blocks to rear
of chassis (Fig. 24). Difference between the two
measurements must not exceed 1/8 inch. If differĆ
ence exceeds 1/8 inch, axle is not parallel with chasĆ
sis; therefore it must be readjusted.
12. Check the deflection of the drive chain from botĆ
tom of rider (refer to step 2).
13. Tip rider back to its normal operating position
and install chain cover..
14. Fill crankcase with oil: refer to Fill Crankcase
With Oil, page 12.
15. Fill fuel tank with gasoline: refer to Fill Fuel Tank
With Gasoline, page 13.
16. Install the battery: refer to Activating and ChargĆ
ing Battery, page 12.
 Loading...