Do you have a question about the Toro 900 Series and is the answer not in the manual?
Guidance on valve installation, including orientation, space, flushing, flow direction, and inspection.
Steps for initial system startup, pressure confirmation, and stability checks.
Detailed procedure for readjusting the valve's set pressure by adjusting the pilot locking nut and screw.
Periodic valve inspection, cleaning of the in-line filter, and monitoring downstream pressure.
Common issues like valve not opening or closing, with causes, checks, and solutions.
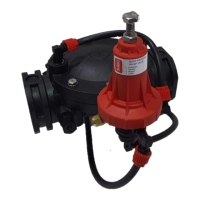
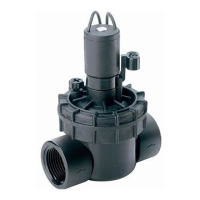
The Toro 900 Series Quick Relief Valve is a hydraulically operated, diaphragm-actuated control valve designed to relieve excessive system pressure that rises above pre-set maximum conditions. It is equipped with a 2-way diaphragm-actuated, spring-loaded pilot, which ensures immediate, accurate, and highly repeatable reactions by fully opening when needed. The valve is engineered to provide smooth, drip-tight closing once system pressure reduces below the pre-set conditions, preventing unnecessary water loss and maintaining system integrity.
The valve offers flexible installation options, as it can be installed either horizontally or vertically, accommodating various pipeline configurations. Before installation, it is crucial to ensure sufficient space nearby for both installation and future adjustments. The pipeline should be thoroughly flushed to ensure clean water flow, preventing debris from interfering with valve operation. The flow direction arrow on the valve must match the line flow direction for proper functioning. After installation, a post-installation inspection is recommended to check for any loose or damaged fittings. To accurately set the desired pressure, a pressure gauge should be installed upstream, or an existing pressure checkpoint on the valve can be utilized. For ease of maintenance, installing isolation valves upstream (and downstream if not released to the atmosphere) is highly recommended.
The Quick Pressure Relief Valve is factory set to the maximum system pressure allowed, according to its designed parameters. During the initial system startup, it is important to ensure that both upstream and downstream isolation valves are closed (if installed). The upstream isolation valve should then be fully opened. If the upstream pressure exceeds the set pressure, the valve will partially or fully open as designed. After this, it is essential to confirm that the pressure and flow in the system are stable.
If the set pressure deviates from the design specifications or if site requirements have changed, the pressure can be readjusted. First, confirm that the main line pressure matches the designed dynamic operating pressure of the system. It is important to note that when the setting is below the designed dynamic operating pressure, the valve will be partially or fully open. To adjust the pressure, unlock the pilot locking nut and slowly turn the adjusting screw clockwise until the valve completely closes. Next, slowly turn the pilot adjusting screw anti-clockwise until the valve begins to leak. At this point, rotate the setting screw clockwise by 1/4 or 1/2 turn until the valve seals again. Finally, tighten the locking nut to secure the new setting. The valve is now set at the required pressure. The internal design of the 2-Way Pilot restricts the valve from closing completely at equilibrium pressure, automatically preventing the valve from sealing entirely if the closing process were to cause system pressure to rise.
Regular maintenance is crucial for the longevity and optimal performance of the Quick Pressure Relief Valve. A periodic valve inspection should be conducted to check for any damage, loose fittings, or leakage. The in-line finger filter should be inspected and cleaned regularly, with the frequency depending on water quality, typically every few months. It is also advisable to monitor the valve's function by periodically checking the downstream pressure gauge and adjusting the valve if required to maintain desired performance. If problems persist, such as the valve not opening or closing, or non-uniform regulation, troubleshooting steps include checking inlet pressure, pilot screw position, pilot ports, and the inline finger filter. If debris is found on the sealing seat or the diaphragm is damaged, these components should be cleaned or replaced. For persistent issues, replacing the pilot may be necessary.
| Brand | Toro |
|---|---|
| Model | 900 Series |
| Category | Control Unit |
| Language | English |