Do you have a question about the Toshiba E-STUDIO2323AM and is the answer not in the manual?
Guidance on addressing toner empty errors encountered during operation.
Instructions for resolving paper misfeed issues within the equipment.
Information on using the bypass tray for paper feeding and operations.
Details regarding the side cover of the equipment for maintenance or access.
Information about the Reversing Automatic Document Feeder (RADF) functionality.
Details concerning the Paper Feed Unit (PFU) and its role.
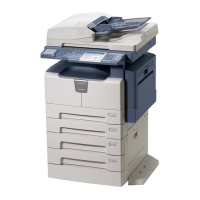
Overview of the main components and parts of the multifunctional digital system.
Description of the control panel's buttons, screen, and functions.
Instructions for loading paper into the equipment's drawer and bypass tray.
Steps for installing the necessary printer and scanner drivers from the DVD.
Guidance on connecting the equipment to a computer via USB or network cable.
Instructions for setting up the device using the Plug and Play installation method.
Steps for making copies, including setting the number of copies and preferences.
Instructions for printing documents from an application to the device.
Procedures for scanning documents and saving them to a USB storage device.
How to register and recall custom settings as templates for recurring tasks.
This document serves as a Quick Guide for the TOSHIBA e-STUDIO2523A/2523AD and e-STUDIO2323AM/2823AM multifunctional digital systems, covering components, preparations, basic operations, and troubleshooting. Before initial use, users are advised to consult the Safety Information printouts, and a more comprehensive manual is available as a PDF file on the bundled DVD.
The device features a comprehensive set of components designed for various document handling tasks. On the top, it includes a Reversing Automatic Document Feeder (RADF), which is an optional component, alongside a platen sheet and original glass for scanning and copying. A control panel provides user interaction, and a platen cover (optional, but standard in some regions) protects the original glass.
The side of the device houses a side cover and a USB port for external connections. At the front, a bypass tray allows for feeding various paper types, and an Automatic Duplexing Unit (ADU) is available as an option, specifically for the e-STUDIO2523A model, enabling two-sided printing. The toner cartridge is accessible from the front, behind the front cover. Below this, there is a drawer for paper storage, and a Paper Feed Unit (PFU), which is an optional addition, further expands paper capacity.
For output, the device has a paper exit stopper and a receiving tray. Connectivity options at the rear include an AC-IN terminal for power and a power switch. Network interface connectors are present on the e-STUDIO2323AM/2823AM models, facilitating network integration. A USB terminal (4-pin) is also available for direct connections. The scanning area and original scale are clearly marked for accurate document placement.
The control panel is the primary interface for operating the device. It includes dedicated buttons for COPY, SCAN, USER FUNCTIONS, JOB STATUS, and TEMPLATE. An LCD screen displays operational information and menus. Other buttons include ENERGY SAVER, DRAWER, DATA, ALERT LAMP, CANCEL, OK, and digital keys for numerical input. START, CLEAR/STOP, and FUNCTION CLEAR buttons are also present for initiating tasks, stopping operations, and resetting settings, respectively.
Proper paper loading is crucial for optimal device performance. The guide details how to load paper into both the drawer and the bypass tray.
To load paper into the drawer, users should gently pull out the drawer. Once open, paper can be placed inside, ensuring it is aligned correctly. The device is designed to detect the paper size automatically. When paper is loaded, a pop-up window will appear on the control panel, prompting the user to confirm or set the paper size. This feature, if enabled, ensures that the device uses the correct settings for printing and copying. Users should follow the on-screen instructions to set the paper size accurately.
The bypass tray offers flexibility for different paper types and sizes. To load paper into the bypass tray, users should extend the tray and adjust the paper guides to fit the width of the paper. Paper should be inserted gently until it meets resistance. Similar to the drawer, a pop-up window may appear to prompt the user to set the paper size for the bypass tray. This allows for quick changes between different media without having to reconfigure the main paper drawer.
To fully utilize the device's printing and scanning capabilities, driver installation and proper computer connection are essential.
The device comes with a DVD containing the necessary installer for the drivers.
Before installing drivers, the device needs to be physically connected to the computer.
The copier function is straightforward, allowing users to quickly duplicate documents.
The device functions as a printer when connected to a computer.
The device offers two primary scanning methods: Scan to USB Memory and TWAIN Scan.
This method allows users to scan documents directly to a USB storage device without needing a computer.
TWAIN scanning involves using a TWAIN-compliant application on a computer to control the scanning process.
Templates allow users to save frequently used copy or scan settings for quick recall, streamlining repetitive tasks.
The guide provides basic troubleshooting steps for common issues, helping users quickly resolve problems and minimize downtime.
If the "Toner empty" message appears, it indicates that the toner cartridge needs to be replaced.
A "Paper misfeed" message, often accompanied by an error code like "E130," means paper is jammed within the device.
The side cover is a crucial access point for maintenance and troubleshooting.
The RADF is designed to feed multiple originals for scanning or copying, including two-sided documents.
The optional PFU expands the device's paper capacity.
The bypass tray is used for feeding special media or single sheets.
These troubleshooting steps are designed to be user-friendly, allowing quick resolution of common operational issues and ensuring continuous productivity. For more complex problems, users should refer to the detailed manual on the bundled DVD or contact customer support.
| Functions | Print, Copy, Scan |
|---|---|
| Print Speed | 23 ppm |
| Print Resolution | 2400 x 600 dpi |
| Copy Speed (Black) | 23 cpm |
| Copy Resolution | 600 x 600 dpi |
| Scan Resolution | 600 x 600 dpi |
| Paper Size | A3, A4, A5, B4, B5 |
| Paper Capacity (general) | 350 sheets |
| Max Paper Size | A3 |
| Zoom | 25 - 400% |
| Connectivity | USB 2.0 |
| Interface | USB 2.0 |
| Dimensions (W x D x H) | 575 x 540 x 402 mm |
| Dimensions | 575 x 540 x 402 mm |
| Type | Multifunction |
| Paper Weight | 64-80 g/m² |
| Paper Capacity | 350 sheets |
| Warm-Up Time | 15 seconds |