This document provides the instruction manual for the Toshiba Electric Hot Pot, designed for household use. The hot pot is primarily used for boiling water. It comes in various models, including PLK-45SD, PLK-45SDI, PLK-45SDR, PLK-45SDRI, PLK-45SE, PLK-45SEI, PLK-45SF, PLK-45SFI, PLK-45SFE, and PLK-45SFEIS. The manual emphasizes reading and understanding all safety precautions and operating instructions thoroughly before use, and keeping it handy for future reference.
Safety Precautions
The manual begins with a comprehensive section on safety precautions, categorized by "WARNING" and "CAUTION" signals, along with corresponding symbols. A "WARNING" indicates potential severe injuries or death if the product is used incorrectly, while a "CAUTION" indicates potential injury or property damage.
Prohibitions and Mandatory Actions:
- Do not disassemble or repair: This can cause fire, electric shock, and injury. For repairs, contact the retailer or Toshiba service center.
- Do not directly touch the steam vent: This can cause burns, especially for small children.
- Do not connect or disconnect the power cord with wet hands: Risk of electric shock or injury.
- Do not boil anything except water: Boiling other liquids like tea, milk, or alcohol can cause splashing and burns.
- Do not cover the steam vent: Covering the vent with clothes or other items can cause hot water to splash and result in burns.
- Close the lid firmly: If the pot falls, water can spill out and cause burns.
- Do not put ice in the pot: This can cause moisture on the outside, leading to electric shock and accidents.
- Do not fill water above the maximum level gauge: Hot water may splash and cause burns.
- Do not misuse the power cord: Avoid scratching, bending, pulling, twisting, or placing heavy objects on the cord. Keep it away from heat sources. Damage to the cord can lead to fire or electric shock.
- Do not tilt, shake, or strike the pot: Even with the dispensing lock, water can flow out from the dispenser or steam vent, causing burns.
- Do not let the pot fall down: Water can spill from the dispenser or steam vent, causing burns.
- Keep out of reach of children: Children should not operate the appliance to prevent burns, electric shock, or injury.
- Do not wet or immerse the pot in water: Do not wash the pot thoroughly, immerse the bottom, or turn it over when wet. Do not wet the power cord. This can cause a short circuit, electric shock, and injury.
- Do not hold the lid when moving the pot: Water can spill, causing the pot to slip and fall, leading to burns and injury.
- Do not throw away water with the lid closed: If the lid detaches accidentally, water can spill and cause burns.
- Clean dusty power plugs: Wipe away dust from the power plug pins with a dry cloth to prevent fire.
- Fully insert the plug: Ensure the plug is fully inserted into the socket to prevent electric shock, short circuit, and fire.
- Insert the power plug (main body side) completely: Ensure the plug is fully inserted into the insertion hole on the rear side of the main body.
- Pull the plug from the AC outlet when not in use: This prevents injury, burns, electric shock, or electric leakage due to insulation deterioration.
- Hold the plug, not the cord, when disconnecting: This prevents electric shock, short circuit, and fire.
- Do not place the unit on hot, delicate, or unstable surfaces: This can cause fire.
- Do not pour water or open the lid while boiling: Steam or hot water can splash and cause burns.
- Maintain after the pot has cooled down: Touching hot parts can cause burns.
- Do not use the pot near walls or furniture: Steam or heat can deteriorate, discolor, or distort nearby surfaces.
- Do not hold the lid release lever when moving: The lid can open automatically, causing injury or burns.
- Do not touch hot parts during or after use: This can cause burns.
- Do not rotate the pot while pouring: Water can splash and cause burns.
- Use only the attached power cord: Using other cords or using the attached cord with other appliances can cause accidents and fire.
- This appliance is not for unsupervised use by persons with reduced capabilities or children: Children must be supervised to ensure they do not play with the appliance.
- This appliance is intended for household and similar applications: Including staff kitchen areas, farmhouses, hotels, motels, and bed and breakfast environments.
Important Document on Safety Precaution (Continued):
This section reiterates forbidden operations and strictly followed information.
- Safety Warning: Do not disassemble, repair, or modify the product. Do not handle the plug with wet hands. Do not operate with damaged or improperly inserted plugs. Do not modify the cable or use non-included cables. Do not bend, break, twist, or pull the cable during operation. Do not place objects on or pinch the cable. Keep the plug and cable away from high temperatures, water, humidity, or sharp objects. Do not connect to unspecified power sources. Do not expose the product to water. Do not use adapter plugs or use the power outlet with other appliances.
- Safety Caution: Insert the electric plug fully. Wipe dust or moisture from the plug pins. Unplug when not in use or before maintenance.
- Caution for Safety Installation: Keep flammable objects, hazardous materials, chemicals, or gases away. Do not install near naked flames, wet areas, or hot/humid areas. Avoid high electromagnetic areas. Keep out of children's reach. Install on a stable, level surface. Connect the ground wire at the specified position.
- Caution for Safety Operation: Read the manual carefully. Inspect the product before use. Remove all packing materials. Do not allow children to use alone. Do not place objects on or cover the product during use. Do not touch hot or cold parts.
How to Install Earth Lead Wire:
For models PLK-45SD, PLK-45SDR, PLK-45SE, PLK-45SF, PLK-45SFE:
- Remove the screw, spring washer, and flat washer from the Earth connecting plate.
- Set the Earth lead wire on the Earth connecting plate, then place the flat washer and spring washer over the lead wire and tighten the screw firmly.
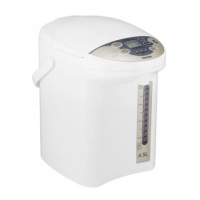
Part Names and Functions:
The hot pot features:
- Warning label of burning: For safety.
- Lid release lever: To open the lid.
- Steam vent: Releases steam during boiling.
- Lid detach lever: For removing the lid for cleaning.
- Handle: For carrying the pot.
- Lid lock button: Locks the lid.
- Lid: Covers the inner pot.
- Control panel: Contains buttons and indicators for operation.
- Water dispenser: Dispenses hot water.
- Main Body: The main housing of the pot.
- Water level gauge: Indicates the water level.
- Filter: Located at the bottom of the pot.
- Model name display: Shows the specific model.
- Rotating base: Allows the pot to rotate up to 360 degrees, with the cord rotating along.
- Inner pot: Coated with fluorocarbon-resin for easy cleaning.
- Socket: For connecting the power plug.
- Power cord: Available in 3-pin (grounded) and 2-pin versions depending on the model.
How to Open and Detach the Lid:
- Press the lid lock button, then lift the lid release lever and lift the lid up.
- Hold the lid release lever up. While pressing the lid detach lever, lift the lid slantwise upwards.
To install, reverse the removal process. Ensure a clicking sound is heard when closing the lid.
Control Panel Functions:
The control panel includes:
- REDUCE CHLORINE indicator (▲): Lights up when chlorine reduction is active.
- EMPTY indicator (▼): Lights up when the pot is nearly empty.
- Display: Shows temperature, timer, and other information.
- Timer indicator (▲): Lights up when the timer function is active.
- UNLOCK indicator: Lights up when the pot is unlocked for dispensing.
- UNLOCK button: Unlocks the dispensing mechanism.
- PUMP button: Dispenses water.
- Window sensor: Detects ambient light for saving mode.
- CLEAN indicator (▼): Lights up during cleaning mode.
- BOIL indicator: Lights up when water is boiling.
- SAVE MODE indicator: Lights up when saving mode is active.
- WARM indicator: Lights up when water is kept warm.
- Warm display (▼): Shows the selected warming temperature (98°, 85°, 60°).
- Buzzer: Provides audible feedback ("beep beep" or "beep") for correct operation.
For the First Time Use (or after long disuse):
- Fill the inner pot with water up to the maximum level gauge and close the lid.
- Connect the power plug and boil the water at 98°C.
- Press the PUMP button to pour out about half of the water.
- Unplug, detach the lid, and pour out all remaining water. Do not use the control panel button for this step.
Boiling/Pouring:
- Boiling Water: Fill the pot, close the lid, connect the plug, and press the "TEMP. CLEAN" button to select the desired temperature (98°, 85°, or 60°).
- The BOIL indicator will light up, and the selected TEMP. indicator will flash for about 2 seconds before the display shows the temperature.
- The display shows the rising water temperature in 5°C increments. "Lo" appears if the temperature is below 15°C.
- When selecting 98°C, the BOIL indicator turns off, the WARM indicator lights up, and a "bee bee bee" sound is heard when water boils.
- When selecting 85°C or 60°C, the BOIL indicator turns off, and the selected TEMP. indicator flashes when water boils. The WARM indicator lights up and "bee bee bee" sounds when the selected temperature is reached.
- Boiling Time: Approximately 40 minutes for 4.5L.
- Time to reach 85°C after boiling: Approximately 1 hour 30 minutes for 4.5L.
- Time to reach 60°C after boiling: Approximately 4 hours 30 minutes for 4.5L.
- Note: The boiling point and warming time can vary based on altitude, pressure, and room temperature. Do not fill water while the pot is decreasing temperature to keep warm, as there may not be enough water to reboil.
- Pouring Water:
- Press the UNLOCK button to unlock the dispenser. The UNLOCK indicator will light up. Water can be poured after 2 seconds, and the pot automatically locks after 2 minutes.
- Place a cup under the water dispenser and press the PUMP button.
- Two pouring levels: SOFT (slow for small containers) and NORMAL (fast for large amounts).
- To lock immediately after pouring, press the UNLOCK button again.
Reducing Chlorine:
- Press the "REBOIL TIMER" button once while boiling, or twice while warming, to activate chlorine reduction. The REDUCE CHLORINE indicator (▲) will light up.
- The BOIL indicator will flash, and the REDUCE CHLORINE indicator (▲) will light up.
- Chlorine is reduced after 3 minutes of boiling.
- When water is reboiled, press the button twice.
When the Pot is Nearly Empty:
Fill the water before it reaches the water level gauge.
- Empty Pot Warming Prevention: If the pot is warmed empty, the heater's electric current is cut off, and a "bee bee bee" signal sounds with flashing indicators. Refill water and press the "REBOIL TIMER" button. Repeated empty warming may discolor or peel the fluorocarbon-resin coating.
Reboiling/Warming (Timer and Saving Mode):
- Reboiling Water while Warming: Press the "REBOIL TIMER" button once. The BOIL indicator will light up.
- Reboiling times: 3-6 min (98°C), 9-10 min (85°C), 15-18 min (60°C), up to 18 min in saving mode (max water, 20°C room temp).
- Timer Mode: (Not available at 60°C warming temperature)
- Press the "REBOIL TIMER" button while keeping the temperature at 98°C or 85°C. The TIMER indicator (▲) will light up.
- "6" (hours) will be displayed, and the WARM indicator will flash. The remaining time is displayed hourly.
- After 6 hours, the TIMER indicator (▲) will turn off, and the temperature indicator will display. Water will then reboil.
- To cancel, press the "REBOIL TIMER" button; it will switch to BOIL.
- Selecting 60°C during timer setting will cancel the operation.
- Saving Mode: (Not available at 60°C warming temperature)
- Press the "SAVING MODE" button while warming at 98°C or 85°C. The SAVE MODE indicator will light up.
- The mode automatically switches to saving mode after 5 seconds, and the WARM indicator flashes slowly.
- When ambient light increases (after 4 minutes), the WARM indicator flashes rapidly, and a signal sounds when the selected warming temperature is reached.
- To cancel, press the "SAVING MODE" button again. The SAVE MODE indicator will turn off.
- To reboil in saving mode, press the "REBOIL TIMER" button once.
- Note: Selecting 60°C or setting the timer in saving mode will cancel the operation. Saving mode cannot be used during timer setting mode.
- To return to saving mode operation: If the pot is moved and saving mode stops, cancel saving mode, adjust lightness, and press the "SAVING MODE" button for 5 seconds until "bee bee bee" is heard.
Maintenance:
- WARNING: Do not wet the lid or the pot. Do not wash thoroughly, immerse the bottom, or turn the pot over when wet. Do not wet the cord. This can cause short circuits, electric shock, and accidents.
- Daily Maintenance:
- Filter: Located at the bottom of the pot. Pull it out, clean with a brush, and remove water slime. Push down firmly to reinstall.
- Inner Pot: Wipe gently with a sponge and wash with water. Clean with citric acid once a month or every three months.
- Main Body and Lid: Wipe with a damp cloth.
- Water Slime/Stains: White particles (crystallized mineral), milky/black/red water, rust-like spots, and roughness are caused by minerals in the water, not changes in color, bad smell, or peeling fluorocarbon. While not a health problem, regular citric acid maintenance is recommended.
- CAUTION:
- Do not use benzene, cleanser, or scrubbing brushes, as they can erode surfaces or coatings.
- Do not clean the pot with a dishwasher or dish dryer, as they can distort the pot.
- Do not wash with detergent, as it can leave a smell.
- Clean the pot regularly. Dirt can cause noise during boiling or pouring problems.
- If not in use for a long time, allow it to air dry naturally after maintenance.
How to Clean the Pot with Citric Acid:
- Fill the pot to maximum water level, add about 50 grams of citric acid, and close the lid.
- Connect the power cord and press the "TEMP. CLEAN" button to select "CLEAN".
- The CLEAN indicator (▼) flashes, and lights turn on to start cleaning.
- Cleaning takes about 90 minutes.
- During cleaning, the WARM and BOIL indicators flash, and the remaining time is displayed in minutes.
- When cleaning is finished, "bee bee bee bee bee" sounds, and the WARM, BOIL, and display indicators flash quickly.
- Unplug and pour out all the water. Wipe away dirt and wash with water.
- To remove any citric acid smell, fill the pot to maximum water level, select 98°C, boil the water, and then pour out all the boiled water.
How to Open the Lid (PUSH POSITION):
- Push down on the LID LOCK LEVER at the "押す" (push) position.
- Lift up the LID LOCK LEVER, then lift the lid up.