Do you have a question about the Toshiba RWF-W1669BF(K) and is the answer not in the manual?
Details specific safety instructions and warnings for operating the water dispenser.
Only certified technicians should perform service to prevent damage and electric shock.
Covers restrictions on mechanical defrosting, restart delay, ventilation, and indoor use.
Explains the function and behavior of the heating, cooling, and water level pilot lamps.
Instructions on where to place the dispenser, ensuring proper ventilation and accessibility.
Step-by-step guide on how to correctly install a 5-gallon water bottle into the dispenser.
Guide on connecting power, activating heating/cooling switches, and initial operation.
Procedure for dispensing cold water, including timing and tap operation.
Procedure for dispensing hot water, including button presses and tap operation.
Steps for replacing an empty water bottle with a new one, including safety notices.
Instructions on how to loosen, remove screws, and fix the bracket to the unit.
Steps for drilling a hole, fixing the bracket to the floor, and ensuring proper grounding.
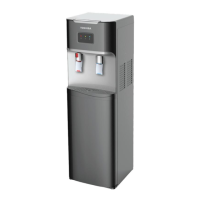
| Color | Black |
|---|---|
| Hot Water Temperature | 85-95°C |
| Cold Water Temperature | 5-10°C |
| Voltage | 220-240V |
| Dimensions | 310 x 360 x 1040 mm |
| Type | Bottom Loading Water Dispenser |