This document serves as an instruction manual for a Toshiba Bottom Loading Water Dispenser, specifically models RWF-W1669BF(W) and RWF-W1669BF(K). It provides comprehensive guidance on the safe operation, installation, and maintenance of the appliance.
Function Description
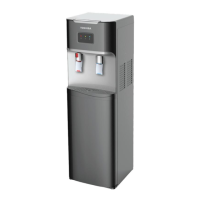
The Toshiba Bottom Loading Water Dispenser is designed to provide both hot and cold purified drinking water. Unlike traditional top-loading dispensers, this unit features a bottom-loading design, which makes changing water bottles easier and more convenient. The dispenser is equipped with a pump system that draws water from a 5-gallon purified water bottle located inside the lower cabinet, delivering it to internal hot and cold water tanks. Once the water reaches the desired temperature, it is dispensed through dedicated taps. The unit includes a heating system to provide hot water and a cooling system, utilizing R134a refrigerant, for cold water. Pilot lamps on the operation panel indicate the status of heating, cooling, and water levels, ensuring the user is always aware of the dispenser's operational state.
Usage Features
The water dispenser is designed for indoor use in various settings, including households, staff kitchens in shops and offices, farmhouses, hotels, motels, inns, and other residential applications. It operates within a temperature range of 10°C to 43°C.
Installation and Setup:
- Placement: The dispenser should be installed on a solid, level surface, in an upright position, and in an easily accessible location. A minimum gap of 20 cm is required between the back and sides of the dispenser and adjacent walls to ensure proper airflow and prevent obstruction of ventilation openings.
- Grounding: It is crucial to plug the unit's 3-pin power cord into a properly grounded electrical outlet. The ground pin must be reliably connected to a grounding provision to prevent electric shock.
- Water Bottle Installation:
- Open the lower door of the cabinet.
- Hang the probe assembly on the probe hanger.
- Clean the outside of a fresh 5-gallon purified water bottle with a cloth.
- Insert the probe into the bottle, pushing it downward until it clicks into place and the tube reaches the bottom of the bottle.
- Slide the bottle into the cabinet and close the door.
- The pump will automatically begin to move water to the hot and cold tanks, which takes approximately 3-4 minutes for the first fill.
- Initial Use: Before turning on the heating or cooling switches, ensure water comes out of both taps to prevent overheating. It is recommended to dispense and dispose of at least one quart of water during initial setup to flush out any dust or odors accumulated during transit.
- Activating Heating and Cooling:
- The unit comes with two switches at the rear top portion: a red switch for heating and a green switch for cooling.
- To activate, push the upper part of the respective power switches to the "ON" position. The heating pilot lamp (red) and cooling pilot lamp (blue) will light up when active.
- To turn off a function, push the bottom part of the corresponding switch to the "OFF [O]" position.
Dispensing Water:
- Cold Water: Cold water is typically ready 3 hours after initial installation and approximately 1 hour for subsequent uses. Position a glass or container below the blue tap, press the blue tap lever, and release when the desired amount is obtained. The cooling pilot lamp will turn off when the cooling cycle is complete, though the compressor may still run, which is normal.
- Hot Water: Hot water is ready approximately 15 minutes after initial installation and about 10 minutes for subsequent uses. To dispense hot water, first press the red safety button, then use a container to press the red tap lever. Release the red button and then the tap lever when the desired amount of hot water is obtained. The heating pilot lamp will turn off when the heating cycle is complete.
Changing Water Bottles:
The low/empty water pilot lamp will flash to indicate a low water level or an empty bottle.
- Turn off both heating and cooling switches.
- Open the lower door.
- Slide out the empty bottle.
- Remove the probe assembly from the empty bottle and hook it on the probe hanger.
- Set the empty bottle aside.
- Clean a new, filled 5-gallon purified water bottle.
- Insert the probe into the new bottle, pushing it down until it clicks and the tube reaches the bottom.
- Slide the bottle into the cabinet and close the door.
- The pump will automatically refill the tanks. Once the low/empty water pilot lamp stops flashing, the heating or cooling switches can be turned on as needed.
Safety Instructions:
The manual emphasizes several critical safety precautions:
- Prohibited Actions: Do not immerse the cord, plug, or any part of the dispenser in water. Do not use extension cords. Avoid using damaged power lines, plugs, or loose sockets. Do not operate near flammable materials or store explosive substances inside or near the dispenser. Do not disassemble, remodel, modify, or repair the unit yourself. Do not place anything on top of the dispenser.
- Child Safety: Children should be supervised to prevent them from playing with the dispenser and should not dispense hot water without direct supervision. Unplug the unit to prevent unsupervised use by children.
- Grounding: The dispenser must be properly grounded to prevent electric shock.
- Power Cord: Do not damage, cut, process, bend, pull, twist, or bind the power line. Insert the power plug securely into the outlet.
- Cleaning: Disconnect the power plug before cleaning or inspecting. Use a soft cloth moistened with neutral detergent diluted with water. Avoid insecticides, thinners, benzene, chlorine, or acid-containing liquids.
- Placement: Do not use outdoors. Keep away from direct sunlight and fire sources. Do not place in an enclosed space or cabinet. Do not invert or tilt the unit more than 45°.
- Water Type: Only use certified bottled drinking water of 5 gallons with a recommended TDS range of ≤ 200 and chlorine ion concentration range of ≤ 100mg/L. Do not use uncertified bottled water, tap water, underground water, or water purified by home filters.
- Refrigeration Circuit: Do not damage the refrigeration circuit to prevent refrigerant leakage.
- Ventilation: Do not close or block the ventilation openings.
- Freezing Point: If operating below freezing point, turn off the cooling switch and wait 4 hours before turning it on again to prevent blockages and water leakage.
- Restarting: Wait at least 3 minutes after turning off the dispenser before turning it on again.
- Power Saving: Turn off the heating or cooling switches if not needed for a long period to save power.
- Long-Term Storage: If not used for a long time, turn off power switches, unplug the unit, and drain all remaining water from both tanks through the drain outlet and water collector assembly.
Maintenance Features
The manual provides guidance on troubleshooting common issues and general cleaning recommendations.
Troubleshooting:
The manual includes a table outlining common problems, their possible causes, and solutions. Examples include:
- Unit not working: Check if plugged in, power interruption, switches are off, or low voltage.
- No water from tap: Water bottle empty.
- Cold water not cold: Unit not plugged in, cooling process not complete, or cooling switch is off.
- Hot water not hot: Unit not plugged in, heating process not complete, or heating switch is off.
- Excessive heating around body: Unit too close to a wall, or ventilation openings obstructed.
- Noise: Unit leaning against a wall, or on an uneven surface.
- Water leakage: Hole/crack in bottle, water collector overflow, or drain cap not tightened.
- Steam from dispenser: Excessive heating in the hot water tank (requires service).
- Unpleasant taste: Incorrect cleaning materials, poor water quality, or inferior water bottle.
Cleaning:
- Professional Assistance: For cleaning, sanitizing, and removing mineral deposits, it is recommended to call the service center for professional assistance. Self-disassembly is prohibited due to safety risks and potential damage to the machine.
- Sanitizing: Generally, sanitizing should be performed every three months.
- Mineral Deposit Removal: Generally, mineral deposits should be removed every six months.
- Daily Cleaning: For routine cleaning, use a soft cloth moistened with neutral detergent diluted with water. Avoid harsh chemicals like insecticides, thinners, benzene, chlorine, or acid-containing liquids, as these can cause material cracks, electrical shock, fire, or harmful gases.
- Power Disconnection: Always disconnect the power plug from the electrical outlet before cleaning or inspecting the water dispenser to prevent electric shock.
- Dust Removal: Wipe off any dust or dirt accumulated on the power line plug to prevent fire, electric shock, or short circuit.