4
ENGLISH
Installation Procedure (continued)
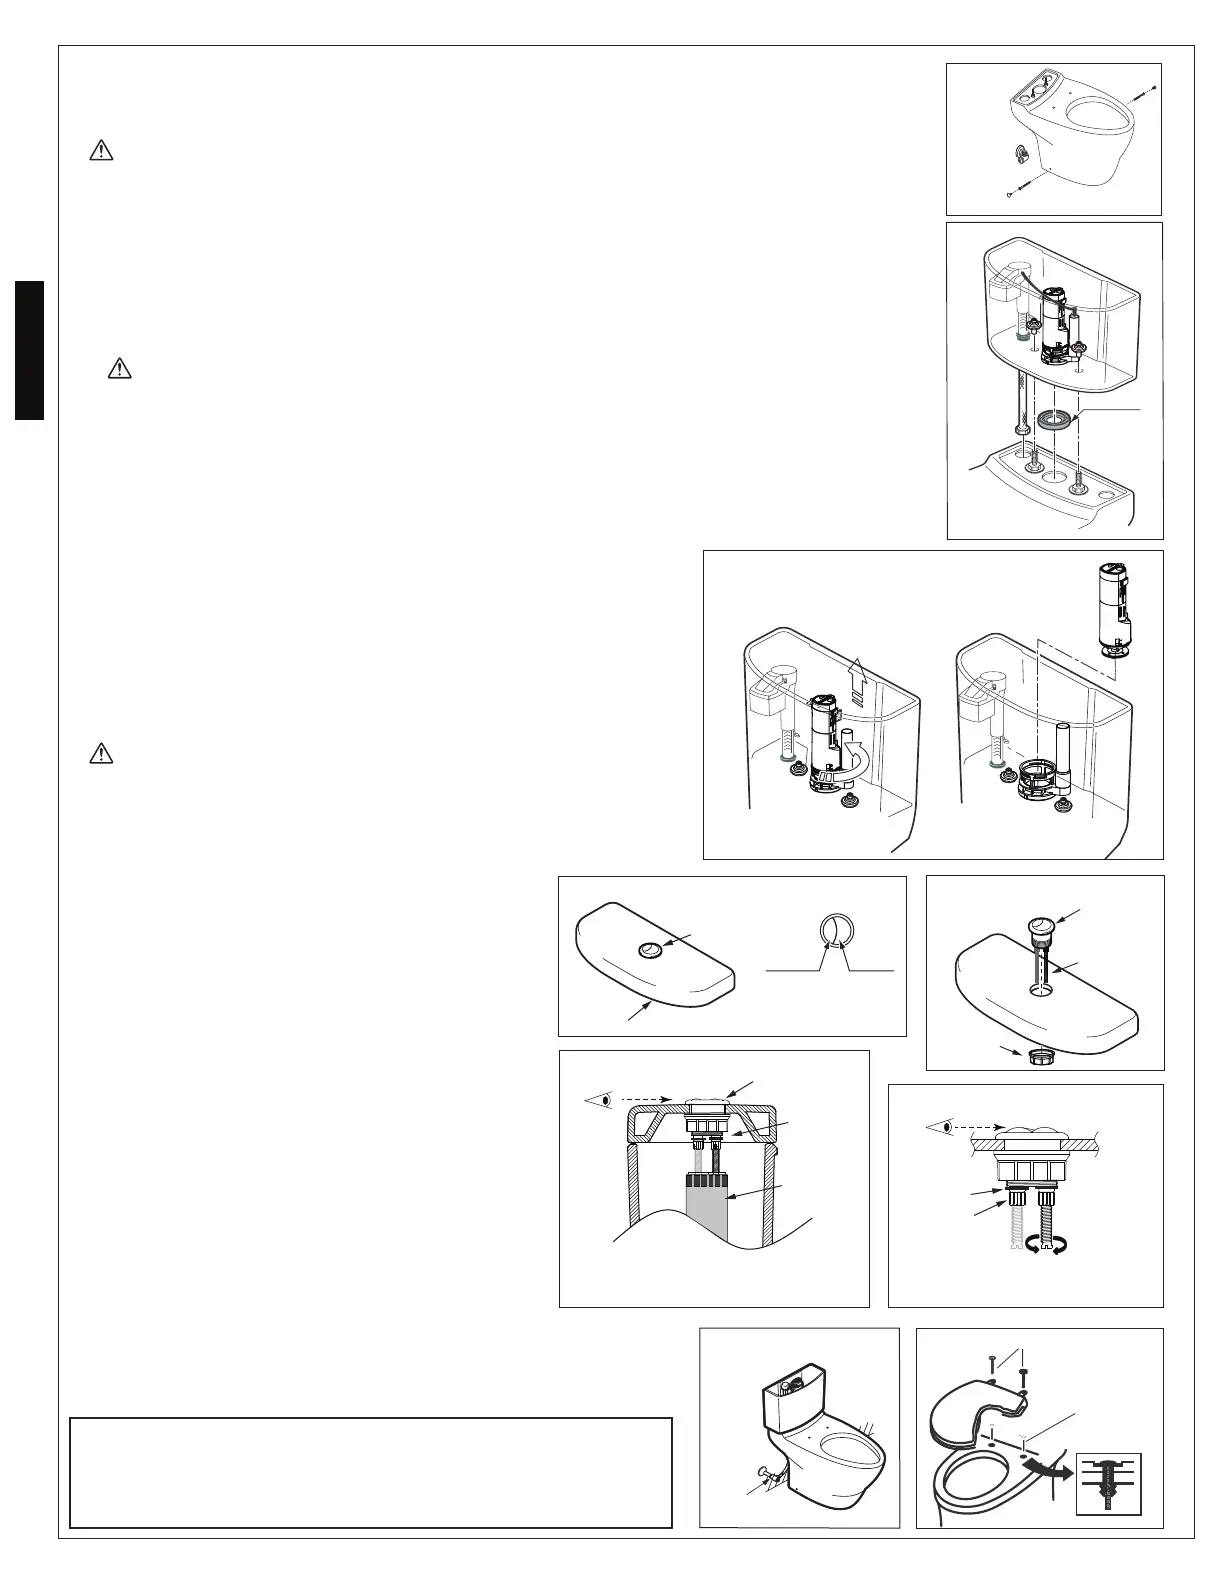
7) Install the side screws to the mounting blocks. Cover the screw head with the provided screw-cap (see Ill. 6).
If the side screw does not engage the mounting blocks, then either the toilet bowl is not
fully inserted in the socket or the mounting block is not installed properly. If the toilet is
not installed properly, it may slide out of socket during use or cause leaks. Please ensure that
both sides are properly tted and secure. Do not over-tighten the screws, as it may result in
product damage.
CAUTION
Ill. 6
8) Connect the water supply hose to the ll valve. Do not overtighten water supply hose to ll valve. First hand-
tighten, then using wrench, do not exceed 1/4 turn. The water supply hose must be connected to the ll valve
BEFORE the tank-to-bowl installation. TOTO recommends using a exible supply hose.
Please be sure to connect the water supply hose to the ll valve before installing the tank to the bowl. If
procedure is reversed, the water supply installation may be impossible.
FAILURE TO FOLLOW THIS INSTRUCTION MAY RESULT IN PERSONAL INJURY AND/OR PROPERTY
DAMAGE.
CAUTION
9) Install the tank-to-bowl gasket over the ush valve outlet on underside of the
tank (see Ill. 7).
Pick up the tank and carefully guide the ush valve hose into the bowl inlet
hole on the bowl tank-shelf. Make sure the bolts on the bowl t through the
opening in the base of the tank.
10) For easy assembly, remove the top-portion of the ush valve by disconnecting
the rell tube. Turn the upper portion of the ush valve counter-clockwise, and
pull it up (see Ill. 8). Insert the rubber washer then metal washer on the mount-
ing bolt. Thread on the nuts, hand-tighten before releasing the tank. Tighten
the nuts evenly until tank sets snugly on each of the three contact points on
the bowl. Re-install ush valve and rell tube.
Ill. 7
Ill. 8
Do not over-tighten the mounting bolt. Over tightening may
result in product breakage and cause personal injury and/or
property damage.
CAUTION
12) Connect the opposite end of the water supply tube to the
angle stop (see Ill. 11). Open the supply valve and ush the
toilet several times. Check all the connections for leaks and
periodically afterwards following the installation.
Seat Bolt
Rubber Brushing Net
Ill. 12
If the button(s) is too low (see Ill. 9):
1) Loosen the lock nut/s counterclockwise.
2) Turn the rod(s) counterclockwise to lengthen
(each full turn is 1mm).
3) Place the lid on the tank to check the buttons.
If rod(s) is too long, water will keep running in the toilet.
1) Loosen the lock nut(s) counterclockwise.
2) Turn the rod(s) clockwise to shorten them.
Adjust the rods as necessary by turning the rod 1 full turn
(see Ill. 10); to lengthen, turn the rod counterclockwise; to
shorten, turn the rod clockwise. When the adjustment is
completed, tighten the lock nut to secure it.
Left
Right
Partial
Flush
Full
Flush
Mounting
Nut
Adjustable
Push Rods
Push Button
Housing
Tank
Lid
Push Button
Assembly
Flush Valve
Tank
Lid
Clip
Lock Nut
Clockwise/
Counterclock-
wise
The rod(s) is too short, the buttons are lowered.
Buttons are at the correct level.
Push
Buttons
Tank Lid
13) The toilet seat is installed with the top-mount bolt set (see Ill. 12). Insert the
rubber bushing-nut into the seat mounting holes. Place the seat on the bowl
and rotate the hinge unit into place while holding the seat down on the bowl.
Tighten the bolt from the top with the screwdriver.
Ill. 10
Ill. 9
Ill. 11
11) Carefully place the lid on top of the tank, making sure that the push rod colors
match the ush valve buttons (blue to blue and white to white).
WARNING! DO NOT USE IN-TANK BOWL CLEANERS
The use of high concentration of chorine or chlorine base products can damage
the ttings in the tank. Damage to the tank ttings may cause leakage and/or
property damage. TOTO shall not be responsible or liable for any tank tting
failure or damage caused by the use of in-tank bowl cleaners.