EasyManua.ls Logo

TP-Link Agilent XGZ030 - User Manual

TP-Link Agilent XGZ030
2 pages
Print Icon
To Next Page IconTo Next Page
Loading...
Quick Installation Guide
Connect the Hardware
Register the Terminal
Connect to the Internet
1-Port XGS-PON Terminal
XGZ030
Establish your internet connection according to your ISP's instructions.
Note: If you need assistance, contact your ISP.
If the PON LED is solid on, please skip to Connect to the Internet.
B
Go to Network > GPON Settings > GPON Registration.
Enter the GPON Password and/or GPON SN provided by
your ISP (Internet Service Provider) to register the Terminal
and click Save.
2 1
Power adapter
Terminal
Enjoy!
http://192.168.1.1
Internet
Verify that the hardware connection
is correct by checking these LEDs.
3
Power: On
PON: On or Flashing
LOS: O
1
Connect your computer to the Terminal via an Ethernet cable.
3
Register the Terminal via a web browser.
Ethernet Cable
A
Launch a web browser and type in http://192.168.1.1 in the
address bar. Set and confirm your password to log in to the
Terminal.
If the Terminal’s LAN IP address is 192.168.1.1, please type
in IP address 192.168.1.x (x is from 2 to 253), subnet mask
255.255.255.0, and default gateway 192.168.1.1.
2
Configure TCP/IP Properties manually on your computer.
Save
New Password
Conrm Password
Low Middle
High
SN Type:
GPON SN:
Password Type:
GPON Password:
Normal Mode
GPON Registration
OLT Mode:
ASCII+HEX HEX
ASCII HEX
Question and Answer IconNeed help?

Do you have a question about the TP-Link Agilent XGZ030 and is the answer not in the manual?

Overview

This document describes the Quick Installation Guide for the TP-Link 1-Port XGS-PON Terminal, model XGZ030.

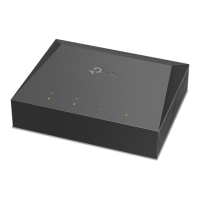
The device is a 1-Port XGS-PON Terminal designed to connect your home or office to the internet via a Fiber Optic Network. It acts as a bridge between the fiber optic network and your local network, allowing you to access internet services.

Function Description:

The TP-Link XGS-PON Terminal receives the fiber optic signal and converts it into an Ethernet signal, which can then be connected to a router or computer. It features a PON (Passive Optical Network) interface for the fiber connection and an Ethernet port for local network connectivity. The device is designed for easy setup and provides LED indicators to monitor its operational status.

Important Technical Specifications:

While specific detailed technical specifications like power consumption, operating temperature, or exact dimensions are not explicitly listed in this quick installation guide, the document highlights key aspects of its functionality and connectivity.

  • Connectivity:
    • PON Port: For connecting to the XGS-PON fiber optic network.
    • Ethernet Port: For connecting to a computer or router.
  • Power Input: The device requires a power adapter for operation.
  • Network Protocol: Supports TCP/IP properties and requires manual configuration of IP address, subnet mask, and default gateway if not using DHCP.
  • Management Interface: Accessible via a web browser at http://192.168.1.1 for configuration and status monitoring.

Usage Features:

The installation and usage process is designed to be straightforward, as outlined in the "Quick Installation Guide."

  1. Connect the Hardware:
    • Power Connection: Connect the power adapter to the terminal and plug it into a power outlet.
    • Ethernet Connection: Connect your computer to the terminal via an Ethernet cable.
    • PON Connection: Connect the fiber optic cable to the PON port.
    • LED Indicators: The device features several LED indicators to show its operational status:
      • Power LED:
  • On: Power is on.
  • Off: Power is off.
    • PON LED:
  • On: The Terminal is registered with the OLT (Optical Line Terminal).
  • Flashing: The Terminal is trying to register with the OLT.
  • Off: The Terminal is not registered with the OLT.
    • LOS (Loss of Signal) LED:
  • On: The power of the optical module transmitter is turned off.
  • Flashing: The received optical power is lower than the optical receiving sensitivity.
  • Off: The received optical power is properly.
    • LAN LED:
  • On: A device is connected to the LAN port.
  • Flashing: The LAN port is transmitting or receiving data.
  • Off: No device is connected to the LAN port.
  1. Register the Terminal:

    • TCP/IP Properties Configuration: If your computer is not set to obtain an IP address automatically (DHCP), you may need to manually configure its TCP/IP properties. The recommended IP address for the computer is 192.168.1.x (where x is from 2 to 253), subnet mask 255.255.255.0, and default gateway 192.168.1.1.
    • Access Web Management: Open a web browser and type http://192.168.1.1 in the address bar to log in to the Terminal's management interface.
    • GPON Registration: Navigate to Network > GPON Settings > GPON Registration. You will need to enter the GPON Password and/or GPON SN provided by your ISP (Internet Service Provider) to register the Terminal. After entering the details, click "Save."
    • New Password: The device may prompt you to set a new password for security. Choose a strong password and confirm it.
  2. Connect to the Internet:

    • After successful registration, establish your internet connection according to your ISP's instructions. This typically involves connecting a router to the Terminal's Ethernet port and configuring the router as per ISP guidelines.

Maintenance Features:

The document provides some basic troubleshooting and maintenance advice:

  • Troubleshooting - Cannot Access Web Management Page:

    • Ensure the computer is properly connected to the Terminal via the Ethernet cable.
    • Verify the IP address settings for the computer connected to the Terminal.
    • Ensure http://192.168.1.1 is correctly entered in the browser.
    • Disable then enable the network adapter being used.
    • Restore the Terminal to its factory default settings and reconfigure it by following the instructions in this Quick Installation Guide.
  • Troubleshooting - Cannot Access the Internet:

    • Ensure all cables are connected properly and securely to the Terminal.
    • Check the PON LED and make sure that it is lit and stable, indicating that the internet connection is established. If not, make sure that the provided GPON Password and/or GPON SN are entered correctly in the Network > GPON Settings > GPON Registration page.
    • Unplug and reconnect the fiber cable to the Terminal. Wait for 2 minutes and try again.
    • Make sure you have followed your ISP's specific instructions to connect to the internet.
    • Make sure that the computer is connected to the Terminal.
    • Contact your ISP if the problem still exists.
  • How to Restore to Factory Default Settings:

    • With the Terminal powered on, press and hold the RESET button on the rear panel of the Terminal for at least 5 seconds, then release the button. The Terminal will reboot and restore automatically.

Safety Information:

The document includes important safety information to ensure proper and safe operation of the device:

  • Keep the device away from water, fire, humidity, or hot environments.
  • Do not attempt to disassemble, repair, or modify the device. If you need service, please contact us.
  • Do not use damaged charger or USB cable to charge the device.
  • Do not use any other chargers than those recommended.
  • Adapter shall be installed near the equipment and shall be easily accessible.

Compliance:

The device complies with EU Declaration of Conformity and UK Declaration of Conformity, adhering to relevant directives and regulations for electromagnetic compatibility and radio equipment. Further details on compliance can be found on the TP-Link support website.

TP-Link Agilent XGZ030 Specifications

General IconGeneral
BrandTP-Link
ModelAgilent XGZ030
CategoryTouch terminals
LanguageEnglish

Related product manuals