Do you have a question about the TP-Link Omada ER7206 and is the answer not in the manual?
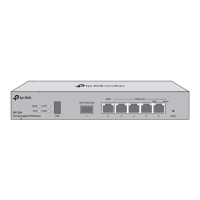
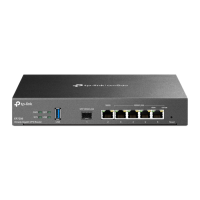
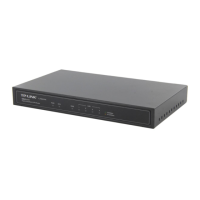
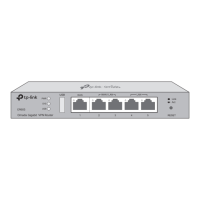
Explains the meaning of Power, USB, Link/Act, SFP WAN, and 1000Mbps port LEDs for router status.
Illustrates connecting the modem to the router's WAN port and a computer to a LAN port.
Step-by-step instructions for configuring the router individually via a web browser.
Instructions for managing the router using the Omada Hardware Controller (OC200/OC300).
Guide to installing and configuring the Omada Software Controller on a PC for centralized device management.
This document outlines the installation and configuration of the Omada Gigabit VPN Router, a device designed for robust network management. The router offers flexible deployment options, catering to both individual network setups and large-scale, centrally managed environments.
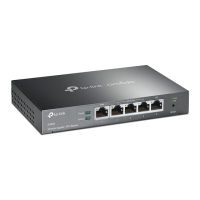
The Omada Gigabit VPN Router serves as a central component in a network, providing secure and reliable connectivity. Its primary function is to route network traffic, enabling communication between devices within a local network and connecting the local network to the internet. As a VPN router, it supports Virtual Private Network functionalities, allowing for secure remote access and encrypted data transmission over public networks. This is particularly beneficial for businesses or individuals requiring secure connections for remote work or inter-office communication. The router is equipped with multiple ports, including WAN and LAN, to facilitate various network connections. It also features LED indicators that provide visual feedback on its operational status, including power, system activity, USB connection status (for ER605), and link/activity status for its network ports. For the ER605 model, a USB port allows for connection to external USB devices, enhancing its versatility. The ER7206 model includes an SFP WAN port, offering fiber optic connectivity options for high-speed internet access.
The Omada Gigabit VPN Router offers two primary modes of operation: Standalone Mode and Controller Mode, providing adaptability to different network management needs.
In Standalone Mode, the router is configured and managed individually. This mode is ideal for smaller networks or users who prefer direct control over their device. Configuration is performed via a web-based interface, accessible by connecting a computer to a LAN port of the router and navigating to a default IP address in a web browser. Users are guided through a setup process that involves creating a username and password for secure access. Once logged in, the web interface provides a comprehensive menu for configuring various functions of the router. This includes setting up WAN connections, managing LAN settings, and configuring VPN services. The standalone approach offers simplicity and direct control, making it suitable for users with basic to intermediate networking knowledge.
For larger or more complex networks, the Controller Mode offers centralized management capabilities. This mode is recommended for environments with multiple network devices, such as access points, switches, and gateways, as it allows for their unified configuration and management. When the router is managed by a controller, its individual configurations are overridden by the controller's settings, ensuring consistency across the network. There are two types of Omada Controllers:
Omada Hardware Controller (OC200/OC300): This is a dedicated hardware device that runs the Omada Software Controller. It's a suitable option for users who don't have a spare PC to continuously run the software controller. The hardware controller obtains an IP address from the router's DHCP server, which can be identified through the router's web interface. Once the controller's IP address is known, users can access its web page to complete a quick setup wizard, create login credentials, and then configure the network. The hardware controller also supports remote management via the Omada Cloud Service, allowing users to access and manage their network from anywhere using a web browser and their TP-Link ID.
Omada Software Controller: This is a free software application that can be installed on a Windows or Linux PC. For this mode, the PC running the software controller needs to be continuously operational to manage the network devices. Users download the installation file from the TP-Link website, run the installer, and follow a quick setup wizard. Similar to the hardware controller, a login screen appears after setup, allowing users to configure the network. The Omada Software Controller also integrates with the Omada Cloud Portal, enabling remote access and management of the controller and its connected devices through a web browser and a TP-Link ID.
Both controller modes benefit from the Omada App, a mobile application that allows users to manage their controller from a local site or remotely via their mobile device, providing convenience and flexibility.
The device is designed for ease of maintenance and troubleshooting. The LED indicators provide immediate visual cues regarding the router's status, allowing for quick identification of potential issues. For instance, a flashing System/SYS LED indicates normal operation, while an on/off state suggests an abnormal system. Similarly, Link/Act LEDs show connection and activity status for network ports.
For detailed configurations and advanced troubleshooting, users can refer to the comprehensive User Guide, which is available on the TP-Link official website's download center. This guide provides in-depth instructions and explanations for all features and settings.
In case of technical difficulties or questions, TP-Link offers several support channels:
The device is also designed with safety in mind, with guidelines provided to ensure proper handling and longevity. These include keeping the device away from water, fire, humidity, or hot environments, and refraining from disassembling, repairing, or modifying the device. Users are advised to use only the recommended charger and USB cable (if applicable) and to ensure the adapter is easily accessible. Proper placement of the device, with its bottom surface downward, is also recommended.
The product adheres to EU and UK regulatory standards, with declarations of conformity available on the TP-Link website, ensuring compliance with essential requirements for electromagnetic compatibility and electrical safety.
| Model | ER7206 |
|---|---|
| Category | Network Router |
| VPN Support | Yes |
| Load Balancing | Yes |
| VPN | Yes |
| Operating Temperature | 0°C to 40°C (32°F to 104°F) |
| Storage Temperature | -40°C to 70°C (-40°F to 158°F) |
| Operating Humidity | 10% to 90% non-condensing |
| Storage Humidity | 5% to 90% non-condensing |
| LAN Ports | 4 |
| Centralized Management | Yes |
| Supported VPN Protocols | IPsec, PPTP, L2TP, OpenVPN |
| Dimensions | 226 x 131 x 35 mm |
| SFP Ports | 1× Gigabit SFP Port |
| Power Input | 100-240V AC, 50/60Hz |