*Images may dier from your actual product.
©2023 TP-Link 7106510017 REV1.0.0
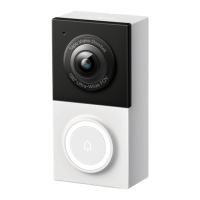
Tapo Wired Video Doorbell
Tapo D130
Quick Start Guide
Before You Start
OR
Tapo
WARNING: Risk of Electric Shocks
• Ensure that your existing doorbell works by ringing the
doorbell.
• Locate your existing doorbell chime.
• Make sure the doorbell is in an area with a strong Wi-Fi signal.
• Disconnect power at the fuse or circuit breaker before
installing.
• You can always nd detailed wiring and installation instructions
in the Tapo app.
Take care to avoid electric shocks.
*Recommended Installation Height: 1.2 m (4 ft) above the ground
Option 2. Mount to the wall
Install Your Doorbell
03 /
Flip the page over to complete setup.
1. Remove your existing doorbell on the door. Disconnect the
wires.
2. (Optional) Select the mounting wedge to adjust the viewing
angle of the doorbell.
Preparations for Installing Your Doorbell
02 /
Without Mounting Wedge
Without
Mounting Wedge
With Vertical
Mounting Wedge
With Horizontal Mounting Wedge
15°
5°
Take care to avoid electric shocks.
01 /
Install Jumper Wire for Your Existing Chime
1. Turn o the circuit breaker. Make sure the power is o by
ringing your doorbell a few times.
OFF
Take care to avoid electric shocks.
2. Remove the chime cover and take a photo of the wiring in
case you want to reconnect it.
Note: If your doorbell chime has dierent markings, refer to instructions in
the Tapo app or consult a licensed electrician.
3. Slightly loosen the screws for the Front and Trans of your
front doorbell, then insert the jumper wire.
4. Tighten the screws and replace the chime cover.
Option 1. Stick to a clean wall
*This equipment shall be installed at a height of fewer than 2 meters.
1. Attach the included adhesive to the back of the bracket or the
wedge you have selected. If you use the wedge, ax the
bracket and the wedge with screws.
4. Mount the doorbell to the bracket and turn on the circuit
breaker.
3. Connect the wires to the two terminals at the back of the
doorbell, and tighten the terminal screws.
2. Route the wires through the bracket. Stick the bracket with
adhesive to a clean wall.
Note: This is applicable with tile, glass, marble, metal, stainless steel, and
hard wall surfaces.
Note: If the wires are too short, use the included extension wires and wire
nuts to make them longer.
WedgeAdhesiveAdhesive
3M
3M
3M
3M
1. Route the wires through the mounting template and stick the
template. Drill two holes where indicated.
Φ=6 mm (15/64 in.)
Note: When mounting to uneven walls, stick the foam pad on the back of
the bracket or wedge.
2. Route the wires through the bracket. Insert two anchors into
the holes and use the screws to ax the bracket over the
anchors.
3. Connect the wires to the two terminals at the back of the
doorbell, then tighten the terminal screws.
4. Mount the doorbell to the bracket and turn on the circuit
breaker.
Note: If the wires are too short, use the included extension wires and wire
nuts to make them longer.
Wedge
(Optional)
Foam Pad
(Optional)