Page 5
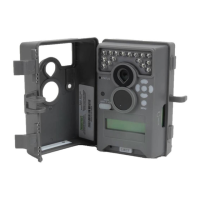
PREMISE Digital Surveillance Camera
Page 8
PREMISE Digital Surveillance Camera
SETUP AND PROGRAMMING (cont)
V
Setting Date and Time
Press the OK button. Use the Left/Right buttons to move from one value to the next and the
Up/Down buttons to adjust each value. Press the OK
button to lock in selections. When all your
selections
have been made, and the date and time has been set, press the Left button.
DATE & TIME
11/11/11 11:11pm
Setting OPTIONS
When you choose OPTIONS, the LCD Display will automatically display dierent feature within the
OPTIONS menu. Using the navigation process, set the features you desire.
CAPTURE MODE
1 PHOTO
Setting Capture Mode
Press the OK button. Use the Up/Down buttons to choose between operating modes.
This camera has 3 modes.
A. 1 Photo - A single still photo is taken
when movement is detected.
B. 3 Photo - Three still photos are taken
when movement is detected.
C. Video - Camera records a video when movement is
detected by the motion sensor. The video
length is congurable in OPTIONS.
CAPTURE MODE
3 PHOTO
CAPTURE MODE
VIDEO
TEST CAPTURE?
<NO YES>
Test Capture
From the Main Screen, press the OK button to enter Test Capture mode. In this mode, you can force
the camera to take a test shot. This option is useful when placing your camera and making sure it is
aimed correctly. Press the Right button to take a test image. A 5-second countdown will commence
and the camera will take the test image.
UPGRADE FIRMWARE
S-770-130919 NO
Upgrade Firmware
The firmware version is displayed. Press
Up/Down to choose setting.
YES - To upgrade rmware.
NO - Keep current firmware.
Make sure that an SD card with the new firmware is inserted into the camera. Press the OK button to
make selection. Make sure the process is completed
before pressing other buttons or powering the
camera O.
Press Left button to go to the next option.
Note: This option will only be used if directed to do so by Moultrie Customer Service.
Reset to Default settings
You can reset your camera to the factory default settings. Press UP or DOWN to choose YES - all
setups restored to factory default or NO - keep custom settings. Press the OK button again to
make selection. Press Left button to return to the Main Screen.
RESET TO FACTORY
DEFAULTS? NO
WI-FI SD CARD?
NO
Wi-Fi SD Card
Select option when using a Wi-Fi enabled SD card. Turning this feature on will keep the SD port
powered for a set amount of time to allow the les to transfer o the card to the Wi- network set up.
Press Left button to go to the next option.
Note: Moultrie does not oer technical support for Wi-Fi SD cards. Please contact your Wi-Fi card’s
manufacturer for support. Before use, you must setup your Wi-Fi SD card on your wireless network.
AC CONNECTED?
NO
AC Connected
When the camera is connected to an AC power supply and this option is selected, the camera will
remain on instead of going to a sleep state between detection and capture sequences. This will
greatly improve camera speed and performance and can be used in conjunction with most external
supplies, but is only recommended when connected to an AC power supply. In the event this option
is selected but no external supply is detected, it will default to the NO state.
Press Left button to go
to the next option.
 Loading...