Page 6
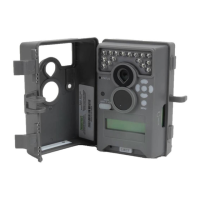
PREMISE Digital Surveillance Camera
START TIME
ALWAYS ON
Start Time
Start time allows you to set specic operating times for the camera so that it will only look for activity
and capture images during times of interest. By default the START TIME is ALWAYS ON, meaning the
camera will look for and react to activity 24 hours per day. If desired, you may set the START TIME to
a specic hour upon which the camera will wake up and begin capturing images when movement is
detected, turning o at the dened STOP TIME. To change the START TIME, press the UP/DOWN but
tons
to highlight the desired time and then press OK.
Press Left button to go to the next option.
STOP TIME
MIDNIGHT
Stop Time
Like START TIME, STOP TIME allows you to control when the camera will react to movement and
capture images. If a START TIME is dened, Setting the STOP TIME will determine when the camera
will cease capturing images when movement is detected. To change the STOP TIME, press the
UP/DOWN buttons to highlight the desired time and then press OK. Press Left button to go to the
next option.
NOTE: If Start Time is set to ALWAYS ON, Stop Time will be hidden.
CAMERA NAME
TRACE CAM
Setting Camera Name
Press the OK button. Use the Up/Down and Left/Right buttons to select an identity for your
camera. For example, you can use a name or a location; the identity you wish to use is up to you.
Press the OK button. Press Left button to go to the next option.
ERASE ALL IMAGES
NO
Erase Images
Press the OK button. Use the Up/Down buttons to choose between Yes - erase all images, or
No - does not change stored images. Press the OK button to select. When your selection has been
made, press Left button to go to the next option.
NOTE: This will also format your SD card for use in your camera.
Setting Photo Quality
Press the OK button. Use the Up/Down buttons to choose between 2 image quality settings.
1. High (8 MP): 3840 x 2160
2. Low (4 MP): 2688 x 1512
Press the OK button.
Press Left button to go to the next option.
PHOTO QUALITY
HIGH (8MP)
Page 7
PREMISE Digital Surveillance Camera
VIDEO LENGTH
30 SECONDS
Video Length
Press the OK button. Use the Up/Down buttons to choose between 2 video length settings
(10 or 30 seconds). Press the OK button.
Press Left button to go to the next option.
Setting Video Quality
Press the OK button. Use the Up/Down buttons to choose between 2 image quality settings.
1. HD: 1280 x 720
2. Low: 640 x 480
Press the OK button.
Press Left button to go to the next option.
VIDEO QUALITY
HD (1280X720)
PROGRAM SECURITY
CODE 00000
Security Code
Press the
OK button. Use the Up/Down and Left/Right buttons to select a 5 digit security code
for your camera. Press the OK button.
Press Left button to go to the next option.
NOTE: Please remember your security code. If the code is lost, you can contact Moultrie
customer support to reset the password. (Charges may apply)
MANAGED MEMORY
OVERWRITE OLDEST
Managed Memory
Selecting the OVERWRITE OLDEST option will cause the oldest les to be overwritten with new
captures when the SD card reaches its capacity. With the DO NOT OVERWRITE option selected, the
camera will cease image capture once the SD card reaches capacity.
Press the OK button to select.
When your selection has been made, press Left button to go to the next option.
 Loading...