7
TRACER
Studio Pro
User’s manual
EN
Wyposażenie dodatkowe
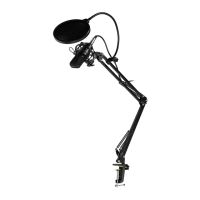
1. Microphone cable, 2. Pop lter, 3. Anti-wind Foam Cap, 4. Shock
Mount, 5. Table Clamp, 6. Microphone stand
Features
• Large capsule with plated membrane
• Cardioid polar pattern
• Ultra-low noise transformerless circuitry
• New, state-of-the-art surface mount electronics
• Heavy-duty satin nickel nish
• Stable metal boom arm system with pop lter
• Boom arm with 2-axis swivel mount for accurate positioning
Microphone Placement
The logo of Tracer on the body of the microphone indicates the front of
the microphone, and the pick-up area of the cardioid pattern. Please be
sure to have the side of the logo facing the sound source you wish to
record. As with many other aspects of the recording process, nnding the
preferred 'sound'is a matter of experimentation.
Recording vocals
• We strongly recommend using the pop lter for all vocal recording.
This aids in minimizing plosive sounds (hard 'P', 'B', 'T' and 'K' so-
unds) that produce a sudden jet of air which can cause the capsule
to overload and produce a 'popping'sound.
• Any moisture on the microphone capsule can cause problems for
condenser microphones, however the use of the pop shield will
reduce the risk of this occurring.
• Placement of the microphone and pop lter relative to the vocalist
may be varied on several factors including room acoustics, the vo-
cal performance, and whether the vocalist has a high or deep voice.
• An ideal reference is to begin with the pop lter directly in front of
the vocalist, and approximately 15cm (6") away from the micropho-
ne. This will assist in keeping the performer at a constant minimum
 Loading...