EasyManua.ls Logo

TracRac CANTILEVER User Manual

Default Icon
9 pages
To Next Page IconTo Next Page
Page #1 background imageLoading...
Page #1 background image
506-7042 1 of 7
CANTILEVER INSTALLATION INSTRUCTIONS
PARTS INCLUDED • PIÈCES INCLUSESPIEZAS INCLUIDAS
A
C
F
B
D
G H I J K L M
E
part
pièce
parte
description
description
descripcion
qty.
qté
cant.
A
Modular Cantilever Hub / Moyeu de bras en porte-à-faux modulaire / cubo del conjunto en volado modular
2
B
Modular Accessory Saddle / Selle d’accessoire modulaire / montura opcional modular
2
C
Cantilever Arm / Bras en porte-à-faux / brazo del conjunto en volado
2
D
Corner Brace / Écharpe / soporte angular
2
E
Crossbar End Cap / Capuchon d’extrémité de barre transversale / tapón del travesaño
2
F
Crossbar / Barre transversale / travesaño
1
G
3/8"-16x1.5" FHCS / Vis à tête plate 3/8po-16 x 1,5po / tornillo Allen de cabeza plana de 3/8pulg. -16×1,5pulg.
4
H
3/8"-16 x 1" HHCS / Vis d’assemblage à six pans 3/8po-16 x 1po / tornillo de cabeza hexagonal de 3/8pulg. -16×1pulg.
2
I
3/8"-16 x .625" BHCS-DRILOC / Vis à tête ronde DRILOC 3/8po-16 x 0,625po / tornillo Allen de cabeza semiesférica de 3/8pulg. -16×0,625pulg. con adhesivo Dri-Loc
12
J
3/8-16 Self Locking Nut / Écrou autobloquant 3/8-16 / contratuerca de 3/8pulg. -16
8
K
3/8-16 x 1-1/4 SS SHCS / Vis à tête creuse en acier inoxydable 3/8po-16 x 11/4po / tornillo Allen de 3/8pulg. -16×1-1/4pulg. de acero inoxidable
4
L
3/8" SS Washer / Rondelle en acier inoxydable 3/8po / arandela de 3/8pulg. de acero inoxidable
4
M
T-Bolt 3/8 x 1.25" / Boulon enT 3/8po x 1,25po / perno en “T” de 3/8×1,25pulg.
6
This product is NOT compatible with 22000 Series TracRac overhead Rack (22666 & 22668 are the correct Cantilevers)
Ce produit n’est pas compatible avec la série de supports surélevés TracRac 22000 (les bras en porte-à-faux adéquats portent les numéros 22666 et 22668)
Este producto NO es compatible con la serie 22000 de portaequipajes para cabinaTracRac (los conjuntos en volado correctos son 22666 y 22668).
Question and Answer IconNeed help?

Do you have a question about the TracRac CANTILEVER and is the answer not in the manual?

TracRac CANTILEVER Specifications

General IconGeneral
BrandTracRac
ModelCANTILEVER
CategoryAutomobile Accessories
LanguageEnglish

Summary

Tools Needed for Installation

Easy Installation Tools

Installation Tips and Usage Guidelines

Cantilever Extension Load Capacity

The extension does not increase load capacity; distribute load evenly and protect the cab.

Avoid Overloading Cantilever Extension

Overloading can damage the system. Use caution on rough roads and at excess speeds.

Check Clearance Before Installation

Do not install if clearance between crossbar underside and truck roof is less than 2 inches.

Use of Cantilever System

Upright Assembly Instructions

Mount Cantilever Saddle

Bolt saddle to TracRac upright using 5/8 FHCS and torque to 32 lb-ft.

Orient Cantilever Saddle Correctly

Ensure saddle's small loft faces the cleat for proper orientation.

Crossbar Assembly Instructions

Attach Crossbar to Saddles

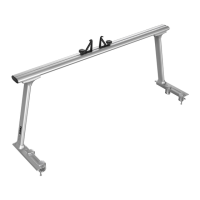
Attach crossbar to cantilever saddles, referencing overhead racks manual.

Arm and Hub Assembly Steps

Bolt Saddle Hub to Cantilever Arm

Bolt saddle hub to cantilever arm, noting saddle orientation relative to the arm.

Insert and Tighten BHCS

Insert BHCS by hand and tighten with 7/32" Allen Key in a star pattern.

Cantilever to Crossbar Assembly

Slide Cantilever Assembly onto Crossbar

Slide cantilever assembly onto crossbar, aligning saddle hub's threaded portion with saddle holes.

Bolt Saddle Hub to Saddles

Bolt saddle hub to saddles using SHCS and 3/8" Allen Key, torque to 16 lb-ft.

Front Crossbar Assembly (Part 1)

Assemble Front Crossbar

Assemble crossbar with t-bolts and end caps, tighten with 3/16" Allen Key.

Front Crossbar Assembly (Part 2)

Install Crossbar into Cantilever Arms

Insert crossbar into cantilever arm channels and secure with nuts.

Corner Brace Installation

Attach Corner Brace to Cantilever Arm

Bolt corner brace to cantilever arm using HHCS and self-locking nut, torque to 14 lb-ft.

Attach Brace to Crossbar

Attach brace to crossbar t-bolt and locking nut, torque to 13.5 lb-ft.

Final Hardware Tightening

Ensure all hardware is tightened properly.

TracRac General Guidelines

Product Fitment and Usage

Use recommended parts, ensure proper fitment and use products for intended purposes.

Load Capacity and Safety

Do not exceed maximum load capacity. Adhere to speed limits and traffic cautions.

Component Security and Inspection

Ensure all components are secure and inspect regularly for wear.

Maintenance and Care

Remove rack for car washes. Lubricate locks periodically for smooth operation.

General Precautions and Support

Check local laws, consult dealer for questions, and do not use on trailers or offroad.

TracRac Product Warranty

Warranty Coverage and Duration

TracRac products warranted for lifetime (products) and 2 years (accessories) against defects.

Warranty Exclusions

Warranty void for damage from shipping, wear, accidents, misuse, or unauthorized modifications.

Obtaining Service and Liability

Contact Customer Service for defects with proof of purchase. Exclusive remedy is repair/replacement.

Related product manuals