EasyManua.ls Logo

Trail Tech 5401-00 - User Manual

Trail Tech 5401-00
2 pages
Print Icon
To Next Page IconTo Next Page
Loading...
010-ELV-150
TRAIL TECH KICKSTANDS
Tech Support: 360-687-4530
tech_support@trailtech.net
5401-00/5401-10 KICKSTAND INSTALLATION
07-08 KAWASAKI KX250F/450F
07-09 KAWASAKI KLX450
07-14 KAWASAKI KX250F 07-11 KAWASAKI KX450F
2007 Kawasaki KX450F Kickstand Installed
1. Remove stock foot-peg, foot-peg hardware, &
foot-peg hanger from frame.
2. Install provided Trail Tech foot-peg bracket, using
the OEM fasteners. (Use thread locking compound on
the pivot bolt to ensure it does not back out.)
3. Re install foot peg & foot-peg hardware following
manufacturers recommended installation procedure.
4. Remove the stock side panel fastener and insert
through the provided spring hanger tab. (Fig 1)
Continued on other side >>
5. Re-install the side panel fastener, and tighten down
hand tight to start.
Note: Do not tighten down to manufacturers torque
specification until spring is hung. Failure to do so may
cause your spring to bind or break during use!
6. Hook spring into spring hanger mounting tab shown
in (Fig. 2)
7. Using safety glasses & a spring puller stretch the
spring and latch it onto the stand arm mounting point.
(Fig. 2)
8. Tighten sub-frame fastener to manufacturers torque
specification.
FIG. 1
FIG. 2
LIMITED WARRANTY
TRAIL TECH INC. WARRANTS TRAIL TECH KICKSTAND PRODUCTS TO BE FREE
FROM DEFECTS IN MATERIAL AND WORKMANSHIP UNDER NORMAL USE AND IF
PROPERLY INSTALLED FOR A PERIOD OF SIX MONTHS FROM DATE OF PURCHASE.
IF FOUND TO BE DEFECTIVE AS MENTIONED ABOVE, IT WILL BE REPLACED OR
REPAIRED. THIS SHALL CONSTITUTE THE SOLE REMEDY OF THE PURCHASER
AND THE SOLE LIABILITY OF TRAIL TECH INC. TO THE EXTENT PERMITTED BY
LAW, THE FOREGOING IS EXCLUSIVE AND IN LIEU OF ALL OTHER WARRANTIES OR
REPRESENTATIONS WHETHER EXPRESSED OR IMPLIED, INCLUDED ANY LIMITED
WARRANTY OF MERCHANTABILITY OR FITNESS. IN NO EVENT SHALL TRAIL TECH
INC. BE LIABLE FOR SPECIAL OR CONSEQUENTIAL DAMAGES.
IMPORTANT: WEAR EYE
PROTECTION WHEN HANGING
SPRINGS!
Note: After every ride it is important to check your kickstand
thoroughly for the following:
• Loose or damaged bolts • Bent or damaged kickstand leg or
bracket • Damaged spring
Damaged or broken parts can result in serious injury! If any part of
your stand has become
damaged do not ride the machine! Contact a factory trained
technician or Trail Tech directly for service or repairs.
FIG. 3
Question and Answer IconNeed help?

Do you have a question about the Trail Tech 5401-00 and is the answer not in the manual?

Summary

Trail Tech Kickstand Installation Guide

2007 Kawasaki KX450 F Kickstand Installation

Steps for installing the kickstand on a 2007 Kawasaki KX450F, including foot-peg bracket and spring hanger.

General Kickstand Installation Steps

General steps for attaching the kickstand spring and tightening fasteners, applicable to multiple models.

Safety Warning: Eye Protection

Emphasizes wearing eye protection when handling kickstand springs to prevent injury.

Limited Warranty Information

Outlines the terms and conditions of the limited warranty for Trail Tech kickstand products.

Trail Tech Kickstand Installation Guide (Continued)

2011 Kawasaki KX450 F Kickstand Installation

Steps for installing the kickstand on a 2011 Kawasaki KX450F, including foot-peg bracket and spring hanger.

Kickstand Maintenance and Inspection

Important post-ride checks for loose bolts, damaged parts, or springs to ensure safety.

Overview

This document outlines the installation and maintenance procedures for Trail Tech Kickstands, specifically models 5401-00/5401-10 and 5402-00/5402-10, designed for various Kawasaki KX and KLX models from 2007 to 2014. The kickstands provide a convenient and stable means of parking a dirt bike, enhancing its utility for riders.

Function Description

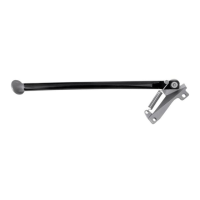
The Trail Tech Kickstand serves as a retractable support mechanism for dirt bikes, allowing them to stand upright without external assistance. This eliminates the need for leaning the bike against objects or using a separate stand, making it ideal for trail riding, pit stops, and general storage. The kickstand is designed to integrate seamlessly with the bike's existing foot-peg mounting points, ensuring a secure and stable attachment. When not in use, the kickstand folds up and out of the way, preventing interference with riding dynamics or ground clearance.

Usage Features

The installation process for the Trail Tech Kickstand involves several key steps, ensuring proper fitment and functionality.

Preparation:

  1. Remove Stock Components: Begin by removing the stock foot-peg, its associated hardware, and the foot-peg hanger from the bike's frame. This clears the mounting area for the new kickstand bracket.
  2. Install Trail Tech Bracket: Mount the provided Trail Tech foot-peg bracket using the original equipment manufacturer (OEM) fasteners. It is crucial to apply thread-locking compound to the pivot bolt to prevent it from loosening over time due to vibrations and stress. This ensures the long-term stability and safety of the kickstand.
  3. Reinstall Foot Peg: After securing the Trail Tech bracket, reinstall the foot-peg and its hardware, following the manufacturer's recommended installation procedure for the foot-peg itself. This ensures that the foot-peg remains functional and secure.
  4. Prepare for Spring Hanger: Remove the stock side panel fastener. This fastener will be reused to secure the spring hanger tab.
  5. Insert Spring Hanger Tab: Insert the side panel fastener through the provided spring hanger tab. This tab is a critical component for attaching the kickstand spring.

Kickstand Assembly and Finalization: 6. Reinstall Side Panel Fastener: Reinstall the side panel fastener, tightening it hand-tight initially. * Important Note: Do not fully tighten this fastener to the manufacturer's torque specification until the kickstand spring has been successfully hung. Overtightening at this stage can cause the spring to bind or break during use, compromising the kickstand's functionality and potentially leading to premature failure. 7. Hook Spring to Hanger Tab: Carefully hook one end of the kickstand spring into the spring hanger mounting tab, as illustrated in the provided figures. 8. Attach Spring to Stand Arm: Using safety glasses for eye protection and a spring puller tool, stretch the spring and latch its other end onto the stand arm mounting point. This step requires caution due to the tension in the spring. * Safety Warning: Always wear eye protection when handling and stretching springs to prevent injury from accidental release or breakage. 9. Final Tightening: Once the spring is securely in place, tighten the sub-frame fastener to the manufacturer's torque specification. This ensures all components are properly secured and the kickstand operates as intended.

Maintenance Features

Regular maintenance is crucial for ensuring the longevity and safe operation of your Trail Tech Kickstand. After every ride, it is important to perform a thorough inspection for any signs of wear or damage.

Post-Ride Inspection Checklist:

  • Loose or Damaged Bolts: Check all bolts for tightness. Loose bolts can lead to instability and component failure. Any damaged bolts should be replaced immediately.
  • Bent or Damaged Kickstand Leg or Bracket: Inspect the kickstand leg and mounting bracket for any signs of bending, cracks, or other damage. A compromised kickstand leg or bracket can fail unexpectedly, leading to the bike falling over.
  • Damaged Spring: Examine the kickstand spring for any signs of stretching, corrosion, or breakage. A damaged spring may not hold the kickstand in the correct position, either allowing it to deploy unintentionally or preventing it from retracting properly.

Action on Damage:

  • Do Not Ride: If any part of your kickstand is found to be damaged or broken, do not ride the machine. Riding with a damaged kickstand can result in serious injury to the rider or further damage to the motorcycle.
  • Contact Professionals: In case of damage, contact a factory-trained technician or Trail Tech directly for service or repairs. Attempting to repair damaged components without proper knowledge or tools can be dangerous and may void any warranty.

Limited Warranty: Trail Tech Inc. provides a limited warranty for its kickstand products, guaranteeing them to be free from defects in material and workmanship under normal use and proper installation for a period of six months from the date of purchase. If a defect is found within this period, the product will be replaced or repaired. This constitutes the sole remedy for the purchaser and the sole liability of Trail Tech Inc. The warranty is exclusive and in lieu of all other warranties, expressed or implied, including any limited warranty of merchantability or fitness. Trail Tech Inc. is not liable for special or consequential damages.

By following these installation and maintenance guidelines, users can ensure the safe and effective operation of their Trail Tech Kickstand, enhancing their riding experience with reliable and convenient bike support.

Trail Tech 5401-00 Specifications

General IconGeneral
Model5401-00
DisplayDigital
BrandTrail Tech
CompatibilityUniversal
MaterialPlastic
ColorBlack
IncludesMounting hardware

Related product manuals