1.3 RECOMMENDED
AND NOT RECOMMENDED USAGE
This belt sawing machine was designed and constructed
according to the most advanced technologies and may be
used for all cutting requirements for metals commonly
used in industry and artisanship.
It can cut:
.COMMON STEELS (FE 37…)
.SPECLAL STEELS (C 40, 18NiCrMo5…)
.ALUMINIUM AND ITS ALLOYS
.BRASS
.BRONZE
.STEEL TUBING (FE 35, FE 52…)
.PROFILED SECTIONS IN SHEET METAL AND
ALUMINIUM
It is not suitable for cutting:
-WOOD AND SIMILAR MATERALS
-BONE AND SIMILAR MATERIALS
ATTENTION:The band saw has been developed and
manufactured to cut in dry condition; the use of any
cooler by lubricating oil makes the machine unusable.
Consult the relative sections for cutting capacities, the
speeds to use and the type of tools for use according to
the material to be cut and its section.(See list of contents).
1.4 STANDARD SAFEY PROCEDURS
-Do not use the machine in very damp places or in the
presence of inflammable liquids or gases.
-Do not use it in the open air when general weather and
environmental conditions are unfavourable (eg.
Explosive atmospheres, during a storm or rain).
-Wear suitable clothes, without wide sleeves or articles
such as scarves, chains and bracelets which could get
caught in the moving parts.
-Always use personal protection devices: protective
goggles as recommended by safety standards, gloves of
the right size, headphones or earplugs, and hairnets if
necessary.
-Use the tools recommended in this manual if you want to
achieve the best performance from your sawing
machine.
-Any power cable extensions must be type approved and
comply with safety standards.
-Avoid using the machine if your psycho-physical condition
are precarious or upset.
1.5 SAFETY PROCEDURS FOR FURTHER RISK
-Always keep processing residues away from the cutting
area.
-Always use the clamp. The parts to be cut must always
be held firmly in the clamp.
-Always keep hands away from the working areas while
the machine is moving: before loading or unlading the
part, release the run button on the hand grip.
-Do not force the machine unnecessarily : excessive
cutting pressure could cause rapid wear to the blade
and negatively influence the performance of the
machine in terms of finishes and cutting precision.
1.6 NOISE CONDITIONS
In normal conditions of use as described in this manual,
this belt sawing machine determines an equivalent level of
acoustic pressure:
Leq= 82dB(A) when operating unloaded;
Leq= 84.3 dB(A) during processing (eg. cutting of a steel
tube D.80mm thickness 5mm), at cutting speed of
80m/min., with a weighted operating cycle of 1 minute.
Measurement were obtained in compliance with UNI
7712, ISO 3740,ISO 3746 and CEE 89/392 regulation.
NOTE : Personal hearing protection should be used,
such as headphones or earplugs.
1.7 INFORMATION ABOUT THE ELECTROMAGNETIC
COMPATIBILITY
The European regulations on safety and , in particular, the
EEC Directive 89/336 contemplate that all the equipment
be equipped with shielding devices against radio
interferences both from and towards the outside.
This machine is equipped with filters both on the motor
and on the power supply through which the machine is
safe and in compliance with above regulations.
Tests were carried out according to EN 55011, EN 55014,
EN50082-1, IEC 1000-4-2, IEC 1000-4-4 regulations.
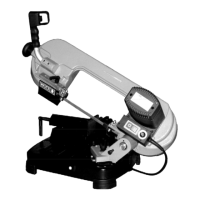
1.8 DESCRIPTION OF THE MACHINE (Fig.1)
The belt sawing machine consists of two basic parts: the
machine body (5) complete with motor and drive (7) which
is integrated into lower part, consisting of the clamp (11)
and the base (13), by means of the swivel support (9).
Here is a list of the main parts with the number indicating it
in the drawing.
Legend Fig. 1
1 - Command grip
2 - Blade tension handwheel
4 - Sliding blade guide
5 - Machine body
6 - Blade
7 - Motor
8 - Control box
9 - Bar stop
10 - Clamp (vice)
11 - Morsa
12 - Clamp drive
13 - Base
2.0 INSTALLAZIONE
2.1 REMOVING THE PACKING
Remove the wooden frame which protects the
machine during transit.
3
 Loading...