EasyManua.ls Logo

Trane 2/4TGB3F018A - User Manual

Trane 2/4TGB3F018A
8 pages
Print Icon
To Next Page IconTo Next Page
Loading...
ALL phases of this installation must comply with NATIONAL, STATE AND LO-
CAL CODES
IMPORTANT This Document is customer property and is to
remain with this unit. Please return to service information pack upon
completion of work.
HAZARDOUS VOLTAGE - DISCONNECT POWER BEFORE SERVICING
WARNING:
Installer’s Guide
© 2009 Trane
A. GENERAL INFORMATION
WARNING
!
THIS INFORMATION IS FOR USE BY INDIVIDUALS HAVING ADEQUATE
BACKGROUNDS OF ELECTRICAL AND MECHANICAL EXPERIENCE. ANY
ATTEMPT TO REPAIR A CENTRAL AIR CONDITIONING PRODUCT MAY RESULT
IN PERSONAL INJURY AND/OR PROPERTY DAMAGE. THE MANUFACTURER
OR SELLER CANNOT BE RESPONSIBLE FOR THE INTERPRETATION OF THIS
INFORMATION, NOR CAN IT ASSUME ANY LIABILITY IN CONNECTION WITH
iTS USE.
CAUTION
!
EQUIPMENT DAMAGE! TO PREVENT SHORTENING ITS SERVICE LIFE, THE AIR
HANDLER SHOULD NOT BE USED DURING THE FINISHING PHASES OF CON-
STRUCTION OR REMODELING. The low return air temperatures can lead to the
formation of condensate. Condensate in the presence of chlorides and fluorides
from paint, varnish, stains, adhesives, cleaning compounds, and cement creates
a corrosive condition which may cause rapid deterioration of the cabinet and
internal components.
1-1/2 – 4 Ton Air Handlers
Upflow / Horizontal Left
These instructions do not cover all variations in systems or provide for every possible
contingency. Should further information be desired or particular problems arise which
are not covered sufficiently by this manual, contact your local distributor or the manu-
facturer as listed on the air handler nameplate.
These Air Handlers are vertical upflow and horizontal left configuration only. Refer to
Section B beginning on page 2 for additional information.
INSPECTION
Check carefully for any shipping damage. This must be reported to and claims made
against the transportation company immediately. Check to be sure all major compo-
nents are in the unit. Any missing parts should be reported to your supplier at once,
and replaced with authorized parts only.
18-GJ02D1-2
INSTALLATION LIMITATIONS & RECOMMENDATIONS
The general location of the air handler is normally selected by the architect, contractor
and/or home owner for the most effective application and satisfaction.
These air handlers are suitable for installation in a closet, alcove or utility room with
free, non-ducted, air return, using the area space as a return air plenum. With ducted
supply air, if the minimum clearances to combustible materials and service access are
observed, the above installations are suitable.
NOTE: Condensation may occur on the surface of the air handler when in-
stalled in an unconditioned location. When units are installed in unconditioned
spaces, verify that all electrical and refrigerant line penetrations on the air
handler are sealed completely.
This area may also be used for other purposes, including an electric hot water heater
- but in no case shall a fossil fuel device be installed and/or operated in the same
closet, alcove or utility room.
In addition, these air handlers are suitable for installation in an attic, garage or crawl
space with ducted supply and return air.
This equipment (for models TGB3F42, 48A only) has been evaluated in accordance
with the Code of Federal Regulations, Chapter XX, Part 3280 or the equivalent. “SUIT-
ABLE FOR MOBILE HOME USE”
For proper installation the following items must be considered:
1. If adequate power is available and correct according to nameplate specifica-
tions.
2. Pursuant to Florida Building Code 13-610.2.A.2.1, this unit meets the criteria for
a factory sealed air handler.
3. Insulate and seal all ducts, particularly if unit is located outside of the condi-
tioned space.
4. To ensure maximum efficiency and system performance, the existing supply and
return duct system static pressures must not exceed the total available static
pressure of the air handler. Reference ACCA Manual D, Manual S and Manual
RS along with the air handler Product Data (available online) and Service Facts
(available online) for additional information.
5. It is recommended that the outline drawing be studied and dimensions properly
noted and checked against selected installation site. By noting in advance which
knockouts are to be used, proper clearance allowances can be made for instal-
lation and possible future service.
6. The Refrigerant lines must be sealed and Electrical inlets need to be sealed at
both the low and the high voltage.
7. If supplementary heat is to be added, power supply must be sufficient to carry
the load. In addition, minimum air flow settings, unit and duct clearances to
combustible material must be maintained as stated on the air handler rating
nameplate.
CAUTION
!
For air handlers not equipped with a factory installed electric heater, a field
installed heater is available from the manufacturer. Only manufacturer-built
heaters are approved for use in the air handler. These heaters have been
designed and tested in accordance with UL standards to provide safe and reli-
able operation. A list of approved heaters is provided on the air handler rating
nameplate. Heaters that are not factory approved could cause damage and are
not covered under equipment warranty.
8. If field installed electric heaters are applied, minimum air flow settings, unit
and duct clearances to combustibles must be maintained as stated on the air
handler rating nameplate.
9. If the unit is installed without a return air duct, applicable local codes may limit
this air handler to installation only in a single story residence & within condi-
tioned space.
10. If the outdoor unit is to be installed later, or by others, then installation of the air
The following warning complies with State of California law, Proposition 65.
This product contains berglass wool insulation! Fiberglass dust and ceramic
bers are believed by the State of California to cause cancer through
inhalation. Glasswool bers may also cause respiratory, skin, or eye irritation.
PRECAUTIONARY MEASURES:
--Avoid breathing berglass dust.
--Use NIOSH approved dust/mist respirator.
--Avoid contact with the skin or eyes. Wear long sleeved, loose tting
clothing, gloves and eye protection.
--Wash clothes separately from other clothing; rinse washer thoroughly.
--Operations such as sawing, blowing, tear-out, and spraying may generate
ber concentrations requiring additional respiratory protection. Use the
appropriate NIOSH approved respirator in these situations.
FIRST AID MEASURES
--Eye contact: Flush eyes with water to remove dust. If symptoms persist,
seek medical attention.
--Skin Contact: Wash aected areas gently with soap and warm water after
handling.
WARNING
!
2/4TGB3F018A -- 2/4TGB3F048A
Question and Answer IconNeed help?

Do you have a question about the Trane 2/4TGB3F018A and is the answer not in the manual?

Summary

General Information

Hazardous Voltage Warning

Warning about hazardous voltage and the need to disconnect power before servicing.

Equipment Damage Prevention

Caution against using air handler during finishing phases to prevent corrosion.

California Proposition 65 Warning

Warning regarding fiberglass wool insulation and potential health risks.

First Aid Measures

Instructions for eye and skin contact with fiberglass dust and fibers.

Inspection and Damage Reporting

Check for shipping damage and report missing components immediately.

Installation Limitations and Recommendations

Location and Installation Suitability

Air handler suitability for closets, alcoves, utility rooms, attics, garages, and crawl spaces.

Condensation in Unconditioned Spaces

Note on condensation in unconditioned spaces and sealing penetrations.

Installation Requirements Checklist

Key considerations for power, duct sealing, insulation, static pressure, and clearances.

Supplementary Heater Considerations

Notes on power supply, airflow, and clearances for field-installed heaters.

Return Air Duct Restrictions

Local code limitations for units without a return air duct.

Unit Installation

Upflow Installation

Instructions for upflow installation including drip tray removal and sealing openings.

Horizontal Left Installation

Instructions for horizontal left installation, filter maintenance, and wiring.

Duct Connections

Duct Connection Procedure

Connecting supply and return air ducts with flame retardant connectors and sealing.

Refrigerant Piping

Refrigerant Line Routing and Sealing

Routing refrigerant lines for service access and sealing openings.

Thermostatic Valve (TXV) Installation

Procedure for tightening TXV mechanical fittings and protection during brazing.

Brazing to Evaporator Section

Procedure for cutting, cleaning, and brazing refrigerant tubing to the indoor coil.

Condensate Drain Piping

Condensate Drain Installation

Ensuring level installation and proper connection of primary and secondary drain lines.

Condensate Trap Requirements

Details on trap placement, clean-outs, and slope for condensate drain lines.

Auxiliary Drain Pan

Recommendation for installing an auxiliary drain pan for horizontal installations.

Electrical - Power Wiring

Voltage Selection

Instructions for wiring the air handlers for 230 or 208 volts.

Wire and Fuse Sizing

Selecting wire and fuse sizes according to unit nameplate specifications.

Grounding Requirements

Adherence to local codes for proper grounding to prevent injury or death.

Knockout Plate Installation

Installing the knockout plate for units without electric heaters and sealing openings.

Control Wiring

Wiring Connections

Connecting wiring between indoor unit, outdoor unit, and thermostat.

Field Wiring Diagrams

Using provided diagrams for single-speed cooling and heat pump systems.

Supplementary Heater Wiring

Instructions for ensuring packaging material is removed for supplementary heaters.

Airflow Performance

Airflow Performance Tables

Tables showing airflow (CFM) for various static pressures and voltage configurations.

Outline Drawing and Dimensions

Unit Outline Drawing (18-36 A)

Diagrams showing dimensions, clearances, and connection points for specific models.

Minimum Unit Clearances

Table of required and recommended clearances to combustible materials.

Model Specific Dimensions

Table detailing gas and liquid line sizes and connection points per model.

Unit Outline Drawing (42-48 A)

Outline Drawing and Clearances

Diagrams showing dimensions, clearances, and connection points for 2/4TGB3F42,48A.

Model Specific Dimensions and Connections

Table detailing gas and liquid line sizes and connection points for models TWG042A to 4TGB48.

Checkout Procedure

General Checkout Checklist

Steps to verify proper installation and operation of the air handler.

Supplementary Heater Checkout

Specific checks for units equipped with supplementary heaters.

Overview

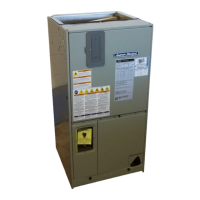
This document serves as an installer's guide for 1-1/2 to 4 Ton Air Handlers, specifically models 2/4TGB3F018A through 2/4TGB3F048A, designed for upflow and horizontal left configurations. It provides comprehensive instructions for installation, operation, and maintenance, emphasizing safety and compliance with national, state, and local codes.

Function Description

These air handlers are designed to provide conditioned air as part of a central air conditioning or heat pump system. They are suitable for both upflow and horizontal left airflow configurations, making them versatile for various installation environments such as closets, alcoves, utility rooms, attics, garages, or crawl spaces. The primary function is to circulate air through an evaporator coil, which cools and dehumidifies the air, and optionally through supplementary electric heaters for heating. The units are designed for draw-through applications, where the blower pulls air through the coil. Specific models (TGB3F42, 48A only) are evaluated for mobile home use, meeting Federal Regulations, Chapter XX, Part 3280 or equivalent.

Important Technical Specifications

Model Range: 2/4TGB3F018A to 2/4TGB3F048A (1-1/2 to 4 Ton capacity). Configurations: Vertical upflow and horizontal left only. Electrical: Shipped factory-wired for 230 volts, convertible to 208 volts. Field wiring must conform to national and local codes, with wire and fuse sizes selected according to the Minimum Branch Circuit Ampacity and Maximum Overcurrent Device listed on the unit nameplate. Refrigerant Connections: Made outside the cabinet. TXV (Thermostatic Expansion Valve) equipped models are non-bleed and may require a start kit on the outdoor unit. Condensate Drainage: Features 3/4" NPT primary and secondary drain connections. The indoor blower creates negative pressure at these connections during operation. A minimum 2" water seal trap is required for the primary drain line. Duct Connections: Supply and return air ducts should be connected with flame retardant duct connectors. Convertible duct flanges can be field fabricated for 3/4" or 1-1/2" ductboard applications. Clearances to Combustible Materials: Minimum clearances are specified as 0" for sides, front, back, and inlet duct. For the outlet duct, 1" clearance is required for the first 3 ft when electric heaters are installed, with exceptions for BAYHTR1405, 1408, and 1410 models which allow 0" plenum and duct clearance in upflow configuration. Airflow Performance: Detailed airflow performance tables (CFM vs. external static pressure in inches W.G.) are provided for various models (2/4TGB3F18A1000A, 2/4TGB3F25A1000A, 2/4TGB3F30A1000A, 2/4TGB3F36A1000A, 2/4TGB3F42A1000A, 2/4TGB3F48A1000A) under both 230V and 208V, and for vertical and horizontal orientations, with and without electric heaters. These tables account for wet coil conditions and include notes on filter presence and baffle configurations (small apex baffle). Heater Compatibility: Only manufacturer-built heaters are approved for use. A list of approved heaters is provided on the air handler rating nameplate. Field-installed electric heaters require sufficient power supply and adherence to minimum airflow settings and clearances. Sound Transmission: For horizontal installations not suspended, vibration isolators (purchased locally) should be placed under the unit to prevent sound transmission.

Usage Features

Versatile Installation: Designed for installation in various indoor spaces, including closets, alcoves, utility rooms, attics, garages, or crawl spaces, with options for free, non-ducted air return or ducted supply and return air. Filter Maintenance: For horizontal applications, a properly sized remote filter and grille are recommended for ease of filter maintenance, with the factory-installed filter removed from the unit. Condensate Management: Primary and secondary drain connections are provided, with specific instructions for trapping the primary drain line to ensure proper condensate removal and prevent overflow. An auxiliary drain pan is recommended for horizontal air handlers to prevent ceiling damage. Field-Installed Heaters: The guide provides clear instructions for integrating field-installed electric heaters, including the use of a knockout plate if no heater is factory installed. Service Access: Refrigerant piping must be routed to maintain service access to the blower compartment and allow easy removal of the filter access panel and filter. Sealing: All electrical and refrigerant line penetrations on the air handler must be sealed completely, especially when installed in unconditioned locations, to prevent condensation and air loss/infiltration.

Maintenance Features

Pre-Installation Inspection: Thorough check for shipping damage, major components, and missing parts upon delivery. Post-Installation Checkout: A detailed checklist is provided for post-installation verification, including power disconnect status, field wiring connections, grounding, unit suspension, duct outlets, drain line integrity, auxiliary drain pan installation, power supply verification, and filter installation. Filter Replacement: Instructions emphasize checking filters for proper size and informing the owner about the procedure for removal and reinstallation. Lubrication: Direct drive motors have permanently lubricated bearings and do not require lubrication under normal use. Condensate Drain Maintenance: Recommendation for a clean-out tee or cross in the primary drain line for future maintenance. Operational Observation: After energizing the system, installers are advised to carefully observe its operation and make any necessary adjustments. Documentation: The installer is instructed to leave the Use and Care Manual with the owner and, if possible, instruct them on proper operating procedures. Safety Warnings: Prominent warnings regarding hazardous voltage, electrical shock, grounding requirements, and potential equipment damage from using the air handler during construction/remodeling (due to corrosive condensate) are provided. A Proposition 65 warning about fiberglass wool insulation and ceramic fibers is included, with precautionary measures and first aid instructions.

Trane 2/4TGB3F018A Specifications

General IconGeneral
BrandTrane
Model2/4TGB3F018A
CategoryAir Handlers
LanguageEnglish

Related product manuals