EasyManua.ls Logo

TransDeco TD600B - User Manual

TransDeco TD600B
4 pages
Print Icon
To Next Page IconTo Next Page
Loading...
Question and Answer IconNeed help?

Do you have a question about the TransDeco TD600B and is the answer not in the manual?

Summary

Assembly Instructions

Step 1: Install Top Panel

Install bolt into side panel and camlock into top panel, then attach top to side panel.

Step 2: Install Bottom Panel

Repeat Step 1 to install the bottom panel.

Step 3: Attach Side Panel

Install bolts to side panel, insert camlocks, and attach side panel to wood frame.

Step 4: Attach Back Panel Components

Attach Part Y to back panel, Part Z to back panel, and install connecting bar.

Step 5: Attach Wood Frame

Attach wood frame to main structure, align, and fasten screws, install wire clips.

Step 6: Install Pivoting Device

Install the pivoting device to the mounting bracket.

Step 7: Attach Mounting Bracket

Attach the mounting bracket to the main structure and fasten screws.

Step 8: Install Shelving Supports

Install Part M, affix silicon Part K, and install Part N.

Step 9: Insert Glass Shelves

Insert the bottom and middle glass shelves.

Step 10: Install Top Glass Shelf

Install the top glass shelf and align with wood frame.

Step 11: Attach TV Mount to TV

Attach TV mounting bracket to the TV using appropriate hardware.

Step 12: Install Safety Bolts

Install safety bolts to the top anchors.

Overview

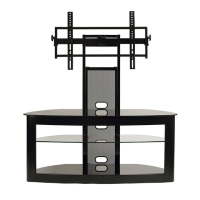
This document provides assembly instructions and a parts list for the TransDeco TD600B, a TV stand with an integrated TV mounting bracket and glass shelving. The stand is designed to support a television and provide storage space, likely for media components.

Function Description:

The TransDeco TD600B serves as a stylish and functional furniture piece for displaying a television. It features a main structure with a wood frame, multiple glass shelves for storage, and a pivoting TV mounting bracket. The design incorporates wire management clips to help organize cables, contributing to a cleaner aesthetic. The pivoting mechanism of the TV bracket allows for adjustment of the viewing angle, enhancing user experience. The stand is designed for home use, providing a stable and organized solution for modern entertainment setups.

Important Technical Specifications:

The parts list details a comprehensive set of hardware components, categorized into general assembly hardware and TV mounting hardware.

  • General Assembly Hardware:

    • Screws: M6 (various lengths: 10mm, 12mm, 25mm, 42mm, 45mm), M4 (12mm).
    • Camlocks: Ø19 (2 sets).
    • Washers: Ø12x3.5mm (9 pcs), Ø23 (2 pcs).
    • Other components: M6 nuts (5 pcs), M4 nuts (2 pcs), various brackets (R, S, T, U, V, W, X, Y, Z, AA, GB, GC, GD), wire management clips (H), silicon pads (K), safety bolts (L), and other miscellaneous parts (M, N, P, Q).
    • The inclusion of camlocks and various screw types suggests a robust assembly method designed for stability.
  • TV Mounting Hardware:

    • Screws: M4x12mm, M5x12mm, M6x12mm, M8x12mm (for TV attachment).
    • Longer Screws: M4x32mm, M5x32mm, M6x32mm, M8x32mm (for TV attachment, accommodating different TV depths).
    • Washers: Ø19xØ6.2 (S9), Ø22xØ8.2 (S10). These are likely for distributing pressure and ensuring a secure fit.
    • Spacers: Ø14x14mm (S11), Ø25x13mm (S12), Ø25x2mm (S13). These are crucial for creating clearance between the TV and the bracket, accommodating irregular TV backs, and ensuring proper airflow.
    • All TV mounting hardware components are provided in quantities of 4, indicating support for standard four-point VESA mounting patterns.

Usage Features:

The assembly process is broken down into 12 steps, guiding the user through the construction of the stand and the attachment of the TV.

  • Modular Assembly: The stand is built in stages, starting with the side and bottom panels, then adding the back panel, wood frame, and finally the glass shelves. This modular approach simplifies the assembly process.
  • Pivoting TV Bracket: Step 6 highlights the installation of a "pivoting device" (Part X) to the mounting bracket (Part AA), indicating that the TV can be swiveled for optimal viewing angles.
  • Wire Management: The inclusion of wire management clips (Part H) in Step 5 allows users to neatly route cables, preventing clutter and enhancing the aesthetic appeal of the entertainment setup.
  • Adjustable Glass Shelves: Steps 9 and 10 involve inserting the bottom, middle, and top glass shelves. Step 10 specifically mentions the ability to "loosen the screws on the back panel for adjustment if necessary" when aligning the top glass shelf with the wood frame, suggesting some flexibility in shelf positioning or fit.
  • Universal TV Compatibility: Step 11 provides a selection of screws, washers, and spacers for attaching the TV mounting bracket to the TV. This "choose only one screw... one washer... and one spacer that fit your TV" approach ensures compatibility with a wide range of television models and VESA mounting patterns.
  • Safety Features: Step 12 instructs the user to "Install the safety bolts to the top anchors," which are crucial for securing the TV to the stand and preventing accidental tipping. The note "There is no bolt for lower anchors" suggests a specific design for the safety mechanism.

Maintenance Features:

While the manual doesn't explicitly detail ongoing maintenance, several aspects imply ease of care and potential for adjustments.

  • Adjustable Components: The ability to loosen screws for glass shelf alignment (Step 10) suggests that minor adjustments can be made post-assembly if needed, which could be useful for settling or minor misalignments over time.
  • Durable Materials: The use of wood for the frame and glass for the shelves, combined with metal hardware, indicates a design intended for durability. Glass shelves are generally easy to clean.
  • Troubleshooting Support: The front page provides contact information (email: info@transdecointl.com, phone: 909-606-3833) for "missing parts or questions," available Mon-Fri 9 AM to 5 PM pacific time. This readily available support is a key maintenance feature, allowing users to address issues promptly and ensure the longevity of the product. Users are advised to have their product model number (TD600B) available when contacting support.
  • Assembly Guidance: The instruction "For easy assembly, do not tighten all the screws until Step 5 completed" (Step 4) is a crucial tip that prevents stress on components during assembly and allows for easier alignment, potentially reducing wear and tear on parts during the initial build. This also implies that if the stand needs to be disassembled or reassembled, following this principle would be beneficial.

TransDeco TD600B Specifications

General IconGeneral
BrandTransDeco
ModelTD600B
CategoryIndoor Furnishing
LanguageEnglish