The motor temperature sensor is factory installed and provides
accurate telemetry data and thermal overload protection for
the motor. If you remove the temperature sensor for vehicle
maintenance, be certain to reinstall it correctly. The sensor should
be installed so the thermistor (the small component at the top of
the temperature sensor) is on the top of the motor (the side where
the wires exit the motor). The sensor should also be centered
on the motor. If the sensor is installed incorrectly, inaccurate or
false readings will be sent to the speed control, and your model’s
performance may be compromised. Do not operate the XRT
Ultimate without the temperature sensor. If the sensor is missing
or incorrectly installed, overheating and permanent motor damage
may occur. Damage caused by overheating is not covered by the
limited warranty.
The XRT Ultimate also features factory installed cooling ns. These
cooling ns help pull the heat away from the motor. Also, the
electronic speed control features a cooling fan to assist in cooling
the VXL-8s in high current motor applications.
Tuning the Sealed Gear Dierentials
The action of the front and rear gear dierentials can be tuned
for dierent driving conditions and performance requirements
without major disassembly or removal of the suspension system.
From the factory, the dierentials are sealed to maintain consistent
long-term performance. Changing the oil in the dierential with
either lower or higher viscosity oil will vary the performance
characteristics of the dierentials. Changing to higher viscosity oil
in the dierential will reduce the tendency for motor power to be
transferred to the wheel with the least traction. You may notice this
when making sharp turns on slick surfaces. The unloaded wheels
on the inside of the turn have the least traction and tend to spin
up to extremely high rpms. Higher viscosity (thicker) oil causes the
dierential to act like a limited-slip dierential, distributing more
equal power to the left and right wheels.
XRT Ultimate will generally benet from higher viscosity oil when
climbing or racing on low traction surfaces. Note: Heavier oil will
allow power to be transferred, even with one or more tires o the
ground. This can make the vehicle more likely to overturn on high-
traction surfaces.
From the factory, the front dierential is lled with SAE 10,000W
viscosity silicone oil. The rear dierential is lled with 30,000W oil.
Only use silicone oil in the dierentials. Traxxas oers
SAE 10,000W, 30,000W, and 50,000W viscosity oil (see
your parts list). The dierentials have to be removed
from the vehicle and disassembled to change/replace
oil. Follow the steps below to access and rell the front
and rear dierentials:
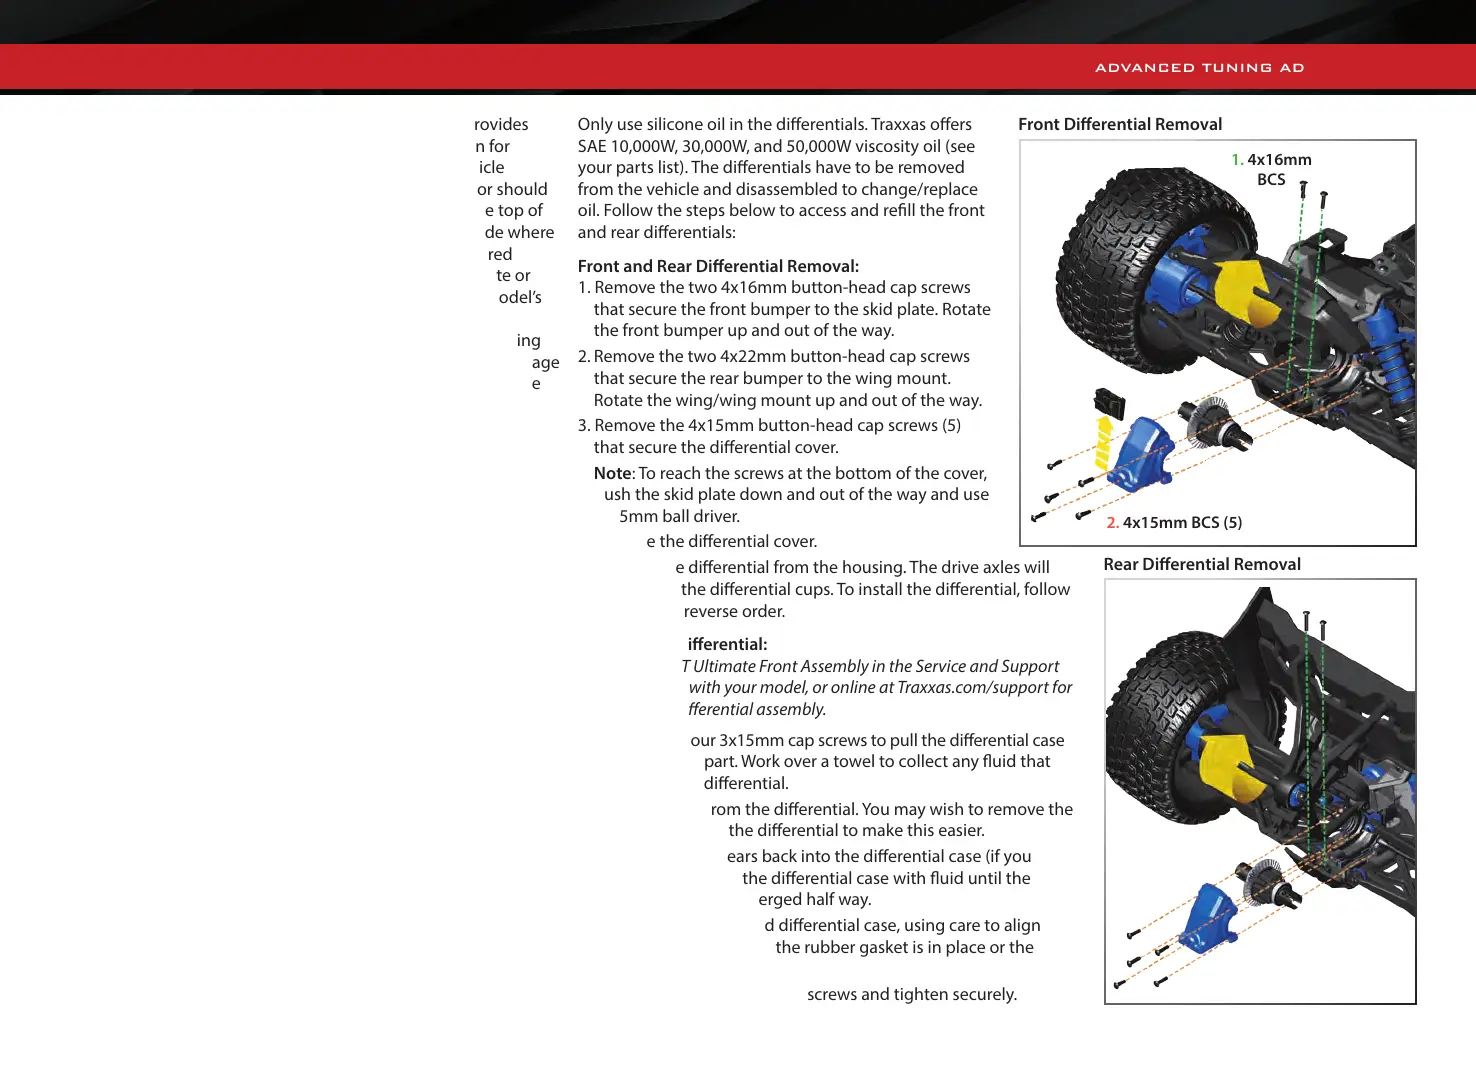
Front and Rear Dierential Removal:
1. Remove the two 4x16mm button-head cap screws
that secure the front bumper to the skid plate. Rotate
the front bumper up and out of the way.
2. Remove the two 4x22mm button-head cap screws
that secure the rear bumper to the wing mount.
Rotate the wing/wing mount up and out of the way.
3. Remove the 4x15mm button-head cap screws (5)
that secure the dierential cover.
Note: To reach the screws at the bottom of the cover,
push the skid plate down and out of the way and use
a 2.5mm ball driver.
4. Remove the dierential cover.
5. Remove the dierential from the housing. The drive axles will
slide out of the dierential cups. To install the dierential, follow
the steps in reverse order.
Relling the Dierential:
Refer to the XRT Ultimate Front Assembly in the Service and Support
Guide included with your model, or online at Traxxas.com/support for
the complete dierential assembly.
1. Remove the four 3x15mm cap screws to pull the dierential case
and ring gear apart. Work over a towel to collect any uid that
drips from the dierential.
2. Drain the uid from the dierential. You may wish to remove the
spider gears from the dierential to make this easier.
3. Place the spider gears back into the dierential case (if you
removed them). Fill the dierential case with uid until the
spider gears are submerged half way.
4. Rejoin the ring gear and dierential case, using care to align
the screw holes. Be sure the rubber gasket is in place or the
dierential may leak.
5. Install the four 3x15mm cap screws and tighten securely.
Front Dierential Removal
Rear Dierential Removal
1. 4x16mm
BCS
2. 4x15mm BCS (5)
ADVANCED TUNING ADJUSTMENTS
1. 4x22mm
BCS
2. 4x15mm BCS (5)



 To Next Page