Do you have a question about the Trend Micro InterScan and is the answer not in the manual?
Provides a general overview of the IGSA's hardware and refers to the Getting Started Guide for detailed panel descriptions.
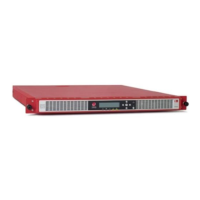
Details the components and elements found on the front panel of the InterScan Gateway Security Appliance.
Describes the various ports and components located on the back panel of the InterScan Gateway Security Appliance.
Explains the IGSA's LCD console, including its display and the function of its control panel buttons for navigation.
Explains the two deployment methods: Full Transparent and Proxy mode, for integrating the IGSA into your network.
Outlines the steps for mounting the IGSA into a 4 Post rack using the provided rack kit and slide sets.
Details the process of connecting the necessary cables and powering on the IGSA for the first time.
Describes the methods for assigning an IP address to the IGSA, either dynamically via DHCP or statically.
Guides users through the Trend Micro online registration website to activate their IGSA product.
Instructions on how to access the IGSA's web management console by using its IP address.
Lists essential tasks to perform after accessing the web console, such as updating engines and changing passwords.
Provides methods to test if the IGSA is correctly passing network traffic, ensuring it's functioning as expected.
The Trend Micro InterScan Gateway Security Appliance (IGSA) is a comprehensive, all-in-one defense solution designed to protect networks from viruses, spyware, spam, and other threats at the Internet gateway. As a leading gateway antivirus vendor, Trend Micro provides these appliances for easy deployment and worry-free operation, aiming to block malware, stop inappropriate content or email, and filter harmful URLs.
The IGSA serves as a robust security appliance positioned at the network gateway to inspect and filter incoming and outgoing traffic. It provides real-time protection against a wide array of cyber threats, ensuring the integrity and security of the network. The appliance can be deployed in two primary modes: Full Transparent and Proxy. Full Transparent mode is recommended for networks where firewall policies are user-based, allowing the IGSA to seamlessly integrate into the existing network infrastructure without requiring significant changes to network configurations. In Proxy mode, the IGSA acts as an intermediary for all network traffic, providing granular control and inspection capabilities. The device's core function is to scan for and neutralize malicious content, including viruses, spyware, and spam, before it can penetrate the internal network or spread from within. It also offers content filtering capabilities to manage inappropriate web access and URL filtering to block access to known malicious websites.
The IGSA M-Series appliance is designed for robust performance and reliability. While specific processor, RAM, and storage details are not explicitly listed in the provided document, the appliance is built to handle significant network traffic and complex security operations. The physical interface includes standard network ports (LAN Ports), a serial connection for console access (DB9), and USB ports for potential peripheral connections or data transfer. Power is supplied via a standard AC power receptacle. The front panel features an LCD module for displaying critical information, such as the IP address, and a removable bezel. The LCD console includes five control panel buttons: Up arrow, Down arrow, Left arrow, Right arrow, and Enter (center arrow). These buttons facilitate navigation through the LCD menu and input of configuration settings. LED indicators provide visual feedback on the appliance's status. The device also includes a Power Switch for controlling power and a Reset Button for system resets. The appliance is designed for rack mounting, utilizing side rails and slide sets for secure installation in a 4-post rack.
The IGSA is designed for ease of installation and configuration. The Quick Start Card outlines a nine-step process, beginning with unpacking and verifying contents, selecting a deployment method, mounting the appliance, and cabling. Initial setup involves obtaining an IP address, which can be assigned dynamically via DHCP (default) or statically. The LCD console allows for basic configuration, including setting the IP address. For more advanced configurations, users access a web-based management console via HTTPS. The default administrator password for the web console is "admin." Through the web console, administrators can perform essential tasks such as updating scan engines and pattern files, changing the web console password, setting the administrator's email address for notifications, and configuring the regional time zone. The appliance also supports the configuration of static routes for networks with multiple segments. The LCD console's navigation buttons (Up, Down, Left, Right, Enter) allow users to cycle through alphanumeric characters, move the cursor, and confirm selections, providing a direct interface for initial setup and monitoring.
Maintenance of the IGSA primarily involves regular updates of scan engines and pattern files, which are crucial for maintaining effective protection against evolving threats. These updates are typically performed through the web console. The appliance's design facilitates physical maintenance, such as rack mounting and cabling. The inclusion of a serial console port (DB9) allows for direct, out-of-band access for troubleshooting and configuration, which can be vital if network access to the web console is unavailable. LED indicators on the front panel provide immediate visual cues regarding the appliance's operational status, aiding in quick diagnosis of potential issues. The power switch requires a 5-second depression to power off the device, a safety feature to prevent accidental shutdowns. The comprehensive documentation, including the Getting Started Guide and online help, provides detailed instructions for installation, configuration, and troubleshooting, empowering administrators to maintain the appliance effectively. Support contact information for various regions (US, APAC, Latin America, Europe) is readily available, offering channels for technical assistance via email and phone.
| Brand | Trend Micro |
|---|---|
| Model | InterScan |
| Category | Gateway |
| Language | English |