SETUP INSTRUCTIONS
INSTALL BATTERY
To open the battery compartment, turn the meter over and push up the flange on the bottom of the
battery compartment cover. Lift and remove the cover and set it aside. Plug the included 9V battery
into the wired socket inside the compartment. The terminals of the battery and the socket mate in
only one way, with the smaller male terminal plugging into the larger female terminal. Close the
battery compartment by replacing its cover and snapping it shut.
OPERATING INSTRUCTIONS
1. POWER ON: To power on the TMM, slide the Power/Scale switch on the back of the meter to
the HIGH position.
Moving the switch should cause some or all of the LEDs on the front panel to
illuminate in sequence from bottom to top. If no LEDs light up, you can assume that
the battery is dead and must be replaced.
The number of LEDs that light up corresponds to the remaining battery life. If all eight
LEDs light up, that means the battery is fully charged. If only a few light up, the
battery is weak and should be replaced soon.
A few seconds after the LEDs light up, they will go dark. If most of the LEDs light up at
power on, the HIGH LED at the upper right will light and remain lit. If only a few LEDs
lit up, the HIGH light will blink, indicating a weak battery that should be replaced.
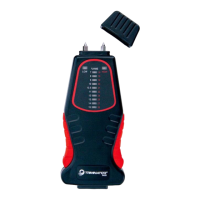
2. CALIBRATE: To check the calibration of the TMM, power on the meter by sliding the
Power/Scale switch to the HIGH position. Remove the protective cap from the top of the
meter, taking care not to stab yourself with the two sharp pins beneath the cap. Then turn the
cap over and place its two holes over the two pins. If the meter is calibrated, an LED at the
18%, 19%, 20%, 21%, and 22% positions on the HIGH scale will illuminate.
Triminator Moisture Meter User Guide 6