7
l. If a circular saw features a riving knife it must be removed before
plunge cutting. A riving knife will interfere with a plunge cut causing
kickback. The riving knife must always be re-fitted after plunge
cutting. A circular saw with a permanent, non-removable riving knife
is NOT suitable for plunge cutting.
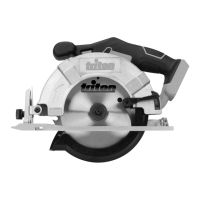
Product Familiarisation
1. Front Handle
2. Plunge Lock Button
3. Dust Extraction Port
4. Main Handle
5. Trigger Switch
6. Rear Bevel Lock
7. Speed Dial
8. Rear Parallel Guide Clamp
9. Rear Fine Adjustment Cam
10. Anti-Kickback Device
11. Brush Access Caps
12. Base Plate
13. Track Sight Panel
14. Track Lock
15. Front Fine Adjustment Cam
16. Front Parallel Guide Clamp
17. Front Bevel Lock
18. Depth Lock
19. Spindle Lock
20. Mode Selection Lever
21. Hex Key
22. Blade Housing
23. Width of Cut Indicators
Intended Use
Circular saw for freehand and track-bound operation, performing light
to medium-duty plunge cuts into wooden floorboards, countertops, and
similar materials.
Unpacking Your Tool
• Carefully unpack and inspect your tool. Familiarise yourself with all
its features and functions
• Ensure that all parts of the tool are present and in good condition
• If any parts are missing or damaged, have such parts replaced
before attempting to use this tool
Before Use
Dust Extraction
• The saw is fitted with a 35mm (1-
3
⁄8")dia Dust Extraction Port (3)
suitable for use with Triton Dust Extraction System (TTSDES) or for
connection to a vacuum system
• See page 9 for details of the Triton Dust Extraction System
Mode Selection
See image A
The mode selector barrel enables fast and easy setting of the major
functions simply by rotating the Mode Selection Lever (20) to the
required mode of operation:
Blade change
Free plunge, for general cutting
Scribe, for a scribe cut of 2.5mm (
3
⁄32") depth
For details of use, see the relevant section in this manual.
Workpiece support
• Large panels and long pieces must be well supported close to both
sides of the cut to avoid pinching and kickback
• Place the workpiece ‘best’ face down, so that if any splintering occurs,
it is more likely to occur on the face that is less visible
Operation
Setting scribe mode
Scribe mode locks the depth of cut at 2.5mm (
3
⁄32"). An initial scribe cut
helps to prevent friction on the blade, particularly when deep plunge
cuts are required. It is also useful for the initial cut on veneered or
melamine laminates.
• Rotate the Mode Selection Lever (20) to Scribe position
• The plunge depth is now locked so that the blade cannot be plunged
deeper than 2.5mm (
3
⁄32")
Setting depth of cut
See image B
• Depth of cut may be adjusted from 0 – 55mm (2-
11
⁄64"). The depth can
be set by direct reference to the depth scale, which has been calibrated
to take account of the track, so no additional calculation is required
• For best results, less than a full blade tooth should be visible below
the workpiece
1. Loosen the Depth Lock (18) and move it along the depth scale until
the pointer aligns with the cut depth required
2. Tighten the Depth Lock firmly
3. The saw will now be able to plunge to the set depth (when in free
plunge mode)
Note: When accuracy is critical, use a set square to check the depth
and make test cuts on a scrap piece of material.
Adjusting the bevel angle
See image C
• The bevel angle may be adjusted from 0° - 48°
1. Loosen the Front and Rear Bevel Locks (6 & 17)
2. Pivot the body of the saw until the bevel angle pointer adjacent to
the Front Bevel Lock aligns with the bevel angle required on the
bevel scale
3. Tighten the Front and Rear Bevel Locks firmly
4. The saw is now secured ready for cutting at the bevel angle required
Note: When accuracy is critical, use a set square to check the angle and
make test cuts on a scrap piece of material
IMPORTANT: When making bevel cuts, it is essential to lock the saw in
the track. See ‘Making bevel cuts’ below for details.
Setting the speed
See image D
• The speed can be adjusted using the Speed Dial (7). This enables you
to optimise the cutting speed to suit the material
• The chart below provides a guide to choice of speed for different
materials:
Type of material Speed setting
Solid wood (hard or soft) 4-6
Chipboard 5-6
Laminated wood, blockboard, veneered & coated board 2-5
Hardboard 1-4
Assembling & fixing the track
• For guidance on assembling and securing the track and use of other
accessories, please see the ‘Accessories’ section of this manual.
• Using the fine adjustment cams
• The Front and Rear Fine Adjustment Cams (9 and 15) enable you to
224627_Manual_26.09.17.indd 7 26/09/2017 10:38

 Loading...