7
cutting whatever is in its path. Be aware of the time it takes for the blade to stop after the
trigger switch is released
w) Periodically check that all nuts, bolts and other fixings have not become loose, and tighten
where necessary
The tool must be used only for its prescribed purpose. Any use other than those mentioned
in this manual will be considered a case of misuse. The user, and not the manufacturer, shall
be liable for any damage or injury resulting from such cases of misuse.
The manufacturer shall not be liable for any modifications made to the tool nor for any damage
resulting from such modifications. Even when the tool is used as prescribed it is not possible to
eliminate all residual risk factors.
Battery Safety
WARNING: Li-Ion batteries, if incorrectly used, stored or charged are a fire, burn and
explosion hazard.
• Keep the battery out of reach of children
• ONLY charge Li-Ion batteries using the charger provided or designed specifically for your
product
• ONLY use Li-Ion batteries provided with a product or specifically designed to be compatible
• Allow batteries to cool for 15 minutes after charging or heavy use. Failure to follow these
instructions may cause overheating or fire
• When not in use batteries should be stored at room temperature (approximately 20˚C)
• Ensure that battery contacts cannot accidentally short in storage. Keep batteries clean;
foreign objects or dirt may cause a short. Keep away from other metal objects, for example,
paperclips, coins, keys, nails and screws
• Under abusive conditions, liquid may be ejected from the battery. This liquid may cause skin
irritation or burns. Avoid contact. If contact accidentally occurs, flush with water. If liquid
contacts eyes, seek medical help
• DO NOT open, disassemble, crush, heat above 60°C or incinerate. Do not dispose of in
fire or similar
Battery Charger Safety
Use the battery charger correctly
• Refer to the section of this manual relating to use of the battery charger before attempting
to charge the battery.
• Do not attempt to use the charger with any batteries other than those supplied. Keep your
battery charger clean; foreign objects or dirt may cause a short or block air vents. Failure to
follow these instructions may cause overheating or fire
• If the supply cord is damaged, it must be replaced by the manufacturer, its service agent or
similarly qualified persons in order to avoid a hazard
• Examine the battery charger regularly for damage, especially the cord, plug and enclosure.
If the battery charger is damaged, it must not be used until it has been repaired
• Children should be supervised to ensure that they do not play with the appliance
WARNING: DO NOT attempt to recharge non-rechargeable batteries.
Battery and charger safety features
The battery and charger are fitted with a number of safety features which may be triggered
during charging or operation:
• Over-charge protection: Charger automatically switches off when the battery has reached
full charge capacity, protecting the internal components of the battery
• Over-discharge protection: Prevents the battery from discharging beyond the recommended
lowest safety voltage
• Over-heat protection: Sensor switches off if the battery becomes too hot during operation.
This can happen if the tool is overloaded or being used for extended periods of time. Up to
30 minutes cooling time may be required depending on the ambient temperature
• Overload protection: Battery temporarily stops if it is overloaded or the maximum current
draw is exceeded, protecting the internal components. The battery will resume normal
operation when the current draw returns to a normal safe level. This may take a few
seconds
• Short circuit protection: The battery will stop working immediately if a short circuit occurs,
this prevents damage to the battery or tool
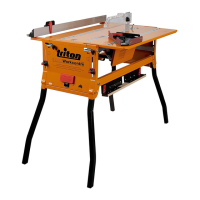
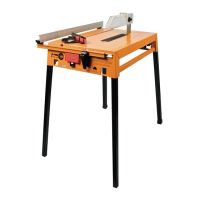
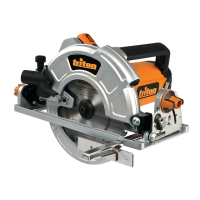
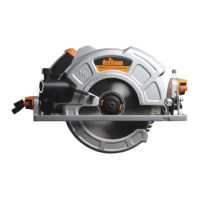
Product Familiarisation
1. Front Handle
2. Lock Off Button
3. On/Off Trigger
4. Main Handle
5. Battery Release
6. Battery
7. Battery Slot
8. Fixed Guard
9. Dust Port
10. Battery Charge Indicator
11. Blade
12. Lower Guard Lever
13. Blade Securing Bolt
14. Base Plate
15. Blade Flange
16. Lower Guard
17. Direction Indicator
18. 0° Line
19. 45° Line
20. Guide Locking Knob Thread
21. Guide Slot
22. Bevel Angle Locking Knob
23. Depth Locking Knob
24. Depth Scale
25. Bevel Angle Gauge
26. Direction Indicator
27. Motor Vents
28. Spindle Lock Button
29. Red LED
30. Charger DC Socket
31. Green LED
32. Battery Charger
33. Charger PSU
34. PSU DC Plug
Note: This manual may be supplied with different package configurations including bare tools
and supplied accessories may vary.
Intended Use
Hand-held battery-powered electric circular saw for cross, rip and bevel cutting of hard and
softwood timber and sheet material. Suitable for creating pocket/plunge cuts when used
carefully by a skilled operator.
Unpacking Your Tool
• Carefully unpack and inspect your tool. Familiarise yourself with all its features and
functions.
• Ensure that all parts of the tool are present and in good condition. If any parts are missing
or damaged, have such parts replaced before attempting to use this tool.
Before Use
Dust extraction
• For a cleaner, safer work environment and to protect the tool from dust and over-heating,
ensure the Dust Port (9) and Motor Vents (27) are kept free of wood chippings and dust.
Regularly clean the area of the tool with a vacuum where a dust extraction system cannot
be fitted or used
Note:
The supplied blade comes pre-fitted, make sure the Blade Securing Bolt (13) is securely
tightened before first use
Removing a battery
• To remove the Battery (6) from the tool, press the Battery Release (5), then slide the
Battery out of the Battery Slot (7)
WARNING: DO NOT try to remove the Battery without pressing the Battery Release button. The
tool or Battery could be damaged.
Fitting a battery
1. Fit a battery by sliding it on to the Battery Slot (7) of the tool until it clicks and locks into
position
Note: Make sure the Battery and tool are lined up correctly. If the Battery does not slide into
the tool easily, do not force it. Instead, slide the Battery out of the tool again, check the top of
Battery and the tool battery slot are clean and undamaged and that the contacts are not bent.
286855_Z1MANPRO1.indd 7 13/07/2015 17:15

 Loading...