ONE QR TWO THREADS \1
PROTRUDING ABOVE
THE RECTANGULAR NUT
)/
o
-R
ECTANGU LAR
B NUT
I
Photo 5-14: The c
orr
ect distance to unscrew the
Forward Clutch Rod
-o
ne or two threads above the
rectangular nut.
3. Remove the belt cover.
4. Slip the forward
dr
ive belt off the en
gin
e-
driven pulley by pushing it off with your left hand
while pulling the engine starter rope with your
right hand (pulling on the starter rope makes the
pulley turn, aiding you in removing the belt).
Photo
5-15
: Slipping the Forward Drive Belt off the
engine-driven pulley
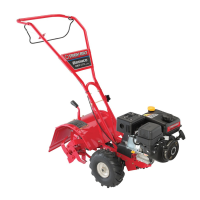
5. On the LEFT side of the tiller (as viewed from
the operato r's position) remove the hairpin cotter
from the clevis pin that connects the forward idler
arm to the forward adjustable link.
'FORWARD
l
aL
ER
ARM
Photo 5
-16
: Removing the Clevis Pin from the
Forward Idler Arm.
40
6. Push inward on the forward idler arm and re-
move the clevis pin.
7. Note the two holes in the forward adjustable
link. Push inward on the forward idler.arm and in-
stall the clevis pin through the
ins
ide
hole in the
fo rward adjustable link and bac k throug h the
hole in the idler arm. Secure the clevis pin with
the hairpin cotter.
IMPORTANT
While pushing inward on the forward idler arm,
make
certa
in
that
the forward
drive
belt is
pushed off to the right-hand side of the tiller.
This creates more room to install the clevis pin
when you push the forward idler arm inward.
8. Place the forward drive belt in the grooves of
both the engine drive pulley and the transmis-
sion pulley. Be sure the forward drive belt is to
the inside of the metal belt guide (on the right-
hand side of the tiller). A
lso-be
sure the forward
drive belt is to the inside of the forward drive idler
pulley (on the left-hand side of the tiller) .
~
WIRE Ee RM
BEI!1i GUIDE
9. Readjust the forward drive belt tension by fol-
lowing
the
instructions
in "Handlebar
Height
Adjustment" in Section 3.
10. Reinstall the belt cover and secure it in place
with the two nuts.
IMPORTANT
With the clevis pin installed in the inner hole in
the forward adjustable link, you will be limited
in the number of future belt tension adjust-
ments you can make. When the time comes,
in future belt tensio n ad
just
ments , that you
can not
screw
the Forward Clutch Rod any
farther into the rectangular nut in the Forward
Clutch bracket, you must replace the forward
drive belt. Before installing a new belt, be sure
to return the clevis pin to the ou
tside
hole in
the adjustable link.