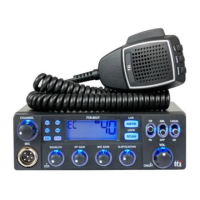
The TCB-881N is a 4W mobile CB transceiver designed for reliable performance across various operating conditions. It features a rugged build chassis, PCBs, and components, ensuring durability. The transceiver prioritizes user convenience with an ergonomic layout of knobs and buttons, complemented by user-friendly graphic displays for quick adaptation and easy operation. A newly implemented menu mode enhances the user experience, particularly for professional users. The device also boasts an elegant and luxurious blue LED light that supports its face design, making it aesthetically pleasing for any vehicle interior.
Function Description
The TCB-881N operates as a mobile CB transceiver, allowing for two-way radio communication. Its primary function is to transmit and receive signals on the Citizens Band (CB) radio frequencies. The device supports both AM and FM modes, depending on the selected frequency band and national regulations.
Usage Features
Channel Selection and Monitoring:
- Channel Selector: A rotary knob allows users to select channels one by one by turning it right or left.
- Quick Up/Quick Down Selector: This selector increases or decreases channel numbers by 10 steps, providing faster navigation through channels.
- Dual Watch (DW): Pressing the DW button momentarily enables monitoring of two pre-selected and memorized channels. The DW icon blinks during setup and remains displayed when active. To set dual watch, press DW on the primary channel, then select the secondary channel using the channel selector or quick up/down selector, and press DW again. To stop, press DW momentarily. If the PTT button is pressed while receiving a signal in dual watch mode, the transceiver transmits on the displayed channel. If no signal is present, it transmits on the primary channel.
- Emergency Scan: Long-pressing the DW button for about two seconds initiates emergency scanning, where the transceiver visits the emergency channel (CH 9) once every second. This scanning can be deactivated by pressing the scan button.
- Memory Channel Selectors (M1-M4): Momentary presses provide direct access to pre-memorized channels (Memory Recall). The LCD displays the corresponding memory number icon (M1, M2, M3, or M4). To memorize a channel (Memory Store), select the desired channel and press one of the memory channel selectors for more than 3 seconds. The channel is then memorized, and the transceiver operates on it. When a selected channel matches a memorized one, the memory number icon blinks.
- Emergency / Noise Blanker (E/NB) Button:
- Emergency: A momentary press switches the transceiver to the emergency channel (CH 9), displaying the "EMG" icon. In this mode, channel selectors and memory channel selectors are disabled. Pressing the button again returns to the previous operation mode.
- Noise Blanker (NB): A long press activates an effective noise limiter circuit to reduce electrical impulse interference from sources like engine ignition systems, improving reception of weak signals in noisy conditions. Long-pressing again deactivates it. It's recommended to deactivate NB if there's no interference, as it can influence sensitivity.
- Scan/Lock Button:
- Scan: A momentary press starts scanning upward to find occupied channels. The "Scan" icon appears when active. Scanning stops only when deactivated. Turning the channel selector counter-clockwise during scanning changes the scanning direction. If a valid signal is detected, the scan pauses for a period set in the menu mode (continuous reception or 1-99 seconds for scan receive time, and immediate response or 1-99 seconds for scan delay time). Pressing the PTT button during scanning returns the radio to the original channel.
- Lock: Pressing this button for more than 2 seconds activates or deactivates the keypad lock function. This locks only the channel selector, quick up/quick down buttons, AM/FM button, and scan button, while other buttons and selectors remain functional.
- AM/FM and LCR Button: In UK, UE, or EC frequency band modes, this button activates or deactivates the Last Channel Recall (LCR) function. In other modes (where national regulations permit), it allows users to switch between AM and FM modes with a momentary press.
- CB/PA Selector: This selector should be in the "CB" position for normal CB transceiver operation. Selecting "PA" (Public Announcement) allows the transceiver to function as an audio amplifier, with speech transmitted through PA speakers via the PTT button.
- ANL/OFF Selector: In "ANL" (Automatic Noise Limiter) position, the transceiver reduces impulsive noise from vehicle engines or external sources. This feature works only in AM mode.
- Local/DX Selector: For receiving weak signals, the selector should be in the "DX" position. For strong signals, the "Local" position provides attenuation for better audio quality.
Audio and Gain Control:
- Volume and Power On/Off Knob: Turning this knob clockwise switches on the transceiver (after a click sound) and increases the audio volume.
- Microphone Gain Knob: Adjust this knob clockwise or counter-clockwise to optimize microphone gain, ensuring the best sound quality at an optimum distance from your mouth.
- RF Gain Knob: Turn this knob clockwise for better RF gain. When signals are very strong, turning it counter-clockwise can decrease sensitivity.
- Squelch Control Knob:
- Main Squelch Control: Turn counter-clockwise until background noise is heard, then turn slightly clockwise until the noise disappears to achieve the best receive sensitivity.
- DSS (Dynamic Squelch System): Turn the knob counter-clockwise until a click sound is heard to activate DSS. To return to manual squelch, turn clockwise until a click sound is heard, then follow the manual squelch setting procedure.
The menu setting mode allows users to program preferences and activate advanced functions. To access it, press the Lock button on the microphone while turning on the transceiver.
- Navigation: Use the Channel Selector to select main menu features (Beep Tone, Time-out Timer, Scan Receive Timer, Scan Delay Timer, Backlight Dimmer).
- Value Setting: Use the AM/FM button to enter the value setting level.
- Value Adjustment: Use the Channel Selector to change blinking values.
- Return to Menu: Use the SCAN button to return to previous main menu features.
- Confirmation: Press the Lock or PTT button on the microphone to complete selections and return to standby mode. Alternatively, selections are automatically confirmed after 5 seconds. Using the Scan button to return to the main menu also confirms selected values.
Operating the Transceiver:
- Ensure the microphone is connected to its socket.
- Verify the power cable is properly connected.
- Confirm the antenna is connected to the antenna receptacle.
- Turn the squelch control knob fully counter-clockwise initially.
- Turn on the transceiver and adjust the volume.
- Adjust the squelch control knob to the optimum level.
- Select the desired channel.
- To transmit, press the PTT button and speak into the microphone.
- Release the PTT button to receive.
Band Selection:
To select the operating band, press the AM/FM and Scan buttons simultaneously while turning on the transceiver. Use the channel selector to choose the desired band. The transceiver is factory-shipped with the "EC" band setting. Press the PTT button or wait 5 seconds for the selection to complete and enter transmit/receive mode.
Maintenance Features
Installation:
- Location Planning: Choose a location for the transceiver and microphone that is convenient for operation and does not interfere with the driver or passengers. Ensure all controls are easily accessible.
- Mounting: The transceiver can be mounted horizontally or vertically using the supplied bracket, which can be fitted above or below the case.
- Place the mounting bracket in the desired location.
- Drill holes and fix the bracket.
- Connect the antenna cable plug to the "ANT" receptacle on the transceiver.
- Connect the power cable directly to the vehicle battery or fuse box. Observe polarity: Red for positive (+), Black for negative (-). Connecting the negative lead directly to the vehicle body is preferable.
- Connect the power cable to the transceiver.
- Mount the microphone bracket on one side of the transceiver or nearby using the included screws.
- Connect the microphone to the transceiver's microphone receptacle.
Antenna Installation:
- Quality: Use a high-quality, high-efficiency 27MHz antenna. A poor or unsuitable antenna can lead to poor performance and potential damage to the transceiver.
- Placement: Mount the antenna as high as possible, ideally in the center of the selected surface.
- Grounding: Ensure a solid metal-to-metal ground connection.
- Cable Care: Be careful not to damage the cable during installation.
- Warning: Never operate the transceiver without a proper antenna connected to prevent damage.
Troubleshooting:
- Initial Checks: If problems occur (no transmission, poor reception, weak/no sound), first check the power supply connection, microphone, and antenna connections.
- Reset Procedure: If issues persist, reset the transceiver:
- Switch off the transceiver.
- Press the DW and E/NB buttons simultaneously.
- While holding these buttons, switch on the transceiver.
- Press the PTT button on the microphone to complete the reset.
This procedure erases all memories and restores factory settings, often resolving common problems. If difficulties continue, consult a dealer or the manufacturer's website.
Safety Requirement:
- Power Supply: The power cable is for 12V/24V DC only. Ensure the transceiver is off before connecting the power leads.
- Polarity: Always observe polarity: Red for positive (+), Black for negative (-), even though the unit is protected against accidental inversion.
- Grounding: The unit must be wired for negative ground only.
- Antenna: Do not operate the CB radio without connecting a proper antenna to avoid damage.