EasyManua.ls Logo

U-Line H-573 - User Manual

U-Line H-573
3 pages
Print Icon
To Next Page IconTo Next Page
Loading...
PAGE 1 OF 3 0321 IH-573
H-573
DELUXE STRAPPING
TENSIONER
1- 80 0 -295 - 5510
uline.com
THREADING TENSIONER (See Figure 1)
1. Wrap both ends of strapping around product.
2. Squeeze handle and base together.
3. Insert the shorter end of strapping under the gripper plate and cutter
wheel leaving approximately 5" of strapping off the front end.
4. Release handle and base.
5. Feed the other end through the cutter wheel and up through the windlass.
6. Pull strapping as tight as possible.
TENSIONING (See Figure 2)
1. Move tension lever forward and back to begin tensioning.
2. Continue back and forth motion until strapping has reached desired
tension.
SEALING
1. Seal should be placed open side down on top of both ends of strapping.
2. Close nose of sealer around seal.
3. Crimp tightly around strapping.
REMOVING EXCESS
1. Squeeze handle and base together to cut strapping.
2. Slide tool off to the right.
MAINTENANCE
Tools need to be cleaned and maintained periodically with a steel brush or
dry compressed air. Lubricate all moving parts with light machine oil.
Figure 1
Figure 2
OPERATION
Tension Lever
Windlass
Cutter Wheel
Gripper Plate
Base Handle
Para Español, vea página 2.
Pour le français, consulter la page 3.
Question and Answer IconNeed help?

Do you have a question about the U-Line H-573 and is the answer not in the manual?

U-Line H-573 Specifications

General IconGeneral
BrandU-Line
ModelH-573
CategoryPackaging equipment
LanguageEnglish

Summary

Operation Guide

Threading Tensioner

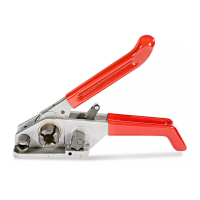
Guide for threading strapping through the tensioner, involving wrapping and insertion steps.

Tensioning

Instructions for using the tension lever to apply the desired tension to the strapping.

Sealing

Steps to position and crimp the seal securely around the strapping for a finished product.

Removing Excess

Procedure to cut excess strapping and slide the tool off the secured strapping.

Maintenance

Details on periodic cleaning with a brush or air, and lubricating moving parts.

Related product manuals