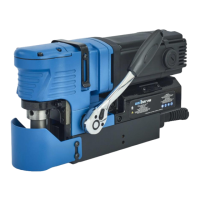
The Unibor ELP50/1 is a magnetic drilling machine designed for drilling holes in ferrous metals. Its primary function is to securely hold the drill in place using a magnet while the drilling operation is performed. This machine is suitable for various applications, including fabrication, construction, railways, and petrochemical industries. It is CSA approved, ensuring it meets specific safety and performance standards.
Technical Specifications:
- Model Number: ELP50/1
- Maximum Hole Cutting Capacity (in .2/.3C steel): 2" diameter x 2" deep
- Arbor Bore: 3/4" diameter
- Voltages: 120V 50-60Hz
- Normal Full Load: 10 A
- Electro Magnet: 0.53A
- Magnet Size: 7-9/16" long, 3-1/4" wide
- Holding Force (at 20°C with 1” minimum plate thickness): 2250 lbs
- Note: Magnetic performance decreases with material less than 1" thick. For thinner materials, substitute material should be placed under the magnet, or an alternative secure restraining method must be used.
- Overall Dimensions:
- Height (minimum): 7"
- Width (including Capstan fitting): 3-15/16"
- Length Overall (including Guard): 13"
- Nett Weight: 24 lbs
- Vibration Total Values (triax vector sum) in accordance with EN62841-1:
- Vibration Emission Value a W: 5.782 m/s²
- Uncertainty(K): 1.5m/s²
- Level of Sound Pressure in accordance with EN62841-1:
- LpA: 85 dB(A)
- LwA: 98 dB(A)
- Uncertainty(K): 3dB(A)
- Power Supply: Suitable only for a single phase 50-60Hz A.C. power supply. DO NOT USE ON D.C. SUPPLY. Using D.C. current will earth back through the magnet and cause irreparable damage.
- Extension Cable Recommendation (for 120v supply): 11.5ft of 3 core x 5/64"² (14AWG) to avoid loss of magnetic traction and power reduction.
Usage Features:
- Safety First: The manual emphasizes reading and understanding all instructions to prevent electric shock, fire, and personal injury. It highlights the importance of keeping the work area clean and well-lit, avoiding explosive atmospheres, and keeping bystanders away.
- Electrical Safety: Grounded tools must be plugged into properly installed and grounded outlets. Users should avoid body contact with grounded surfaces, keep power tools away from rain or wet conditions, and never abuse the cord. Outdoor extension cords marked "W-A" or "W" should be used when operating outside.
- Personal Safety: Operators must stay alert, wear appropriate clothing (no loose items), contain long hair, and use safety equipment such as eye protection, dust masks, non-skid safety shoes, hardhats, or hearing protection. Accidental starting is prevented by ensuring the switch is off before plugging in. Adjusting keys or switches must be removed before turning the tool on.
- Tool Use and Care: Workpieces should be secured with clamps. The correct tool should be used for the application. The tool should not be used if the switch is faulty. Disconnect the plug before making adjustments, changing accessories, or storing the tool. Idle tools should be stored out of reach of children. Tools must be maintained with care, keeping cutting tools sharp and clean.
- Safety Chain: Always use a safety chain as the mounting can release.
- Cutter Mounting: The machine accepts cutters with 3/4" diameter Weldon shanks. Cutters are mounted by laying the machine on its side, winding the arbor to its lowest point, inserting the pilot through the cutter shank, aligning drive flats with socket screws, and tightening with a hexagon key.
- Operational Procedures:
- Ensure the magnet is OFF before plugging in.
- Do not use in wet/damp conditions or flammable atmospheres.
- Inspect all electrical supply cables for damage.
- Always check the function of all operational systems and switches.
- Securely restrain the machine to a fixed independent feature using a safety strap (RD4329B) to prevent free movement if the magnet detaches.
- Wear approved eye protectors, ear defenders, and recommended PPE.
- Disconnect from power source when changing cutters or working on the machine.
- Protect hands when handling sharp cutters and swarf.
- Ensure cutter-retaining screws are secured tightly.
- Regularly clear swarf and dirt from the work area and magnet base.
- Remove jewelry and secure long hair.
- If the cutter gets stuck, stop the motor immediately, disconnect power, and turn the arbor to and from. Do not attempt to free the cutter by switching the motor on and off.
- After accidental drops, thoroughly examine the machine for damage.
- When using the machine inverted, use minimal coolant and prevent it from entering the motor unit.
- Position the guard over the cutter before activating the machine.
- Slugs will be ejected upon completion of a cut; do not operate the machine as ejected slugs can cause injury.
- Store the machine in a safe and secure location when not in use.
- Only approved UNIBOR™ agents should conduct repairs.
- Drilling Operation:
- Keep the inside of the cutter clear of swarf.
- Ensure the coolant bottle has sufficient cutting oil.
- Occasionally depress the pilot to ensure correct cutting fluid metering.
- Start the machine by following control panel instructions.
- Switch off the motor by depressing the MOTOR stop button, not the MAGNET switch.
- Apply light pressure when commencing the cut until the cutter enters the work surface, then increase pressure. Excessive pressure is undesirable and can activate the safety overload protection device.
- Ensure the slug has been ejected from the previous hole before cutting the next.
- If a slug sticks, move the machine to a flat surface, switch on the magnet, and gently bring the cutter down to make contact with the surface to straighten and eject the slug.
- Apply light oil lubricant regularly to the slide and arbor support bearing.
- Cutter breakage is often due to insecure anchorage, a loosely fitting slide, or a worn bearing.
- Only use approved cutting fluid.
- Pipe Adaptor Kit (RD2311) Fitting Instructions:
- Attach adjustable angle plates (RD3328) with cap screws (RD4325) and washers (RD4205) to the magnet sides, but do not tighten initially.
- Locate the machine on the pipe's centerline, ensuring the magnet aligns with the pipe's longitudinal axis.
- Switch on the magnet and move the sliding plates down to the pipe's outside diameter.
- Tighten the screws on both sides by hand, ensuring the full length of the moving plates touches the pipe at the front and back.
- Fasten the plate securely and feed the safety strap through the lugs around the pipe, pulling it tight.
- When cutting, do not use excessive pressure; allow the cutter to ease into the surface.
Maintenance Features:
- General Maintenance: Keep the machine in good working order. Before any job, check for damaged or loose parts and tighten them. Always disconnect the power supply before maintenance.
- Visual Check for Damage (Every Operation): Inspect the machine for any signs of damage, especially the mains cable. Do not use if damaged.
- Operation Check (Every Operation): Ensure all components are working correctly.
- Brush Wear Check (Weekly, if used frequently): Check for abnormal wear. Replace brushes if worn more than 2/3 of their original length to prevent machine damage.
- Magnetic Base Check (Every Operation): Ensure the base is flat and undamaged. An uneven base reduces magnetic holding efficiency and can cause injury.
- Grease Check (Monthly): Check gearbox grease to ensure all moving components are covered to prevent wear. Change grease at least once a year.
- Armature Check (Monthly): Check for visual signs of damage to the body or commutator. Some commutator wear is normal, but abnormal damage requires replacement.
Included Accessories (from the parts list):
- 4mm Hexagonal Wrench (RDF4030) - Quantity: 2
- Coolant Bottle (RDF4031) - Quantity: 1
- Ratchet Handle (RDF4032) - Quantity: 1
- Safety Strap (RD4329B) - Quantity: 1
- Safety Goggles (RDF4033) - Quantity: 1
- Carbon Brush Set (RDF3005) - Quantity: 1
Warranty:
Unibor™ warrants its machines against faulty parts under normal usage for 12 months from the initial purchase date. Other parts (excluding cutters) have a 90-day warranty, provided the warranty registration is completed within 30 days of purchase. Failure to register voids the warranty. Unibor™ will repair or replace faulty items at its option.
The warranty does not cover:
- Components subject to natural wear and tear not in accordance with operator instructions.
- Defects caused by non-compliance with operating instructions, improper use, abnormal environmental conditions, overload, or insufficient servicing/maintenance.
- Defects caused by using non-original Unibor™ accessories, components, or spare parts.
- Tools with changes or additions.
- Electrical components are subject to the manufacturer's warranty.
Online registration is available at www.Unibor.co.uk. Warranty claims require submission of the complete tool with the original sales receipt and a complaint form (available online). Failure to complete the form will delay the claim. All defective goods must be returned pre-paid. Unibor™ is not liable for subsequent direct or indirect loss or damage. The warranty is in lieu of any other warranty, expressed or implied, including merchantability or fitness for a particular purpose. Unibor™ reserves the right to make improvements and modifications without prior notice.