1. START UP
When the machine has been installed and the hydraulic, electrical
connections have been carried out by a qualied installer
¾ Turning the machine on
Put the main On/Off switch on position 1 (do not put it on position 2 until
the boiler is full).
The On/Off indicator switches on and the boiler level is set automatically.
The water-intake indicator blinks to show that the boiler is lling.
¾ Heating
When the water-intake indicator stops blinking, put the switch on position
2 to start the heating process.
When the correct temperature has been reached, the steam pressure is
approximately 1 bar.
2. HOW TO PREPARE A CAPPUCCINO
- Use a high, narrow container half-full of cold milk (preferably skimmed).
- Keep the end-piece of the steam tube at the surface to obtain a ne
foam.
BE CAREFUL NOT TO BOIL THE MILK
- After each use, clean the steam tube with a wet rag and press
a moment on the steam tap to eliminate the small amount of milk
remaining in the tube.
3. INJECTION-UNIT CLEANING
- Take the 2-cup lter-holder.
- Place the rubber plug (DO-197) inside the lter.
¾ Daily rinsing of decompression circuit
- Insert and tight the lter-holder in the unit.
- Press a coffee key to put the lter-holder under pressure, and then stop
the unit. Repeat this operation several times, each time removing the
water from the lter-holder.
¾ Daily rising of lter-holder joint
- Insert the lter-holder into the unit without tightening it.
- Press a coffee key then tighten and loosen alternately the lter-holder
in order to create a leak at the lter-holder joint to clean it.
¾ Weekly cleaning with detergent pellet
- Put a detergent pellet above the rubber plug then insert and tighten the
lter-holder in the unit.
- Keep pressed the key then press the 2 large cups
Æ Display shows nP
(in chrono mode (C1) press twice before pressing )
- Press again to start the automatic cycle
(2s On / 8s Off – x 10 sequences)
- When the display shows rP: take off the lter-holder from the unit and
wait the end of the rinsing cycle (3x 30 seconds)
- At the stop of the automatic cycle: put back the lter holder without the
plug and without coffee then start a 2 large cups cycle to rinse it
4. DAILY CLEANING AND MAINTENANCE
- The unit is to be ushed prior to putting it into service, or after24 hours
of inactivity. Dispense to the drain :
Through each coffee head and water nozzle 0,5 liter of water
Through each steam nozzle some steam for 1 minute
- Clean the lter-holders and lters with detergent.
- Use a soft rag and alcohol for the stainless steel parts and a non-
abrasive detergent for the painted parts.
DO NOT FORGET TO REGENERATE YOUR WATER SOFTENER
PERIODICALLY
ATTENTION: Air must be able to circulate freely all around the machine.
The ventilation holes located at the rear and on the top of the machine
must not be obstructed.
5. PROGRAMMING
The keys from P1 to P4 can be programmed.
The multiple doses (1 , 2 ou 3 cups ) are calculated automatically from
the programming of one of them on each box
- Set the machine switch to Position 0
- Keep the key P5 pressed and put again the machine on.
Display shows Pn then Pc and Pr by pressing several times the key P5
¾ Pc = Calculated programming
- Insert a lter-holder (with coffee) into the unit
- Install cups
) P5
Display Pc
) P1 à P4 Select the dose to be programed (2c for example)
) P5 Start the infusion cycle
) P5 Press again to stop when the amount of coffee desired
is correct.
Display of the corresponding digital value
( from 00 to 99 )
- Repeat operation at 3 for the other doses (2C for example)
¾ Pn = Digital programming
Quick programming without coffee and/or values carried forward on other
units.
) P5
Display Pn
) P1 à P4 Select the dose to be programed
) P5 Display the digital value of the selected dose
) P1 Increase the value
) P4 Reduce the value
) P5 Memorize the new value
- Repeat operation at 4 for the other doses
¾ Pr = Manual programming
Same proceeding as in calculated programming Pc.
- The manual programming doesn’t calculate the other doses (1, 2 or 3
cups), only the programed dose is modied.
- Caution: any new programming (Pn or Pc) cancel ALL previous
programed values.
- Wait until the program mode is automatically inactivated (from 10 to
15s), or switch off and on again the machine.
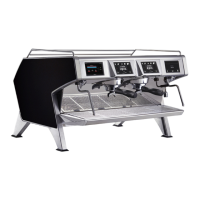
6. STEAM AND HOT WATER ELECTRONIC BOX
¾ Use
- An impulse on the keys 3 to 5 makes the corresponding dose ow:
Hot water keys 3 and 4 – Steam key 5
The led lights in green during an hot water dose delivery, in red for a
steam dose
- You can stop before the end of the dose by pushing again the same key
Note: a safety cuts the ow after 105 seconds
¾ Programming
The programming mode allows the delivery time adjusting for steam and
hot water
- Keep the key PRO (2) pressed on until the led lights in orange.
- Place a container under the appropriate outlet and press the key
(3 to 5) to set
- When the level in the container is convenient press again on the same
key
- Press on PRO (2) to conrm the new adjustment and come out of the
programming mode
Note: the programming mode is automatically switched off after 20
seconds without any action
1: safety level control 3: display
2: continuous / stop 4: on – off switch
1: led
2: programming key
3: hot water small dose
4: hot water large dose
5: steam dose
The SteamAir option allows, particularly when making cappuccino,
to foam the milk very easily and automatically: the supply of air mixed
with steam brings milk to a programmed temperature (60° to 70°) and
foams it.
The stop is done automatically when the temperature is reached which
saves milk from boiling. By this way the milk qualities are preserved.
Once the air/steam adjustment is dened, the operation is as follows:
- Insert the
SteamAir outlet into the milk container
- Push on the
SteamAir key
Wait for it to stop automatically.
The SteamAir box also controls a timed steam and hot water outlet
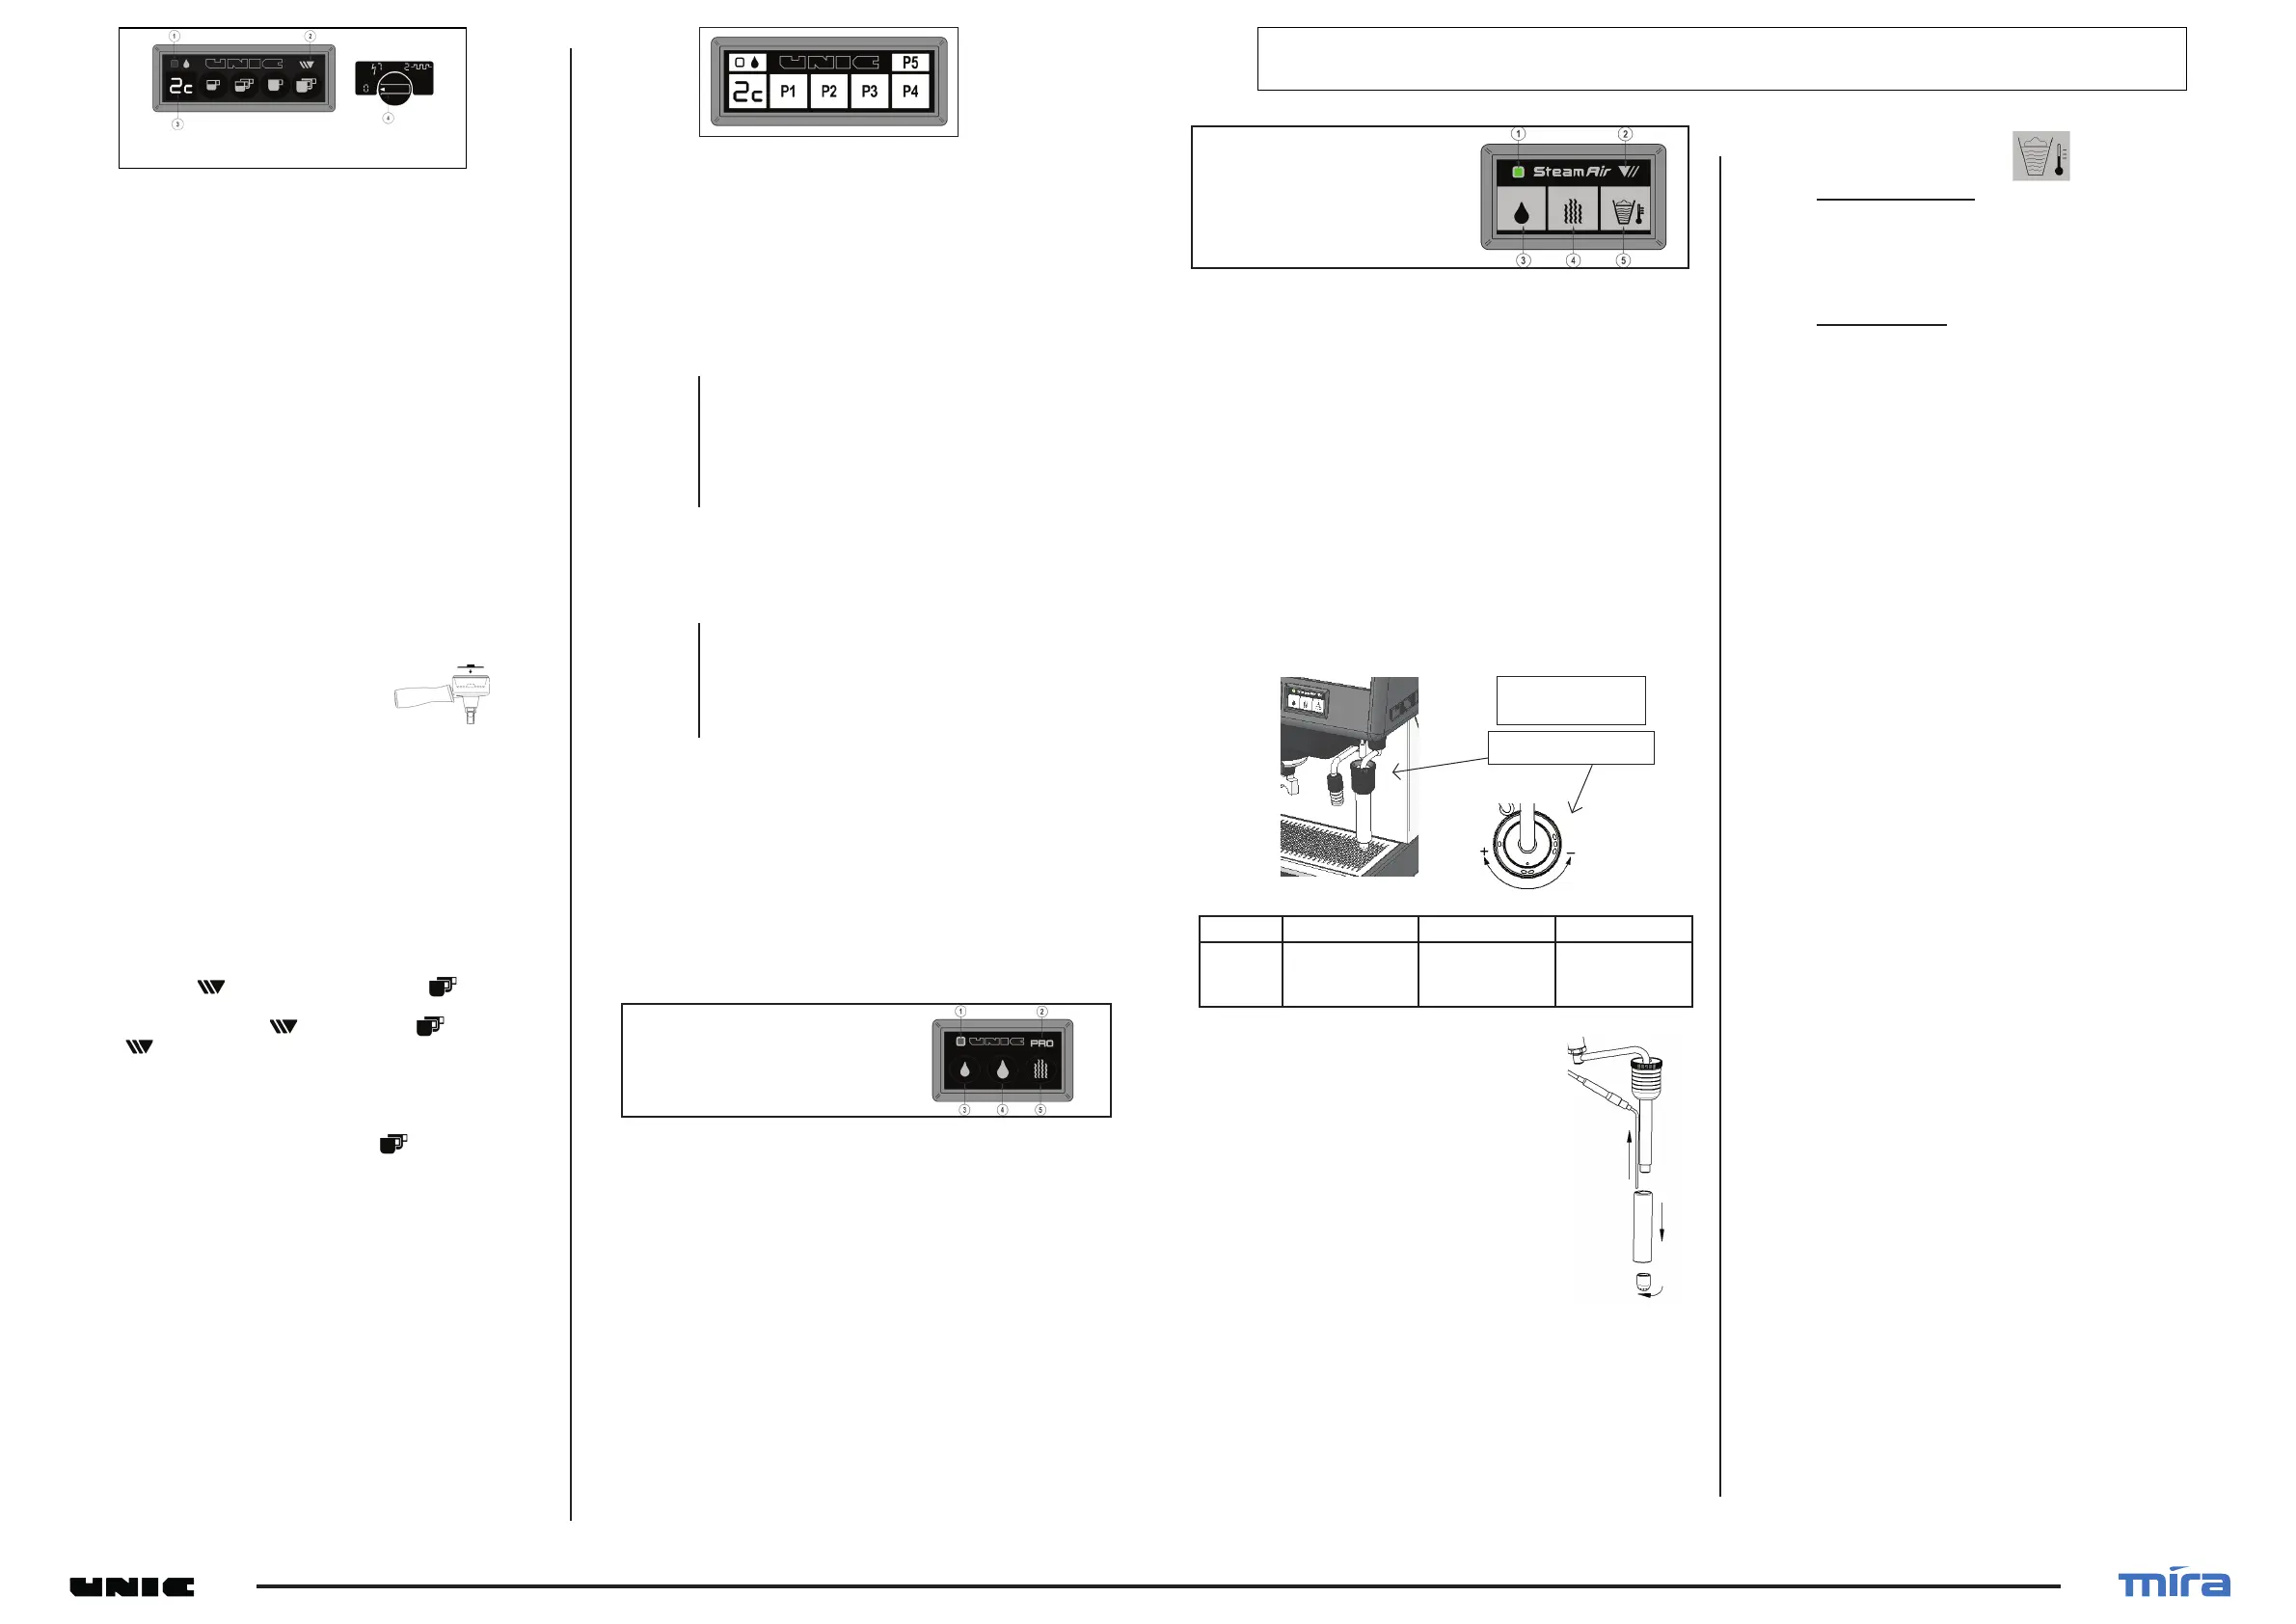
1. COMPONENTS
¾ Outlet cleanning :
2. USE
¾ Steam and hot water keys
An impulse on the key activates the corresponding ow delivery
The led lights in green for an hot water dose and in red for a steam dose
- To stop before the end of the delivery, press again the same key
Note: a safety stops the ow after 105 seconds for the water and after
180 seconds for the steam
1: led
2: programming key
3: hot water dose
4: steam dose
5:
SteamAir
air/steam adjust
SteamAir
outlet
O OO OOO
Steam
only
Level 1
Very ne foam
Level 2
Fine foam
Level 3
Medium foam
¾ SteamAir key
■ Automatic mode: (To reach the programmed T°)
One impulse on the key makes the SteamAir ow until the liquid
reaches the preset temperature (see § 3)
You can stop it manually by pushing again on the key.
■ Manual mode: (Over the programmed T°)
If after the stop in automatic mode (temperature reached) you wish to
continue the heating, you have to press again the key.
Then you go into manual mode and the outlet is again activated.
To stop you will have to push again on the same key.
If you don’t do it, it will be stopped automatically by one of the two
safeties: after 180 seconds or when the liquid temperature reaches 96°
Note: when a safety is switched on, the led blinks.
3. PROGRAMMING
The programming mode allows adjusting the steam and hot water time
together with the
SteamAir level temperature adjustment
¾ Hot water / steam delay time adjustment
To adjust the hot water and steam delay time you have to:
- Switch off the machine by cutting the main switch.
- Keep the programming key (2) pressed on, when switching on until
orange blink of the led which conrms that you have entered the
programming mode
- Place a container under the appropriate outlet and press on the key to
set (3 or 4)
- When the level in the container is convenient press again on the key
- Press on the programming key (2) to conrm the new adjustment and
come out of the programming mode (the led blinks twice in orange)
¾ SteamAir temperature adjustment
To adjust the SteamAir temperature, you need (with power on) to:
- Maintain the key pressed on until orange blink of the led which
conrms that you have entered the programming mode.
- Press the
SteamAir key paying attention to the number of
blinks and colour of the led which shows the temperature adjustment
registered: the led lights in orange, it means that the adjustment is as in
factory 62°C
A blink corresponds to a difference of 2°C compared to the factory value;
with green colour it is below, in red it is above.
Examples:
2 green blinks means that the temperature is set to 58°C (62° - 2x 2°)
3 red blinks means that the temperature is set to 68°C (62° + 3x 2°)
To modify the adjustment :
Each impulse on hot water key (3) reduces the temperature of 2°, on the
steam key (4) increases of 2°
- Press on the
SteamAir key to check the adjustment : check the
number of blinks looking the colour of the led
- Press on the programming key (2) to conrm the new adjustment and
come out of the programming mode (the led blinks twice in orange)
Note: The temperature adjustment can be done in a range of 50°C to
90°C
- Brake down the device and clean it once per
day minimum
- After each use, rinse the outlet using the
steam
OPTION SteamAir
 Loading...