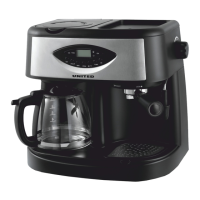
This document describes the UNITED Coffee Maker, model EM5186, a versatile appliance designed for both coffee making and espresso preparation, with additional features for frothing milk.
Function Description
The UNITED Coffee Maker is a multi-functional device capable of preparing various coffee beverages. It operates as both a drip coffee maker and an espresso machine, featuring a steam wand for frothing milk. The appliance is equipped with controls for selecting brewing modes (drip coffee, espresso), adjusting brewing parameters (such as time for drip coffee), and activating the steam function. It includes a water tank, a filter funnel for coffee grounds, a warming plate to keep coffee hot, and a removable drip tray for easy cleaning.
Important Technical Specifications
While specific power ratings and capacities are not explicitly detailed in the provided excerpts, the manual implies a standard household appliance. Key components include:
- Water Tank: A transparent water tank with measurement markings for easy filling.
- Filter Funnel: A removable filter funnel for holding coffee grounds, suitable for both drip coffee and espresso.
- Metal Mesh Filter: A reusable metal mesh filter is used for coffee grounds.
- Warming Plate: A heated plate to keep the coffee carafe warm after brewing.
- Steam Wand (Frothing Nozzle): A dedicated nozzle for frothing milk for cappuccinos and lattes.
- Control Panel: Features ON/OFF buttons, mode selectors (coffee/espresso/steam), indicator lights (red for ON, orange for TIME, green for brewing/preheating/pump), and a clock/timer display.
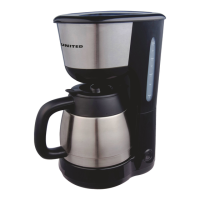
- Carafe: A glass carafe with a handle and lid for collecting brewed drip coffee.
- Espresso Cup Holder: A removable shelf designed to hold espresso cups.
- Measuring Spoon: A spoon for precise coffee ground measurement.
- Tamper: A tool for compacting espresso grounds in the filter.
Usage Features
The coffee maker offers distinct modes for drip coffee and espresso, along with milk frothing capabilities.
Drip Coffee Preparation:
- Water Filling: Open the water tank cover and fill with cold water up to the desired level.
- Coffee Grounds: Place the nylon filter into the funnel, add ground coffee (1 measuring spoon per cup), and close the filter cover.
- Carafe Placement: Place the carafe on the warming plate, ensuring it is centered.
- Power On: Connect to power source; the display will show 12:00.
- Brewing: Press the ON button. The red indicator illuminates, and the appliance begins brewing. The green indicator flashes during brewing and remains steady when brewing is complete.
- Automatic Shut-off: The appliance automatically shuts off after 30 minutes.
- Timer Function: The clock/timer can be set for delayed brewing. Press HOUR and MIN buttons to set the desired start time. The green indicator will flash, and the appliance will start brewing at the set time.
Espresso Preparation:
- Water Filling: Fill the water tank with cold water.
- Coffee Grounds: Place the metal mesh filter into the funnel, add ground coffee, and tamp it down firmly. Insert the funnel into the appliance and lock it into position.
- Hot Water/Steam: Place a cup on the removable shelf.
- Power On: Press the ON button. The green lamp illuminates, indicating preheating. Once the green lamp is steady, the appliance is ready.
- Brewing: Press the PUMP button. The green lamp flashes, and espresso is dispensed.
- Milk Frothing (for Cappuccino/Latte):
- Fill a jug with about 100 grams of milk for each cappuccino.
- Turn the steam control knob to the OFF position.
- Press the PUMP button (first make sure there is water in the tank). After about 20 seconds, close the pump, and wait until the green indicator is illuminated again.
- Turn the steam control knob in an anti-clockwise direction. The steam will be produced.
- Immerse the frothing device into the milk and move it slowly to create froth.
- Turn the steam control knob in an anti-clockwise direction, slowly moving the frothing device from the milk in the moving vessel round from up to down.
- After frothing, turn the steam control knob to OFF and press the PUMP button to make the green indicator flash.
Maintenance Features
Regular cleaning and descaling are essential for optimal performance and longevity of the coffee maker.
General Cleaning:
- Power Off: Always cut off power before cleaning.
- Housing: Clean the housing with a moist sponge. Do not immerse the housing in water.
- Removable Parts: Detach the metal funnel by turning it clockwise, remove the coffee residue inside, then clean it with cleanser, rinse thoroughly after cleaning.
- Attachments: Clean all detachable attachments in water and dry thoroughly.
Cleaning Mineral Deposits (Descaling) for Espresso Coffee:
- Preparation: Fill the water tank with water and descaler (citric acid or commercial descaler) in a 4:1 ratio.
- Brewing Cycle: Place a cup under the funnel. Press the ON button. The red indicator illuminates. Press the PUMP button. The green indicator flashes, and water flows out. Press the PUMP button again to stop.
- Waiting Period: Wait for 15 minutes.
- Repeat: Repeat the brewing and waiting cycle 3-5 times.
- Rinsing: Run the appliance on water only 3 times to rinse.
Cleaning Mineral Deposits (Descaling) for Drip Coffee:
- Preparation: Fill the water tank with water and descaler (citric acid or commercial descaler) in a 4:1 ratio.
- Warming Plate: Push the carafe on the warming plate.
- Brewing Cycle: Press the ON button. The red indicator illuminates, and water drips out automatically.
- Waiting Period: After percolating the equivalent of one cup, press the ON button again to stop.
- Repeat: Repeat the solution work for 15 minutes, repeat the steps of 3-5 again.
- Rinsing: Run the appliance on water only 3 times to rinse.
Troubleshooting:
The manual provides a troubleshooting guide for common issues such as:
- Carafe leakage: Check if the carafe is properly located and if the water level in the tank exceeds the highest step.
- Espresso coffee drips out too slowly: Indicates fine ground coffee or too much coffee.
- Metal spots in the tank: May be due to unsuited water or manufacturing residue.
- Water drips from the bottom of the coffee maker: Indicates a malfunction or too much water in the warming plate.
- Water leaks out of the outer side of the filter: Indicates some coffee powder on the filter edge or mineral deposits.
- Acid taste in espresso coffee: Indicates old coffee powder or improper storage.
- Coffee maker not working: Check if the power outlet is plugged in correctly.
- Steam cannot froth: Check if the green indicator is flashing (should be steady) or if the container is too big/shape is not fit, or if skimmed milk is used.
- No steam: Check if the green indicator is steady.
- Water tank too full: Use appropriate water levels.
- Appliance makes noise: This is normal for the first time or after a long period of inactivity.