corner of the display.
Note: the time cycle is 24 hours.
2. Press the HOUR and MIN button while the current time is set, that is 8:10 (See fig. 2). Note: if you
keep pressing down HOUR or MIN button for more than two seconds, the hour or minute number on
display will increase rapidly.
3. Press PROG button once again and the word TIMER shows on upper-left corner of displ ay.
4. Now you can set the presetting time in the same way through press HOUR button and MIN button,
that is 13:00 (see Fig. 3).
5. Press ON button for drip coffee once, the indicator of TIME will be illuminated. After about 10
seconds, the LCD will display the current clock, you may see the automatic start time by pressing
PROG button twice.
Note: You may cancel the automatic start function by pressing ON button for drip coffee twice. If you
want to change the automatic start time, only following the above 1-4 steps again.
At 1:00 pm, the indicator of TIME will go out automatically, at the same time the indicator of ON
will turn on and the unit starts brewing. After brewing, you can replace the carafe on keeping warm
plate. Once the coffee maker is energized, the coffee can be kept warm, if leave the coffee maker
unattended for 2 hours, the appliance will be cut off power automatically.
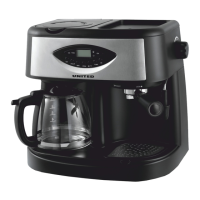
PRE-HEATING
To make a cup of good hot Espresso coffee, we recommend you preheating the appliance before
making coffee, including the funnel, filter and cup, so that the coffee flavour can not be
influenced by the cold parts.
1. Open the tank cover, pour water into water tank according to the steps, then close the tank cover.
2. Set steel mesh into metal funnel (no coffee in steel mesh). Then insert the funnel into the
appliance from the “Insert” position and release the press bar, and you can fix them into coffee
maker firmly through turn it anticlockwise until it is at the lock position.(See fig. 1).
3. Place espresso cup (yourself cup) on removable shelf. And make sure the steam control knob is on
the OFF position.
4. Connect to power source, 12:00 will show on display.
5. Press down ON button for espresso coffee, the red indicator is illuminated, the green indicator is
flashed on the position. It is the default program. You should press the PUMP button, when there
is water flowing out and close the pump immediately. The purpose of the step is that pump the water
of the tank into the housing.
6. When the green indicator will not flash and is illuminated, you should press the PUMP button
again, there will be hot water flowing out. When the green lamp is flashing, close the pump. The
pre-heating is finished.
 Loading...