Do you have a question about the Universal Remote Control Easy Clicker UR3L-SR4 and is the answer not in the manual?
Step one involves removing the battery compartment cover from the back of the remote control.
Step two instructs to check battery polarity and install batteries as per the illustration.
Step three is to replace the battery compartment cover after installing batteries.
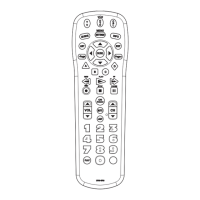
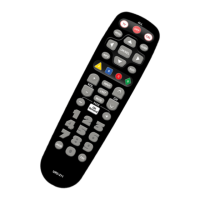
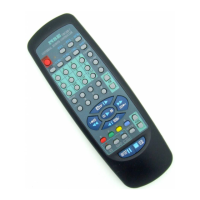
Allows turning TV, DVD, and Set-top box On and Off.
Used to select the component to operate and signals remote control activity.
Displays the settings Menu.
Selects highlighted screen options.
Displays information about the program currently playing or highlighted.
Accesses the previously tuned channel.
Raises or lowers the sound level.
Displays a list of programs, allowing selection for viewing.
Perform VCR/DVD functions or Video On Demand functions.
Displays favorite channels.
Designed to send Power On/Off commands for up to three components.
Displays the program guide listings.
Exits from the current screen.
Make direct selections from on-screen menus.
Silences the audio. Press again to restore sound.
Selects the next higher or lower channel.
Provides direct access to On Demand channel.
Accesses pages above or below the information currently displayed.
Enter numbers to tune channels or make numeric entries.
Selects the video source from available video components.
Program the remote by entering a three-digit code for the equipment brand and model.
Turn on the target equipment (Cable Box, TV, or DVD) before programming.
Press [DEVICE] and [OK/SEL] simultaneously to enter programming mode; LED indicates readiness.
Enter the three-digit code for your brand; try codes until equipment turns off.
Press the [DEVICE] button again to store the code; LED blinks twice to confirm.
If functions fail, re-enter programming and try the next code for the brand.
Finds correct code by cycling through codes automatically when manual codes fail.
Turn on the target equipment before initiating the auto search process.
Press [DEVICE] and [OK/SEL] simultaneously; LED indicates readiness for auto search.
Press CH+/- to send codes; release when the equipment turns off.
Press [DEVICE] to save the code; LED blinks twice for confirmation.
Read the code that was programmed using the auto search method.
Press [DEVICE] and [OK/SEL] to enter code retrieval mode; LED indicates readiness.
Press [INFO]; LED blinks indicate code digits, separated by off intervals.
Assign a second TV to be controlled by the DVD button.
Press [DVD] and [OK/SEL] to enter programming mode for the DVD button.
Press the [TV] button to indicate the TV device for this programming.
Point remote at TV and enter the three-digit code for your TV.
Press [DVD] to store the code; LED blinks twice for confirmation.
Press [COMPONENT] and [INPUT] simultaneously to enter learning mode; LED lights up.
Align the UR3L-SR4 with the source remote, head-to-head, 1-2 inches apart.
Press the button on UR3L-SR4 to teach a command (e.g., MUTE).
Press and hold the corresponding button on the source remote until UR3L-SR4 LED blinks.
Press [COMPONENT] and [INPUT] to save; LED blinks 3 times. Test learned buttons.
Press [COMPONENT] and [INPUT] simultaneously; LED turns on.
Press and hold the desired button for 3 seconds; LED blinks twice to confirm erasure.
Press and hold [COMPONENT] and [INPUT] to exit; LED blinks 3 times.
Press [COMPONENT] and [INPUT] simultaneously; LED turns on.
Press and hold [COMPONENT] and [PAUSE] for 5 seconds; LED blinks twice for erasure.
Press and hold [COMPONENT] and [INPUT] to exit; LED blinks 3 times.
Press the [CBL] button to select the Cable Box mode.
Press [All OFF] and [OK/SEL] simultaneously; CBL LED turns on.
Assign desired power commands for components to the [ALL OFF] button.
Press [CH+] to save; CBL LED blinks twice for confirmation.
Program Macro buttons for up to five 2-digit, four 3-digit, or three 4-digit channels.
Press the [CBL] button to select the Cable Box mode for macro programming.
Press [MACRO] and [OK/SEL] simultaneously; CBL LED turns on.
Enter channel codes (2, 3, or 4-digit) using Number Pad, pressing [STOP] after each.
Press [CH+] to store channels; CBL LED blinks twice for confirmation.
Press [MACRO] repeatedly to cycle through the programmed channels.
Procedure to erase Macro programming and return to original function.
Press the [CBL] button to select the Cable Box mode for macro erasure.
Press [MACRO] and [OK/SEL] simultaneously; CBL LED turns on.
Press [CH+] to erase functions; CBL LED blinks twice for confirmation.
Press [OK/SEL] and [CBL] simultaneously; LED turns on.
Press the [VOL+] button; the device LED blinks.
Press the desired [DEVICE] button to assign control; LED blinks twice.
Press [OK/SEL] and [TV] simultaneously; LED turns on.
Press the [VOL-] button; the device LED blinks.
Press the desired [DEVICE] button to assign control; LED blinks twice.
Device LED blinks twice when battery is low, indicating replacement is needed.
The remote retains programmed memory for 10 years, even without batteries.
Visit www.universalremote.com for more information about the remote control.
Lists setup codes for various Cable TV converter brands and models.
Lists setup codes for various TV brands and models.
Continues the list of setup codes for various TV brands and models.
Continues the list of setup codes for various TV brands and models.
Continues the list of setup codes for various TV brands and models.
Continues the list of setup codes for various TV brands and models.
Lists setup codes for various DVD player brands and models.
Continues the list of setup codes for various DVD player brands and models.
Lists setup codes for various DVR (Tivo) brands and models.
Lists setup codes for various VCR (DVD) player brands and models.
Lists setup codes for various TV/VCR combo units.
| Type | Universal Remote Control |
|---|---|
| Model | UR3L-SR4 |
| Number of Devices Controlled | 3 |
| Number of Devices Supported | 3 |
| Infrared Range | Up to 30 feet |
| Compatibility | TV, DVD |
| Battery Type | AAA |
| Power Source | Battery |
| Brand Compatibility | Major brands including Sony, Samsung, LG, Vizio, etc. |
| Buttons | Power, Volume, Channel, Mute, Input, Number pad, Navigation |