Do you have a question about the V-ZUG AiroClearWall V2000 V90 and is the answer not in the manual?
Explains symbols and general safety rules for appliance operation.
Lists safety measures specific to the range hood's installation and use.
Details instructions for initial use and proper ongoing operation.
Warns about burn hazards, risks to life, and how to prevent appliance damage.
Steps for removing, cleaning, and reinstalling metal grease filters.
Offers solutions for problems like non-working illumination or poor air extraction.
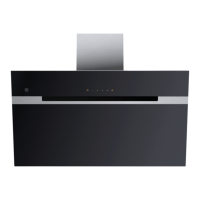
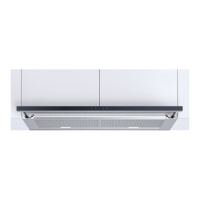
This document provides operating instructions for the V-ZUG AiroClearWall V2000 V90 range hood, a domestic appliance designed for extracting cooking fumes and smells from above the cooking surface. It can be configured for either extraction or recirculation modes.
The range hood operates with a fan that draws cooking fumes and smells. In extraction mode, the air passes through metal grease filters, then through a connecting pipe with an integrated non-return valve, and finally through an air duct to the outside. Adequate fresh air supply is necessary to replace the extracted air. In recirculation mode, after passing through the metal grease filters, the cooking fumes and smells are further filtered by an activated charcoal filter before the cleaned air is circulated back into the room through side openings. If not supplied, activated charcoal filters must be ordered and installed for recirculation mode.
The appliance features an extractor fan with four power levels: low (1), medium (2), high (3), and an intensive level. Power levels 1–3 are suitable for continuous operation, while the intensive level is for short bursts of strong extraction, such as when searing meat, running for a maximum of five minutes. The range hood also includes illumination.
To switch the appliance on, hold the power button for three seconds to activate stand-by mode, indicated by the button illuminating. Pressing the power level buttons (1, 2, 3, or intensive) will switch the appliance on to the selected level, with the corresponding button illuminating. If the intensive level is chosen, the button for the previously running power level will also illuminate. The intensive level can also be selected from stand-by mode. To stop the intensive level before its five-minute duration, press any of the power level buttons. The illumination can be switched on or off independently by pressing its dedicated button.
It is recommended to switch on the appliance at power level 1 five minutes before cooking to allow for optimal air extraction. Lower power levels are suitable for normal cooking smells, while higher levels are for stronger fumes. After cooking, allow the appliance to run for another 15 minutes to ensure all fumes and smells are extracted. To switch off the appliance, hold the power button for three seconds; all buttons will turn off, except for the illumination if it was previously activated.
The appliance includes saturation indicators for both metal grease filters and activated charcoal filters. The grease filter indicator flashes after 40 operating hours, signaling that the filters need cleaning. For activated charcoal filters (recirculation model), the indicator flashes when saturation is reached or after four months, whichever comes first, indicating that the filters need to be replaced or cleaned (for long-life filters). To reset the filter saturation indicator, hold the power button in stand-by mode until an acoustic signal is emitted, and the flashing LEDs will turn off.
The stand-by mode can be activated or deactivated by holding the power button for three seconds. When deactivated, the appliance switches off and the LED goes out. This function is useful for cleaning the hood, as the illumination can still be used. When activated, the LED illuminates.
Ensure no water enters the appliance housing during cleaning to prevent damage. Avoid abrasive cleaners, scouring pads, or steel wool, which can damage surfaces. Before cleaning, deactivate stand-by mode by holding the power button for three seconds, which switches off the appliance and turns off the LED. Clean the exterior with a slightly damp cloth and detergent if necessary, then wipe dry. Grease and condensate can accumulate inside near the grease filters; clean these areas with a slightly damp cloth and detergent, then wipe dry.
The metal grease filters should be cleaned at least once a month with normal use, or whenever the indicator light flashes. To remove them, swing up the glass panel, press down the grip, swing the grease filter forward, and lift it out of its bracket. Care should be taken not to damage the filter. Filters can be cleaned in a dishwasher using an "intensive" or "heavy soiling" program with a warm pre-wash, placed with the grip facing downwards. While cleaning may cause discoloration, it does not affect their function. If a dishwasher is unavailable, clean them in hot water and detergent, soaking for about two hours, then scrubbing with a washing-up brush and rinsing thoroughly. To reinstall, insert the filter into the bottom bracket, press down the grip, engage it in the top bracket, and swing the glass panel down. After installation, reset the filter saturation indicator by holding the power button in stand-by mode until an acoustic signal is emitted, and the flashing indicator light turns off.
The activated charcoal filter display should only be activated for recirculation models. To activate it, deactivate stand-by mode, then simultaneously press the grease filter and activated charcoal filter buttons for three seconds. The grease filter button will flash first, then both will flash, indicating activation. To deactivate, follow the same steps; both buttons will flash, then only the grease filter button, and finally, the activated charcoal filter button will stop flashing, while the grease filter button continues to flash.
These filters cannot be washed or regenerated and must be replaced when the indicator light flashes or at least every two months with heavy use. To remove them, follow the same steps as for metal grease filters, then remove the activated charcoal filter. Install new filters in the same manner.
These filters can be cleaned and regenerated every two months with normal use or when the saturation indicator flashes. They can withstand 5–8 regeneration cycles, providing a service life of up to three years. Before cleaning, disconnect the power supply by switching off the fuse or circuit breaker. Remove the filter mat from its plastic housing and clean it in a dishwasher using an "intensive" or "heavy" program with a warm pre-wash, ensuring it is washed separately to prevent food debris from sticking. If a dishwasher is not available, clean with hot water and detergent, soak for an hour, and rinse well. After cleaning, dry the filter mat in an oven at 100 °C using top/bottom heat or hot air. Spent long-life filters that can no longer be recycled should be disposed of at a suitable recycling point.
| Width | 90 cm |
|---|---|
| Type | Wall-mounted |
| Lighting | LED |
| Energy Efficiency Class | A |
| Filter Type | Metal grease filter |
| Material | Stainless steel |
| Number of Fan Speeds | 3 |
| Control Type | Electronic |