Do you have a question about the VALKYRIE Syn 240 and is the answer not in the manual?
This document provides an installation guide for the Valkyrie Syn series of AIO (All-in-One) water cooling systems, specifically covering the 240, 280, 360, 420, and 480 models. It details the components included and provides step-by-step instructions for installing the radiator, water block, and wiring for Intel LGA1200/1700, Intel LGA2011/2066, and AMD AM4/AM5 platforms. Additionally, it offers a tip on replacing the water block trim strip.
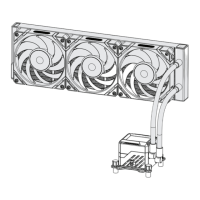
The Valkyrie Syn AIO water cooling system is designed to efficiently dissipate heat from a computer's central processing unit (CPU). It achieves this through a closed-loop liquid cooling system that circulates coolant between a water block, which sits on the CPU, and a radiator, which expels heat into the surrounding air. The system includes fans that are mounted on the radiator to enhance heat dissipation. The water block also features an LCD display, providing real-time information or customizable visuals. The system integrates with the motherboard for power, control, and RGB lighting synchronization, ensuring optimal cooling performance and aesthetic appeal within a PC build.
Installation Process: The installation guide meticulously outlines the steps for setting up the Valkyrie Syn AIO cooler across various CPU sockets.
Radiator Installation: The first step involves attaching the cooling fans to the radiator. It is crucial to use the shorter fan screws provided and explicitly warns against using extended screws to prevent damage. Once the fans are secured, the radiator is then mounted to the computer case using radiator screws. The guide illustrates this process with clear diagrams showing the fan screws going into the radiator and the radiator being screwed into the top of a PC case.
Intel LGA1200/1700 Installation: For Intel LGA1200/1700 platforms, the installation begins with preparing the motherboard. The Intel backplate is aligned with the corresponding platform holes on the back of the motherboard. An important note specifies using the inner mounting holes for LGA1200 (115X) and the outer mounting holes for LGA1700. Next, Intel/AMD bolts are installed into the motherboard, ensuring the larger end of the screw faces down. Brackets are then placed onto these bolts and secured with nuts using a nut socket. The guide mentions that the brackets can be rotated 90 degrees if a different orientation for the water block is desired. Before installing the water block, the protective cover must be removed from the coldplate, as this is critical for cooling performance. Finally, the water block is aligned with the holes on the brackets and screwed into place.
Intel LGA2011/2066 Installation: The process for Intel LGA2011/2066 platforms is similar but uses different components. It starts with installing the LGA2011 bolts directly into the motherboard. Brackets are then placed onto these bolts and tightened with nuts using a nut socket, again with the option to rotate the brackets by 90 degrees for different water block orientations. As with the other platforms, the protective cover must be removed from the coldplate before the water block is aligned with the holes and screwed onto the brackets.
AMD AM4/AM5 Installation: For AMD AM4/AM5 platforms, the initial step involves preparing the motherboard by unscrewing the four original bolts and removing the original bracket, while keeping the original backplate. Intel/AMD bolts are then installed into the motherboard, with the larger end facing down. Brackets are placed onto these bolts and tightened with nuts using a nut socket, with the same 90-degree rotation option for the water block. The protective cover is removed from the coldplate, and the water block is aligned and screwed onto the brackets.
Wiring: The wiring section is crucial for the functionality of the AIO cooler. It details three main connections for the water block:
For the Valkyrie HUB, which manages fan and RGB connections, the wiring is as follows:
Aesthetic Customization: The water block features a trim strip that can be removed and replaced. This strip is magnetic and interchangeable, allowing users to customize the appearance of their water block to match their preferred style or PC build aesthetics. This feature adds a layer of personalization to the cooling system.
Protective Cover Removal: A critical maintenance step highlighted in the installation process is the removal of the protective cover from the coldplate before installing the water block. The guide explicitly states that this step is "critical to the cooling performance," implying that failure to remove it would severely impair the cooler's ability to dissipate heat from the CPU. This is a one-time action during installation but is essential for the long-term efficiency of the device.
Thermal Paste Application: Although not explicitly detailed as a separate maintenance step, the inclusion of "1x Thermally conductive silicone grease" in the parts list indicates that thermal paste is provided for application between the CPU and the water block's coldplate. Proper application of thermal paste is crucial for efficient heat transfer and is a standard maintenance practice during cooler installation or re-installation.
Interchangeable Trim Strip: The water block's magnetic and interchangeable trim strip offers a simple way to refresh the aesthetic of the cooler without needing to replace the entire unit. While primarily an aesthetic feature, the ease of removal and replacement suggests that users can easily clean or swap out the trim strip if it becomes dirty or if they desire a different look. This contributes to the overall longevity and visual appeal of the product.
Component Check: The guide includes a note at the end of the parts list: "*Please check the received goods to make sure the parts are complete." This encourages users to verify all components upon receipt, which is a preventative measure to ensure a smooth installation and avoid issues that might arise from missing parts. While not a direct maintenance feature of the device itself, it contributes to the user's ability to properly install and maintain the product from the outset.
The Valkyrie Syn AIO water cooling system is designed for both high performance and user-friendly installation, with clear instructions and thoughtful features for customization and essential maintenance.
| Radiator Size | 240mm |
|---|---|
| Fan Size | 120mm |
| Fan Speed | 500 - 2000 RPM |
| Warranty | 5 years |
| Product Type | CPU Cooler |
| Compatibility | Intel LGA 115x/1200/1700, AMD AM4/AM5 |