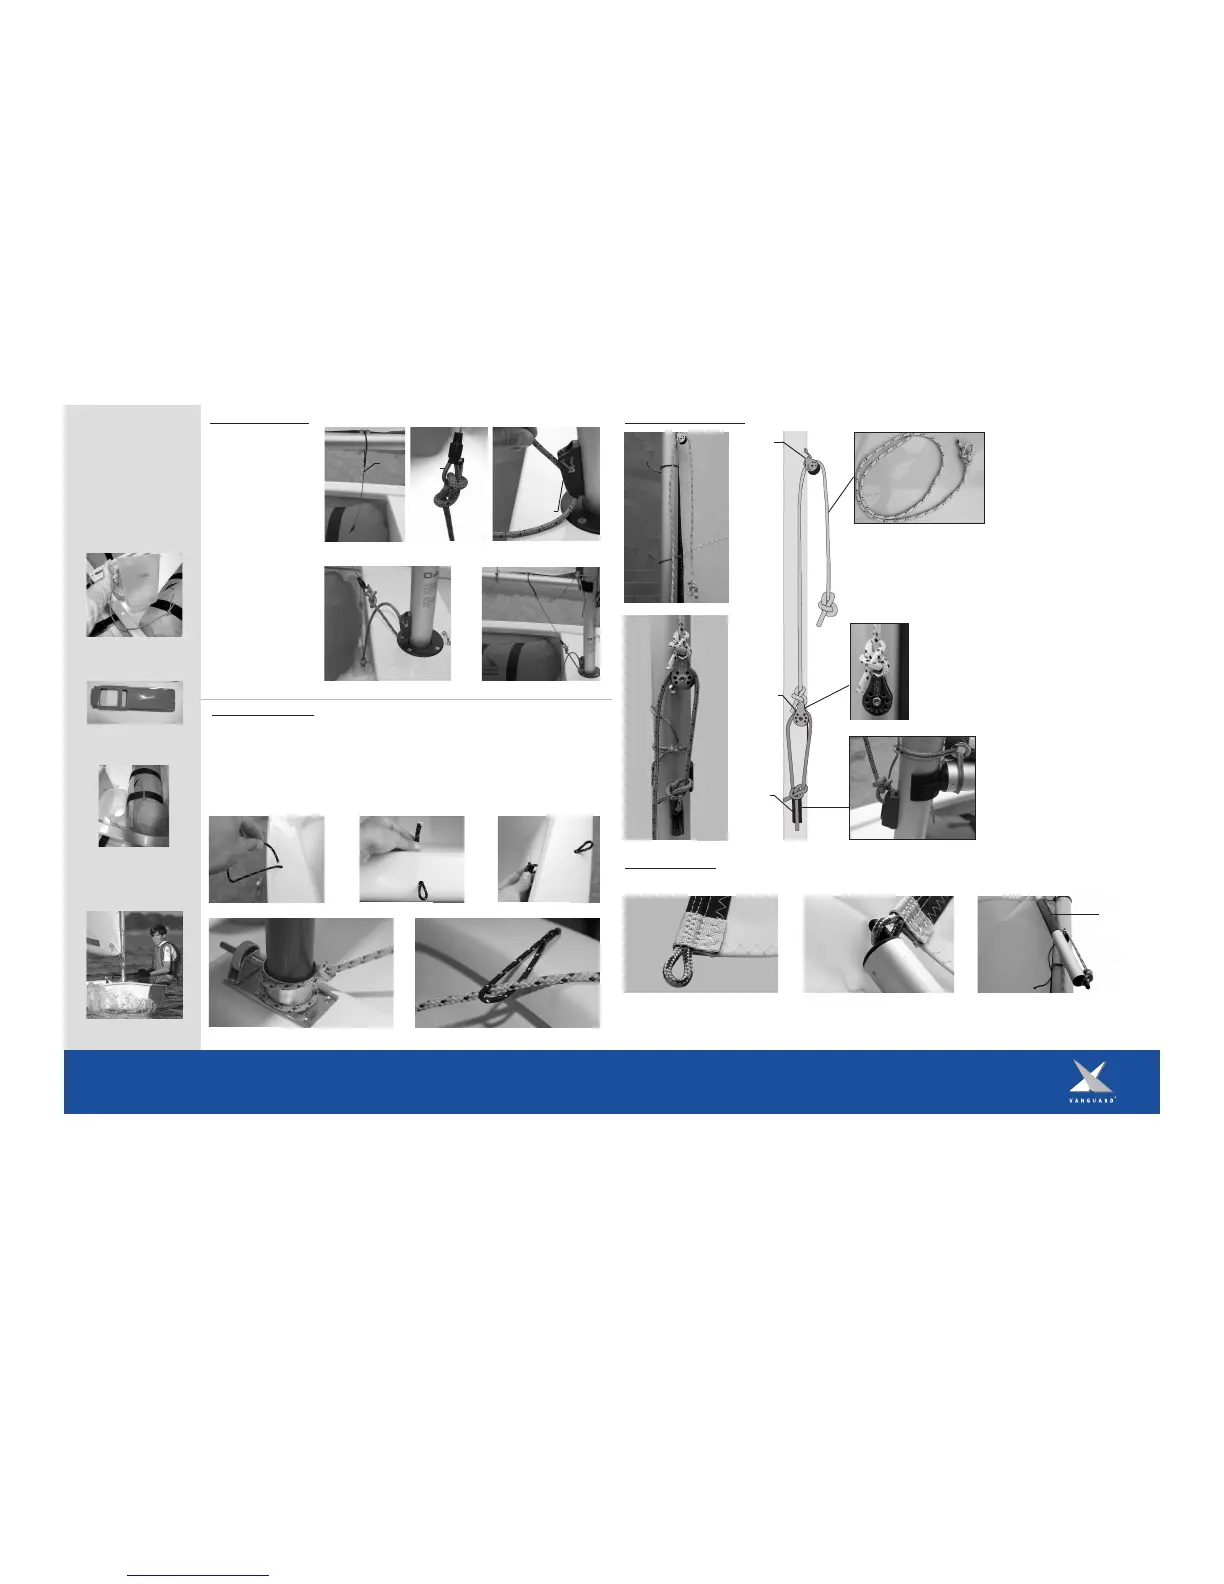
Attaching the Sprit:
R
igging the Sprit Haly
a
r
d
:
F
igure 39
Figure 42
1
. Locate the upper and lower sprit
halyard line from the line bag. Retrieve
t
he micro single block from the delivery
kit.
2
. Tie a bowline in one end of the upper
sprit halyard. Making sure to leave a
very small loop that can then be placed
onto the end of the sprit pole
(Figure 38).
3
. Run the free end of the line through
the micro single block that is attached to
the middle of the mast (Figure 39).
4
. Tie a bowline to the micro single
block with the free end of the upper sprit
halyard line (Figure 40).
5. With the lower sprit halyard line tie
a bowline to the top of the halyard cleat
located on the mast below the boom
connection (Figure 41).
6. Lead the line through the micro
single block and then back through the
cleat to secure (Figure 42).
7. Place a stopper kn
ot in the tail o
f the
lower halyard line.
The sprit has two differing ends. One end has a rubber sleeve covering a section of the aluminum. This end will attach to the sprit halyard
as the rubber is used to reduce the chafe against the mast.
1. Locate the sprit loop at the head of
the sail.
2. Place the sprit end without the
rubber sleeve in
to th
e loop in th
e h
ead
of the sail.
3. Place the opposite end of the sprit into
the small loop created by the bowline in the
upper sprit halyard. Pull on the lower sprit
halyard to raise the top of the sail.
As
sembling the V
a
ng:
1. Locate the vang wire
a
ttached to the forward
b
oom button (Figure 29).
2. Retrieve the vang line
from the line bag. With a
b
owline, tie the vang line to
the thimble located at the
e
nd of the vang wire
(Figure 30).
3. Lead the vang line up
t
hrough the clam cleat
located on the mast just
above the thwart
(Figure 31).
4
. Cleat off. Tie a stopper
kn
ot in the end of the vang
line (Figure 32).
Optimist Safety
Here are a few safety products
t
hat we suggest you have to
keep you safe! Refer to the
Optimist class rules as most of
these items are required
for racing.
To keep water out of the boat,
have a bailer handy.
Don’t rely on the breeze,
have a paddle.
Make sure your bailer and
paddle are secured into the
boat and out of your way.
Always wear your lifejacket!
Completed Vang
Figure 29
F
igure 30
F
igure 31
Figure 32
Attaching the Painter:
1. Locate the bow loop and painter line from the line bag. Take the bow loop line and thread both ends
down through the small hole on the topside of the bow (Figure 33 & 34).
2. Tie off the two ends the bow loop with a square knot (Figure 35).
3. Pull up on th
e bow loop so that th
e square knot is snugly secured beneath the rail of the bow.
4. Wrap the painter line around the mast step, underneath the adjustor bolt, and secure it with a
bowline (Figure 36). Lead the line up through the bow loop (Figure 37). Place the remainder of the
painter in the bow of the boat.
Figure 33
Figure 34 Figure 35
Figure 36 Figure 37
Figure 38
Figure 41
Figure 40
Attached
M
icro Single
Block
Micro Single
Block
H
alyard
Cleat
Clam Cleat
Vang
Wire
T
himble
Rubber
Chafe Sleeve
 Loading...