EasyManua.ls Logo

Vava VA-HS003 - User Manual

Vava VA-HS003
15 pages
Print Icon
To Next Page IconTo Next Page
Loading...
ASIA PACIFIC
E-mail: support.jp@vava.com(JP)
JP Importer: 株式会社SUNVALLEY JAPAN
Address: 104-0032 東京都中央区八丁堀3丁目18-6 PMO京橋東9F
EUROPE
E-mail:
support.uk@vava.com(UK)
support.de@vava.com(DE)
support.fr@vava.com(FR)
support.es@vava.com(ES)
support.it@vava.com(IT)
EU Importer: ZBT International Trading GmbH
Address: Halstenbeker Weg 98C, 25462 Rellingen, Deutschland
NORTH AMERICA
E-mail: support@vava.com
Tel: 1-888-456-8468 (Monday-Friday: 9:00 – 17:00 PST)
US Distributor: SUNVALLEYTEK INTERNATIONAL INC.
Address: 46724 Lakeview Blvd, Fremont, CA 94538
MANUFACTURER
Manufacturer: Shenzhen NearbyExpress Technology Development Co.,Ltd.
Address: 333 Bulong Road, Shenzhen, China, 518129
Learn more about the EU Declaration of Conformity:
https://www.vava.com/downloads-VA-HS003-CE-Cert.html
20190919
VA-HS003_V1.2
www.vava.com
MADE IN CHINA
Model: VA-HS003
VAVA Cam Pro
Quick Start Guide
01 03 05 07 09 11 13 15
17 19 21 23
02 04 06 08 10 12 14 16
18 20 22
Question and Answer IconNeed help?

Do you have a question about the Vava VA-HS003 and is the answer not in the manual?

Summary

Whats in the Box

Product Diagram

Base Station Diagram

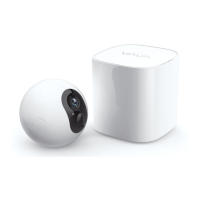
Illustrates the components and ports of the VAVA Base Station.

Camera Diagram

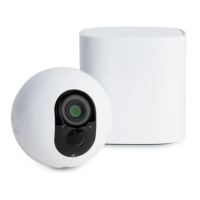
Details the components and sensors of the VAVA Camera.

Button Controls

Camera Button Functions

Explains the functions and operations of the camera's Sync and Reset buttons.

Base Station Button Functions

Details the operations for the Base Station's Sync and Reset buttons.

LED Indicator and Working Status

Camera LED Status

Defines the working status indicated by the camera's LED light.

Base Station LED Status

Outlines the working status indicated by the Base Station's LED light.

Connect Your Base Station to the Internet

Camera Operations

Charge the Camera

Instructions on how to fully charge the camera before use.

Turn on the Camera

Procedure for turning on the VAVA camera using the Sync Button.

Get the APP and Setup

Using the APP

Homepage Overview

Navigating the VAVA Home app homepage for live video and settings.

Record History

Accessing and viewing recorded videos from Micro SD Card and Cloud.

Mount Your Camera

Mounting Height and Location

Guidance on optimal placement for the camera's motion detection range.

Wall Mounting Instructions

Steps for securely attaching the camera mount to a wall.

Stand Mount Installation

Instructions for using the stand mount to position the camera.

Desktop or Shelf Mounting

Guidance for placing the camera on flat surfaces like desks or shelves.

Important Cautions

FCC Radiation Exposure Statement and Compliance

FCC Compliance Statement

Details device compliance with FCC Rules and potential interference guidelines.

WEEE Compliance Information

Instructions for proper disposal and recycling of electronic waste.

Overview

The VAVA Cam Pro is a comprehensive smart home security system designed to provide reliable surveillance and peace of mind. It consists of a Base Station, a Camera, and various mounting accessories, all working together to offer a flexible and user-friendly monitoring solution.

Function Description:

The VAVA Cam Pro system primarily functions as a wireless home security camera setup. The Camera captures video footage, detects motion, and provides live streaming capabilities, while the Base Station acts as the central hub, managing camera connections, storing recordings, and connecting to the internet. This integrated system allows users to monitor their property remotely, receive alerts, and review recorded events.

Usage Features:

The system offers a wide array of features to enhance its usability and effectiveness:

Camera Operation:

  • Power On/Off: The camera can be turned on with a single press of the Sync Button and turned off by pressing and holding the Sync Button for approximately 10 seconds.
  • Pairing Mode: To pair the camera with the Base Station, press and hold the Sync Button for 5 seconds until the LED indicator flashes blue slowly. This initiates the pairing process, allowing the camera to connect to the central hub.
  • Reboot: The camera can be rebooted by pressing the Reset Button once, which restarts the device without losing any stored data.
  • Charging: The camera is equipped with a Micro USB Charging Port and should be fully charged before initial use to ensure optimal battery life. The LED indicator will show a solid red light during charging and will remain solid red when fully charged.
  • LED Indicators: The camera's LED indicator provides visual cues for its status:
    • Off: Indicates Sleep Mode or Power Off.
    • Flashes Blue Slowly: Signifies Pairing Mode.
    • Flashes Blue Quickly: Confirms successful pairing.
    • Flashes Red Slowly: Indicates charging in progress.
    • Solid on in Red: Shows the camera is fully charged.
    • Solid on in Red for 5s then off: Indicates the camera is powering on.

Base Station Operation:

  • Internet Connection: The Base Station connects to the internet via an Ethernet cable to your router. The LED indicator will flash red during connection and turn solid white upon successful connection.
  • Power Source: The Base Station requires connection to a power source using the provided power adapter.
  • Pairing Mode: To bring the Base Station into pairing mode, press and hold both the Sync and Reset Buttons simultaneously until the LED indicator flashes red and white alternately.
  • Reboot: The Base Station can be rebooted by pressing and holding the Reset Button for 10 seconds.
  • Micro SD Card Slot: The Base Station includes a Micro SD Card Slot for local storage of recordings. It is recommended to format the Micro SD card before use.
  • LED Indicators: The Base Station's LED indicator provides status information:
    • Solid On in Red and White: Indicates the Base Station is powering on.
    • Solid On in White: Shows a successful connection to the internet.
    • Flashes Red: Indicates no internet connection.
    • Flashes Red and White Alternately: Signifies Pairing Mode.
    • Flashes Red and White at the Same Time: Indicates a restore to factory settings.

APP Integration and Setup:

  • VAVA Home App: The system is controlled via the "VAVA Home" app, available on both iOS (App Store) and Android (Google Play).
  • Account Registration: Users need to register an account within the app using their email address and then log in.
  • Adding Base Station: The app guides users through adding the Base Station, ensuring all steps are completed for successful integration. A crucial note is that a Base Station can only be bound to one account; unbinding from an old account is necessary to bind to a new one.
  • Adding Camera: After the Base Station is added, cameras can be added through the app. The app provides instructions, and a "Camera successfully synced with the base station" warning tone confirms successful pairing.
  • Live View and Settings: The app offers a live view of the camera feed and allows users to adjust various camera parameters, including Night Vision and Image Flip.
  • Record History: The app displays all recorded videos (both Micro SD and Cloud storage), allowing users to review events by selecting specific dates.
  • Support and Feedback: The app includes sections for FAQs and feedback, enabling users to find solutions to common issues or report problems.

Mounting Options:

The VAVA Cam Pro offers versatile mounting options to suit different environments:

  • Magnetic Wall Mount: Allows for easy attachment to walls using mounting screws and anchors.
  • Stand Mount: Provides a stable base for placing the camera on flat surfaces.
  • Desktop Mount: A compact mount for desktop placement.
  • Mounting Height and Location: For optimal PIR motion sensor detection, the camera should be mounted 7-10ft (2-3m) above the ground. It's important to avoid direct sunlight and ensure the camera is within the Home Base WiFi coverage. The PIR motion sensor has a detection range beyond 1m directly below the camera.

Maintenance Features:

  • Firmware Upgrading: The Sync Button on the camera is not functional during firmware upgrading, indicating a specific state for system updates.
  • Reboot Functionality: Both the camera and Base Station can be rebooted without losing data, which is useful for troubleshooting minor issues.
  • Factory Reset: The Base Station can be restored to factory settings by pressing both the Sync and Reset Buttons simultaneously until the LED indicator flashes red and white at the same time.
  • Power Adapter Usage: Only the included power adapters should be used to charge the camera and Base Station within the permitted voltage range, ensuring proper power delivery and preventing damage.
  • Environmental Considerations: The camera is waterproof, but the Base Station and adapters are for indoor use only. The device should not be used in extreme temperatures, strong electromagnetic interference, or near corrosive substances.
  • Internet Connection Stability: A functional and fast internet connection is crucial for live data feed, highlighting the importance of network stability for optimal performance.
  • Warranty Information: The warranty does not cover defects or damages caused by misuse, unauthorized dismantling, or natural hazards, emphasizing the importance of proper handling and usage.
  • Battery Life Management: The battery life varies based on trigger frequency and video resolution settings, allowing users to adjust settings to optimize battery performance.

Vava VA-HS003 Specifications

General IconGeneral
BrandVava
ModelVA-HS003
CategorySecurity Camera
LanguageEnglish

Related product manuals