Do you have a question about the Verbatim Vi550 S3 and is the answer not in the manual?
Ground yourself before touching components to prevent static discharge damage.
Ensure a clean, dry, and static-safe environment for installation.
Handle the SSD carefully, avoid moisture, and do not touch gold connectors.
Power off, unplug, discharge power, and remove the existing internal hard drive.
Insert the new SSD into the SATA interface connector and secure it.
Secure panels, power on, and finalize setup by cloning or installing OS.
Power off, unplug, discharge power, and decide if replacing or adding a drive.
Insert SSD into SATA connector, use bay adapters if needed, and secure.
Secure panels, power on, and format the drive if installed alongside existing.
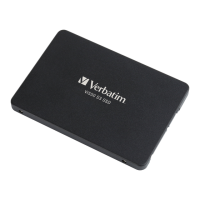
This document outlines the installation process for a Verbatim 2.5" Solid State Drive (SSD) into both laptop and desktop computers. It serves as a general guide, emphasizing key steps and safety precautions rather than providing exhaustive details specific to every PC hardware and operating system configuration. The primary function of this device is to provide high-speed, reliable storage for computers, either as a replacement for an existing hard drive or as an additional storage solution.
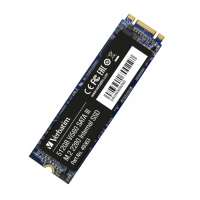
The Verbatim 2.5" SSD is a storage device designed to enhance computer performance by offering faster data access, quicker boot times, and improved overall system responsiveness compared to traditional hard disk drives (HDDs). Its 2.5-inch form factor makes it suitable for a wide range of laptops and desktops, particularly those with compatible drive bays. When installed, the SSD functions as the primary storage medium for the operating system, applications, and user data, or as a secondary drive for additional storage capacity.
For users looking to replace an existing drive, the SSD facilitates a significant upgrade in speed and efficiency. This often involves a process called cloning or data migration, where the contents of the old drive are transferred to the new SSD. This allows users to retain their operating system, applications, and files without the need for a fresh installation. Alternatively, the SSD can be installed as a clean slate, requiring a new installation of the operating system and subsequent software.
When installed alongside an existing hard drive in a desktop computer, the SSD can be utilized to host the operating system and frequently used applications, leveraging its speed for critical tasks, while the traditional HDD can be used for mass storage of less frequently accessed files. This hybrid setup offers a balance of speed and capacity.
The installation process is divided into distinct sections for laptops and desktop computers, acknowledging the different physical configurations and requirements of each.
For laptops, the installation involves powering off the device, disconnecting power, removing the battery, and discharging residual electricity. Users are guided to locate the existing hard drive, unplug it from its SATA interface connector, and then insert the new Verbatim SSD into the same connector. A crucial aspect highlighted is the potential need to transfer existing drive brackets, housing, spacers, and/or adapters from the old drive to the new SSD to ensure a proper fit within the laptop's drive bay. Once the SSD is secured and access panels are reattached, the laptop can be powered on. If the previous drive was cloned, the system should be ready to use immediately. Otherwise, a fresh installation of the operating system, drivers, and applications will be required.
For desktop computers, the procedure similarly begins with powering off and unplugging the system, followed by discharging electricity. Users are instructed to consult their desktop user manual to locate existing hard drives and access points. The guide presents two scenarios: replacing an existing hard drive or installing the SSD alongside an existing hard drive.
If replacing an existing hard drive, the old drive is removed, and the Verbatim SSD is inserted into the SATA interface connector. This may necessitate the use of interface or power cables, 3.5" to 2.5" bay adapters, and/or machine screws to securely mount the SSD in the drive bay.
If installing the SSD alongside an existing hard drive, users must find an available SATA connector and insert the SSD. Similar to the replacement scenario, additional cables, adapters, and screws might be needed for secure mounting.
After installation, access panels are secured, and the desktop is powered on. If the drive was cloned, it's ready for use. If installed alongside an existing drive, users will need to utilize the operating system's disk management tool to format the drive, assign a partition, and assign a drive letter. For clean installations without cloning, the operating system, drivers, and applications must be installed on the new SSD.
The document emphasizes the need for several items not included in the SSD packaging, such as data cloning/migration software (if replacing an existing drive), a USB-to-SATA cable or adapter (for cloning), a SATA III cable (for desktops), a 3.5” to 2.5” mounting bay adapter with screws (for some desktops), brackets, enclosures, and/or drive spacers (for some laptops), a non-magnetic tip Philips head screwdriver, and the host computer's user manual. These requirements underscore the importance of preparation before beginning the installation.
While the Verbatim SSD itself is a solid-state device with no moving parts, making it inherently more durable than traditional HDDs, the document provides crucial "For The Safety of You and Your SSD" guidelines that can be considered preventative maintenance for both the device and the user's computer. These guidelines are critical for ensuring a successful installation and the longevity of the SSD.
Key maintenance-related features and recommendations include:
These guidelines, while presented as safety precautions, effectively serve as maintenance instructions for ensuring the proper functioning and longevity of the Verbatim SSD and the host computer during and after the installation process. By adhering to these recommendations, users can minimize risks and ensure a smooth transition to their new storage solution.
| Capacity | 128GB, 256GB, 512GB, 1TB |
|---|---|
| Form Factor | 2.5 inch |
| NAND Type | 3D NAND |
| Sequential Read Speed | Up to 560 MB/s |
| Sequential Write Speed | Up to 535 MB/s |