EasyManua.ls Logo

VERITAS Custom Smooth Plane No.4 User Manual

VERITAS Custom Smooth Plane No.4
5 pages
To Next Page IconTo Next Page
Page #1 background imageLoading...
Page #1 background image
Custom Bench Plane
U.S. Pat. No. 7,603,783
Your Veritas® bench plane has been assembled with the
component options you selected when you placed your order.
Caution: Be aware that the blade is sharp; careless
handling can result in serious injury.
Figure 1: Plane components.
Figure 2: Blade carrier.
Honing and Polishing the Blade
The blade is ground ready for 30° honing. You may change
the bevel angle as required to suit the pitch of your plane,
the nature of the woods you work with, and your own
preference/experience. Additional sharpening need only
involve honing and polishing a micro-bevel. The back of
the blade has been lapped fl at and does not need work.
Blade Carrier
The key component of your plane is the blade carrier (see
Figure 2). The blade carrier is attached to the blade and links
the cap iron and the adjuster. This arrangement lets you restore
the cap iron without losing its position relative to the cutting edge.
Button-Head
Screw
Cap Screw
Blade Carrier
Lever Cap
Knob
Oval-Head
Screw
Lever Cap
Front Knob
Toe Locking
Knob
Body
Body
Post
Tote
Blade
Cap Iron
Norris-Style
Adjuster
Frog
Threaded Rod
Tote Nut
Mouth Adjustment Screw
Blade Set Screw
Fence Mounting Hole
Button-Head
Screw
Cap Screw
Blade
Toe
Adjuster
Blade Carrier
Cap Iron
Question and Answer IconNeed help?

Do you have a question about the VERITAS Custom Smooth Plane No.4 and is the answer not in the manual?

VERITAS Custom Smooth Plane No.4 Specifications

General IconGeneral
TypeBench Plane
MaterialDuctile Iron
Blade Width2 inches
Adjustable MouthYes
Frog AdjustmentYes
Lateral AdjustmentYes
Length10 inches
Width2.375 inches
Blade MaterialA2 Tool Steel
SoleFlat
Blade Angle45 degrees

Summary

Honing and Polishing the Blade

Blade Carrier Operations

Locating the Blade Carrier

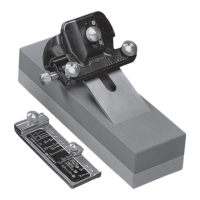
Instructions for locating and sliding the blade carrier within the blade slot.

Reattaching the Blade Carrier

Nudging the blade carrier through the blade hole and sliding it into the slot.

Cap Iron Setting and Adjustment

Cap Iron Setting

Using the cap iron for planing reversing grain or tear-out prone wood.

Mounting the Cap Iron

Securing the cap iron to the blade carrier with a button-head screw.

Fine Shavings Techniques

Adjusting Blade Projection and Skew

Setting blade projection and skew for optimal shaving quality.

Blade Clamping

Clamping the blade securely with the lever cap knob.

Mouth Adjustment

Adjusting the mouth opening for shavings.

Component Assembly and Adjustment

Fence Mounting Holes

Details on plane body holes for mounting a fence.

Frog Removal and Reinstallation

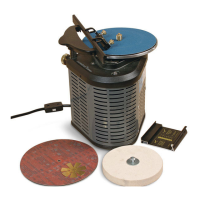
Steps for removing and reinstalling the frog and adjuster assembly.

Adjuster Reinstallation

Pressing the adjuster post into the frog and securing the assembly.

Care and Maintenance

Related product manuals