EasyManua.ls Logo

Verizon AI-111 User Manual

Verizon AI-111
19 pages
To Next Page IconTo Next Page
Page #1 background imageLoading...
Page #1 background image
Install the Equipment Asset Tracker (EAT)
| guide for pro installer partners
This installation guide provides comprehensive “before you get started” information. It is intended for
Verizon Connect professional installer partners who are not yet familiar with installing this specific
device or may need a review of such knowledge. Installers already well-versed in the installation of this
specific device may opt to proceed to the Reveal Hardware Installer app and follow the process outlined
there.
In this article:
Product overview
o Identifying the EAT device
o Device label
o Status button
o Status LEDs
What to bring
What's in the box
Reveal Hardware Installer App
Wiring the device
Mounting the device
Product overview
The Equipment Asset Tracker (EAT) is designed by Verizon Connect and replaces the CalAmp TTU-
2830. The EAT device offers:
I/O leads
o 2 Digital inputs for sensors such as boom and PTO
o 1 digital output capable of triggering a relay
Long life, replaceable backup battery pack. How to replace EAT battery pack
Optimized internal antenna design for improved signal reception
Status button that wakes the device, initiates the status test and prompts the device to send a report.
LED status indicators for Battery, Network, and GPS
2-wire or 3-wire installation options
Identifying the EAT device
Question and Answer IconNeed help?

Do you have a question about the Verizon AI-111 and is the answer not in the manual?

Verizon AI-111 Specifications

General IconGeneral
BrandVerizon
ModelAI-111
CategoryGPS
LanguageEnglish

Summary

Product Overview

EAT Device Features

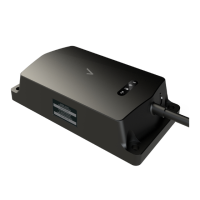
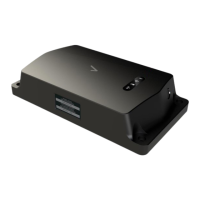
Details features like I/O leads, battery, antenna, status button, and LED indicators.

Identifying the EAT Device

Device Label Information

Information about the device label, including S/N and IMEI barcodes, and how to read it.

Status Button Operation

Using the Status Button

Explains how to use the status button to power on, wake the device, and initiate status checks.

Status LEDs

Interpreting LED Indicators

Describes the meaning of LED flashes for Battery, Network, and GPS status.

What to Bring for Installation

Required Tools and Supplies

Lists essential tools and materials needed for the installation process.

What's in the Box

Package Contents

Details the items included in the EAT device packaging, including the device, harness, and mounting hardware.

Reveal Hardware Installer App Usage

App Installation and Initial Steps

Guides on downloading and starting the installation process using the mobile app.

Selecting Installation Type

Instructs on choosing the correct installation type within the app for powered or non-powered assets.

Device Activation and Testing

Details testing the device for network and GPS connectivity before mounting.

Selecting Wiring Method

Guides the user to select between 2-wire or 3-wire installation methods in the app.

Entering Asset Information

Explains how to input asset details such as name, VIN, and odometer into the app.

Finalizing Device Setup and Activation

Instructs on wiring, mounting, and completing the device setup and activation in the app.

Wiring the Device

Device Harness Wiring Layout

Details the color-coded wires on the EAT device harness and their functions.

Sensor Wiring and Fuses

Explains sensor connection methods, trigger types, and information about device fuses.

Wiring Best Practices and Splicing

Covers best practices for harness routing, using connectors, and wire splicing techniques.

2-Wire and 3-Wire Installation Methods

Details steps and considerations for both 2-wire and 3-wire installation, including trailer specifics.

Connecting Digital Input/Output Sensors

Instructions for connecting optional I/O sensors for functions like PTO or boom monitoring.

Device I/O Capabilities

Details the two digital inputs and one digital output, and the status of One-Wire I/O.

Mounting the Device

Optimal Mounting Locations

Guidance on selecting optimal mounting locations, considering signal reception and environmental factors.

Mounting Procedures and Hardware

Steps for physically attaching the device using screws or bolts, with warnings about torque and hardware.

FCC Compliance Notes

FCC Regulations and Interference

Compliance information related to FCC rules and potential interference.

Related product manuals