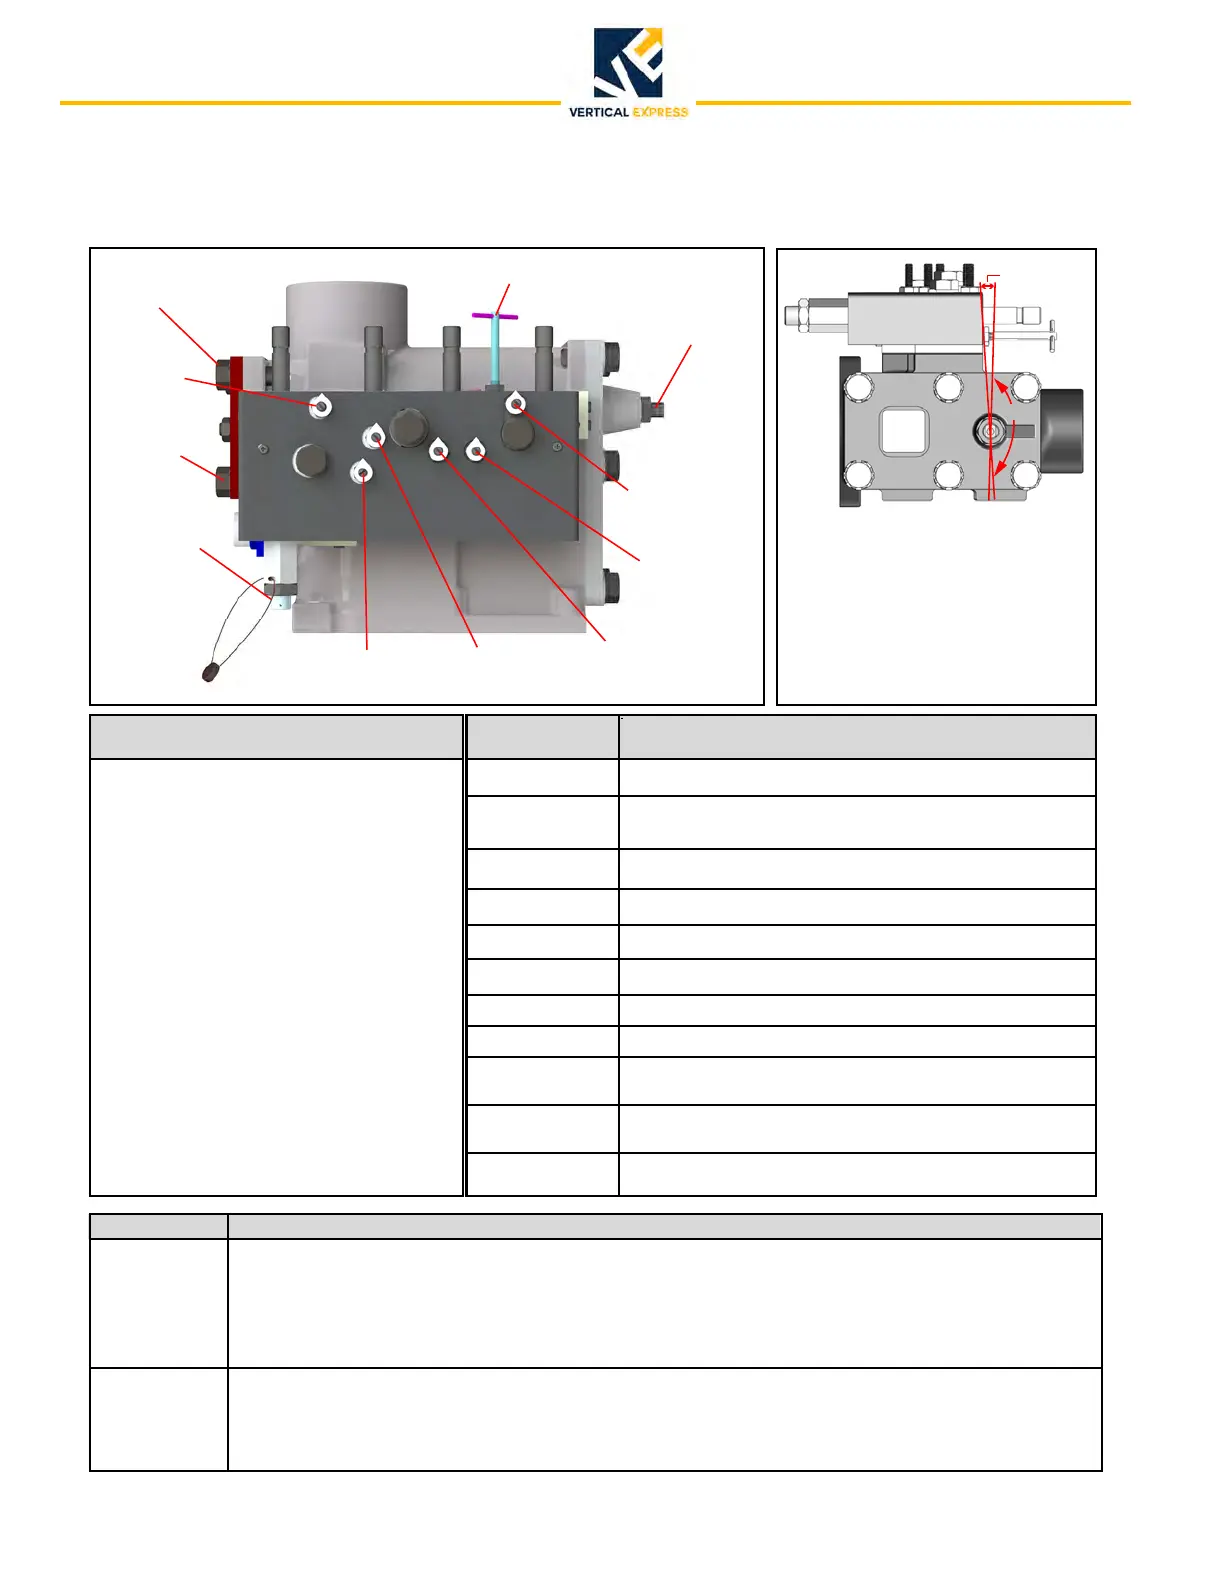
REFERENCE INFORMATION
The closer the ƪDWV on the
lowering & leveling screw get
to perpendicuODU with the Dxis
of the WDQN return line, the
more liNHO\ the YDOYH will ORFN
up in the down direction.
8S6WDUt
Adjustment
Low Pressure
Adjustment
Up Leveling
Adjustment
Up Stop
Adjustment
Up Slowdown
Adjustment
Down StDUt
Adjustment
Down Stop
Adjustment
Down Slowdown
Adjustment
Lowering &
Leveling
Speed
Adjustment
MDQXDO LowerLQJ9Dlve
High Pressure
Relief Adjustment
NOTES
0DNH DGMXVtments with the FDU empt\.
2. Ensure s\stem KDV DW OHDVt 90 36,VWDWLF
pressure before Ddjusting.
3. Do not DGjust the YDOYH unless oil
WHPSHUDWXre is between 80° - 110° F.
4. Do not DWWHPSW to DGMXVW the LoweriQJDQG
Leveling Screw unless the FDU is moving
or resting on the EXƨHU VWDQGs with
pressure Rƨ the lowering piston, or YDOYH
GDPDge mD\ result.
5. Leveling speed Dnd zone DGjustments Dre
sensitive Dnd mD\ require multiplHDWWHPSWV
6. After completing ƩQDl Ddjustments,
bleed the FDU down slightl\ with the
mDQuDO lowering vDOve to see if it levels
EDFN up with the ƪRRU If not, the slowdown
DGjustments need to EHUHFKHFNHG
ADJ. NAME
PRELIMINARY SETTINGS
Appx.
ƅ out.
LOW PRESSURE
Turn CCW until screw disengDJHV from piston, then CW
until resistDQFe is felt, turn CCW DQ DGditioQDO 3 turns.
Turn CCW until the screw stops, then CW 2 turns.
UP STOP
UP SLOWDOWN
UP START
DOWN START
Turn CW until the screw stops, then CCW 6 turns.
DOWN
SLOWDOWN
Turn CW until the screw
stops, then CCW 5
Ƅ
turns.
LOWERING &
LEVELING
Turn CW until the screw stops, then CCW 3 turns.
MANUAL
LOWERING
Turn CW until the screw stops (closed).
ADJ. NAME PRELIMINARY ADJUSTMENTS
0DNH this Ddjustment before Dn\ other! Disconnect both UP solenoids (disconnect CON15 on ,2)DQGDFWLYDWH
the pump (the FDU should not move Dt this point). SLOWLY turn the low pressure screw C:XQWLOWKHFDUEHJLQV
to move, then CCW until it just stops. For 95 GPM pumps DQG lower, turn CCW DQDGGLWLRQDOž turn. For over
95 GPM pumps, turn CCW DQ DGditionDl ½ turn. Turn Rƨ the pump, tighten the ORFN nut, DQd reconnect both
solenoids. No further Ddjustment should be necHVVDr\ on low pressure. Turning CW closes the regulDWRU piston.
RELIEF
Never opeUDWe Dbove 600 PSI!
Open the PDQuDO lowering vDlve slightl\, shut oƨ the YDOYH to the MDFN line, Dnd
UXQWKHFDUXSRQ0DFKLQH5RRP,QVSHFWLRQTurn the relief screw CW to increDse pressure or CCW to reduce
SUHVVXUH&ORVHWKHPDQXDOORZHULQJYDOYHDQGUHFKHFNWKHSUHVVXUH$GMXVWWKHUHOLHIVFUHZDVQHFHVVDU\
6WRSWKHUXQYHQWSUHVVXUHZLWKWKHPDQXDOORZHULQJYDOYHDQGRSHQWKHVKXWRƨYDOYH
\MSS
FORBIDDEN
OK
RELIEF
UP LEVELING
Turn CW until the screw stops, then CCW 2 turns.
Turn CW until the screw stops, then CCW 4 turns.
Turn CW until the screw stops, then CCW 3 turns.
Turn CW until the screw stops, then CCW 6½ turns.
DOWN STOP
LOW
PRESSURE