INSTALLATION DES ATTACHES
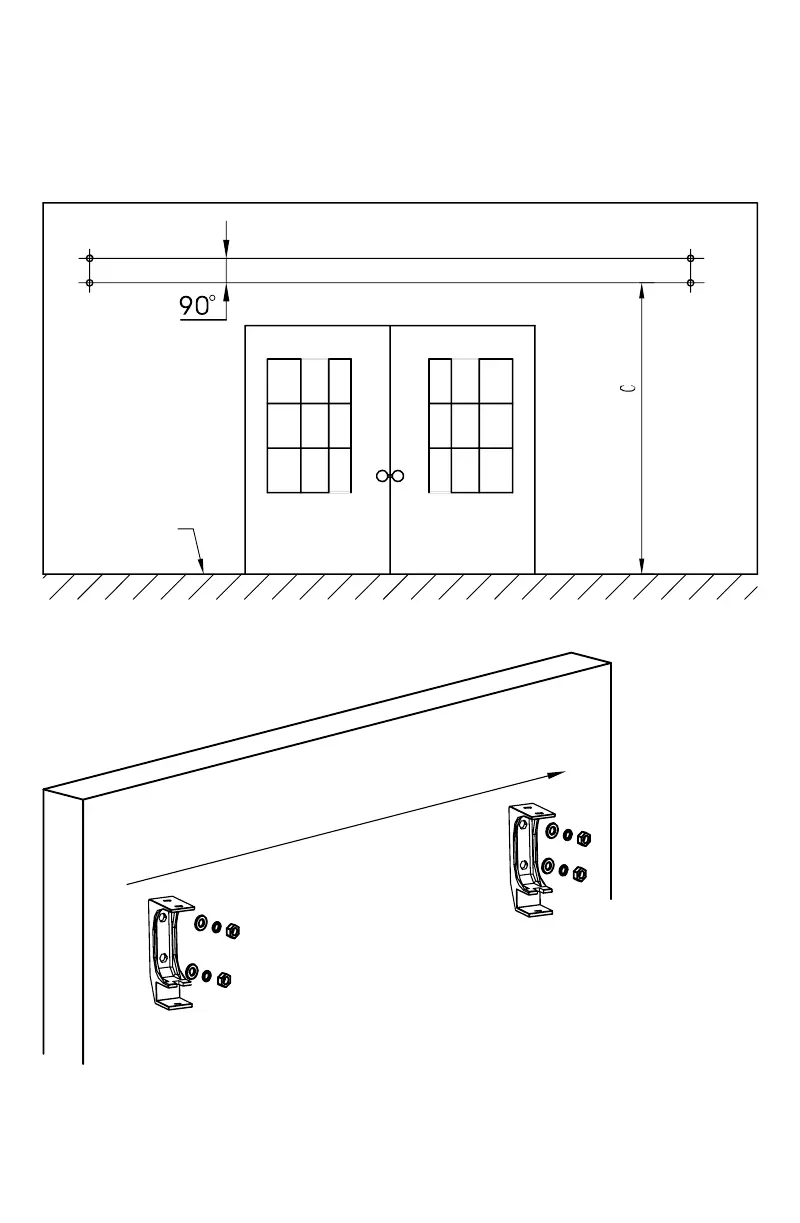
Les trous de chacune des attaches doivent être alignés verticalement et horizontalement.
Marquez la hauteur sur le mur ou au plafond et positionnez les attaches pour marquer
les trous à percer.
INSTALLATION OF THE BRACKETS
The holes in each bracket must be aligned horizontally and vertically. Mark the height on the wall or ceiling and locate
the position of the holes to be drilled for the installation of the brackets.
Assurez-vous que les attaches sont alignées horizontalement /
Make sure the brackets are horizontally aligned
SOL
GROUND
INSTALLATION
Deux personnes doivent procéder à cette installation.
Two persons must perform this installation.
AVANT L’INSTALLATION
• Déballez l’auvent et défaites les attaches. Retirez les pièces et mettez-les de côté.
Repérez les modules pliants, comme les bras articulés. Assurez-vous que vous avez bien
en main toutes les pièces et qu’elles sont toutes en bon état. S’il advenait qu'il manque
une pièce ou que l'une d'elles soit endommagée, n’installez pas l’auvent, rapportez-le à votre
détaillant avec la facture où la date d’achat apparaît pour échanger le produit.
• Lisez attentivement les instructions avant d’entreprendre l’installation.
• Ne modifiez pas la structure ni l’auvent. Le fait de ne pas vous conformer aux instructions
peut occasionner des blessures.
• Assurez-vous que le mur ou le plafond où vous voulez installer l’auvent est bien solide
et adéquat pour supporter le produit.
BEFORE THE INSTALLATION
• Carefully unpack and detach the fasteners. Remove and store the components in a safe place. Beware of the
foldaway components, such as the folding arms. Make sure you have all the components and that they are all in good
order. If there is a part missing or if one should be damaged, do not install the awning, bring it back to your retailer
with the invoice where the date of the purchase is shown to exchange the product.
• Carefully read the assembly instructions before starting.
• Do not modify the design or manufacturing of the canopy. Failure to follow the instructions may cause injuries.
• Make sure the wall or ceiling is solid enough and suitable for the installation of the awning.
HAUTEUR DES ATTACHES
Veuillez noter que les attaches robustes sont conçues pour une installation au mur
ou au plafond pour les trois modèles offerts. Comme illustré, il est recommandé d’installer
l’auvent à un angle de 80° avec le mur lorsque l’auvent est ouvert. Pour déterminer
la hauteur où les attaches doivent être fixées, utilisez la formule suivante :
C = A + 0,17 *H
A = la hauteur recommandée de la ligne avant
H = la longueur maximum de la toile
0,17 = est le chiffre d’ajustement pour l’inclinaison
recommandée de 80°. Si vous préférez utiliser l’auvent
à un angle d’inclinaison inférieur, par exemple pour un angle
de 60°, vous pouvez remplacer le chiffre par 0,58,
ou par 1 pour un angle maximum de 45°.
HEIGHT OF BRACKETS
Please note that the brackets are robust and can be attached to the wall
or ceiling for the models available. As shown, it is recommended to install
the canopy at an angle of 80° with the wall when the awning is opened.
To determine the height where to fix the brackets, use the following formula:
C = A + 0,17 *H
A = the recommended height of the front profile
H = the maximum length of projection of the fabric
0,17 = is the adjustment number for the recommended inclination angle of 80°. If you prefer to use the awning at a
different inclination angle, you may replace the number by 0.58 for an angle of 60°, or by 1 for a maximum angle of 45°.
54
 Loading...