This document is a user manual for a VEVOR inflatable spray paint booth. It provides essential information regarding safety, product specifications, package contents, a product diagram, installation instructions, storage guidelines, usage directions, and troubleshooting tips.
Function Description
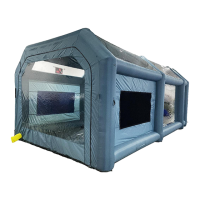
The VEVOR inflatable spray paint booth is designed as a portable, temporary enclosure for painting tasks. It serves as a simple tool room to contain paint overspray and provide a relatively clean environment for painting. The booth is inflated using blowers and features filtration systems to manage air quality. It is intended for use in open, flat, and clean ground conditions, and is not suitable for use in adverse weather conditions such as rain, strong winds, or hail. The booth requires continuous inflation by a blower during operation.
Important Technical Specifications
The manual lists several models of the spray paint booth, varying in size and specifications.
Model Sizes (Length x Width x Height):
- 4X3X2.75: 13 x 10 x 9 ft
- 6X3X2.5: 20 x 10 x 8 ft
- 7X4X2.75: 23 x 13 x 8.5 ft
- 8X4.5X3.3: 26 x 15 x 11 ft
- 8.5X4.8X3.3: 28 x 16 x 11 ft
- 10X6X4: 33 x 20 x 13 ft
Material:
- All models are constructed from 210D Oxford fabric.
- Color: Blue for all models.
Electrical Specifications:
- Input Voltage: 120V~ (USA) or 220-240V~ (EUR/AUS) at 50Hz/60Hz.
- Inflation Blower Power:
- 950W (for 4X3X2.75, 8X4.5X3.3, 8.5X4.8X3.3 models)
- 750W (for 6X3X2.5, 7X4X2.75 models)
- 1100W (for 10X6X4 model)
- Ventilation Blower Power:
- 480W (USA) / 550W (EUR/AUS) (for 6X3X2.5, 7X4X2.75 models)
- 750W (USA) / 750W (EUR/AUS) (for 8X4.5X3.3, 8.5X4.8X3.3 models)
- 950W (USA) / 950W (EUR/AUS) (for 10X6X4 model)
- The 4X3X2.75 model does not list a separate ventilation blower, implying it might use a single blower for both inflation and ventilation or has a different ventilation mechanism.
Weight (Approximate):
- G.W (Gross Weight):
- 25.4kg (4X3X2.75)
- 36.2kg (6X3X2.5)
- 44.4kg (7X4X2.75)
- 56kg (8X4.5X3.3)
- 57.4kg (8.5X4.8X3.3)
- 74.6kg (10X6X4)
- N.W (Net Weight):
- 21.6kg (4X3X2.75)
- 31kg (6X3X2.5)
- 39kg (7X4X2.75)
- 50kg (8X4.5X3.3)
- 51.2kg (8.5X4.8X3.3)
- 67.6kg (10X6X4)
Package Contents:
- Spray paint booth (x1)
- Inflation blower (x1)
- Ventilation blower (x1, except for 4X3X2.75 model)
- Storage bag (x1)
- Sand bags (x4 or x6 depending on model)
- Stakes (x4 or x6 depending on model)
- Ropes (x4 or x6 depending on model)
- Pack of repair patches (x1)
Product Diagram Components:
- Front Door
- Air Column
- Light Hook
- Ceiling
- Rope Ring
- Activated Carbon Filter Cotton
- Handle
- Ventilating Tube
- Air Column Filling Tube
- Air Blower
- Transparent Window
- Emergency Escape Window
- Double Filter Cotton
- Exhaust Zipper Port
- Bottom
- Metal Ring
- Power Line Inlet
Usage Features
Safety Instructions:
- Avoid use in rain, strong wind, hail, or other bad weather.
- Keep away from sharp objects, blades, and fire sources to prevent damage.
- Ensure good ventilation when painting inside due to scarce air.
- Requires 2 to 4 people for installation due to its large size.
- Users must carefully read all instructions and procedures for safe operations.
Installation Process:
- Unfold the tent on a clean, level ground.
- Zip up both sides of the product.
- Tie ropes to the rope rings.
- Connect the air tube(s) to the blower outlet(s). The manual distinguishes between a ventilation blower (1) and an inflation blower (2) in an illustrative image.
- Once inflated, secure the tent with stakes using the bottom metal rings.
- Tie windproof ropes to fixed objects for stability.
Direction for Use:
- The product is a simple tool room for painting and should not be used in windy or rainy conditions.
- The blower must continuously inflate the booth; do not cut off the power supply during use.
- In case of power failure, escape through the front door, safety window, or back door.
- In emergencies, the tent can be cut with a knife for escape.
- Always use on a flat, clean, open ground.
- If the tent shakes excessively in the wind, use windproof ropes and stakes to secure it.
- Ventilation may degrade after repeated use; the inner blue filter cotton can be removed or replaced to improve airflow.
- If inflation is difficult, zip up the front and back doors, turn on the ventilation blower first, then the inflation blower to fully inflate the tent.
Maintenance Features
Storage Instruction:
- Store the product dry to prevent dampness and mildew.
- Place the booth in a storage bag and keep it in a dry environment.
- Avoid sharp objects to prevent scratching.
- After wet weather, air out the tent on sunny days.
Storage Process:
- Unzip and open the front and back doors.
- Turn off both air blowers and open all exhaust zipper ports to drain air.
- Flatten the tent.
- Roll up the tent.
- Secure the rolled tent with ropes.
- Place it into the storage bag and store in a dry environment.
Maintenance, Repair, and Troubleshooting:
- After use, dry the tent before storage.
- If stored in a humid environment, take it out and open it on sunny days.
- For tears, use the provided repair material and tools.
Troubleshooting Guide:
- Blower not working:
- Cause: Voltage mismatch, no power supply, blower switch off.
- Solution: Match voltage, turn on power, turn on blower switch.
- Lack of tent pressure:
- Cause: Voltage instability, air tube connected to the wrong blower, exhaust ports not zipped properly.
- Solution: Supply stable voltage, connect air tube to the inflation blower, zip both sides of the exhaust ports.