This document outlines the operation, installation, and maintenance of a VEVOR Ventilation Fan, designed for various applications requiring efficient air movement. The fan is part of VEVOR's "Tough Tools, Half Price" product line, emphasizing competitive pricing compared to major brands.
Function Description
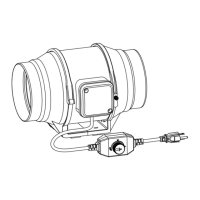
The VEVOR Ventilation Fan is an inline duct fan designed to move air through ducting systems. Its primary function is to provide ventilation by either exhausting stale air or supplying fresh air to a space. The fan features a motor box assembly enclosed within flanges, allowing for integration into existing ductwork. An external speed controller provides adjustable airflow, enabling users to customize the ventilation rate according to their specific needs. The fan's design includes an airflow direction marking to ensure correct installation for optimal performance.
Usage Features
The ventilation fan is designed for straightforward use and offers several features to enhance its functionality and user experience:
- Adjustable Speed Control: The fan comes with a stepless speed controller, allowing users to precisely adjust the wind speed from the highest to the lowest setting. This feature is crucial for adapting the fan's performance to different environmental conditions or ventilation requirements. The controller typically includes an "OFF" position for complete shutdown and an "ON" position for operation, with a rotary knob to fine-tune the speed. A slight motor sound at low speeds is considered normal operation.
- Flexible Installation Options: The fan can be mounted in various ways to suit different setups. It can be secured to wood supports or studs using wood screws and wall anchors. For installations requiring suspension, rope hangers can be looped around the flanges to secure the fan. The design allows for integration with ducting systems, where suitable ducts and clamps are used to ensure tight sealing at both ends of the fan.
- Clear Airflow Direction Marking: The fan unit includes an airflow direction marking on both the motor box and the flange bracket. This ensures that the fan is installed correctly, with the airflow pointing in the desired direction, which is critical for effective ventilation.
- Modular Design for Installation: The installation process involves several steps that highlight the fan's modular design. The motor box assembly can be separated from the flange bracket, simplifying the mounting of the bracket first, followed by the re-insertion and securing of the motor box. This modularity aids in easier handling and precise positioning during installation.
- Safety Considerations: The manual emphasizes several safety precautions, including the importance of using a power supply that matches the rated voltage, disconnecting the fan when moving it, and avoiding the use of the fan if it emits smoke, odor, or abnormal noise. It also warns against disassembling or repairing the machine during use and advises against inserting fingers or other objects through the guard when the fan is running. Specific warnings are given regarding the power cord, such as not damaging, bending, or forcibly pulling it, and unplugging it when the machine is not in use for extended periods or during cleaning.
Maintenance Features
Regular maintenance is crucial for ensuring the longevity and optimal performance of the VEVOR Ventilation Fan. The manual provides clear guidelines for cleaning and care:
- Annual Maintenance: Regular maintenance is recommended annually. Before any maintenance, it is imperative to power off and disconnect the fan from the power supply to prevent electric shock or injury.
- Cleaning Procedure: The cleaning process is designed to be thorough yet simple. It involves:
- Removing the Motor Box: The motor box assembly is detached from the mounting flange, similar to the initial installation step. This allows for better access to internal components.
- Cleaning Impeller and Fan Blades: A damp cloth should be used to clean the impeller and fan blades, removing any accumulated dust and debris. The wind circle between the motor box and the input flange should also be removed and cleaned.
- Cleaning Stator Blades and Flanges: The stator blades on the opposite end of the fan should be cleaned of dust and debris. The interior areas of both the output and exhaust flanges also require cleaning.
- Re-securing the Motor Box: After cleaning, the motor box is re-secured onto the mounting flanges, ensuring all components are properly aligned and fastened.
- Chemical and Water Avoidance: Users are explicitly instructed not to use harsh chemicals such as gasoline, benzene, or diluents to wipe the fan, as these can damage the materials. Furthermore, water should not be allowed to enter the motor and electric parts. Plastic parts should not be immersed in water with a temperature higher than 60 °C.
- Power Cord Care: If the power line is damaged, it must be replaced by the factory, its maintenance department, or qualified professionals to avoid danger. When unplugging the power cord, users should pull the plug itself, not the cord, to prevent damage to the wire and potential leakage or electric shock.
- Environmental Considerations: The manual highlights that the product is subject to European Directive 2012/19/EC, indicating that it should not be discarded with normal domestic waste. Instead, it must be taken to a collection point for recycling electrical and electronic devices, promoting environmental responsibility.
- Supervision for Children: The appliance can be used by children aged 12 years and above and persons with reduced physical, sensory, or mental capabilities, or lack of experience and knowledge, only if they have been given supervision or instruction concerning the safe use of the appliance and understand the hazards involved. Children should not play with the appliance, and cleaning and user maintenance should not be performed by children without supervision.
This comprehensive approach to function, usage, and maintenance ensures that the VEVOR Ventilation Fan provides reliable and safe operation over its lifespan.