This document outlines the features, installation, operation, and maintenance of a VEVOR Ventilation Fan, designed for various air circulation needs. The fan is part of VEVOR's "Tough Tools, Half Price" product line, emphasizing competitive pricing compared to major brands.
Function Description
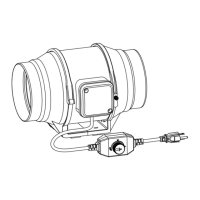
The VEVOR Ventilation Fan is an inline duct fan equipped with a smart controller for precise environmental management. Its primary function is to circulate air, making it suitable for applications requiring controlled ventilation, such as grow tents, hydroponics, or other enclosed spaces where temperature and humidity regulation are crucial. The fan operates by drawing air from an intake flange and expelling it through an exhaust flange, with an airflow direction marking to guide proper installation.
The smart controller is a key component, allowing users to program the fan's operation based on various environmental triggers. It features a digital display that shows real-time temperature, humidity, fan speed, and current settings. The controller supports multiple operational modes, including ON, OFF, TIMER, and AUTO, each designed to address specific ventilation requirements. In AUTO mode, the fan can be programmed to activate based on high or low temperature and humidity triggers, ensuring optimal environmental conditions are maintained automatically. Additionally, the controller includes alarm settings for high/low temperature and humidity, providing alerts if conditions exceed or fall below predefined thresholds.
The fan is designed to be versatile, capable of supporting dual connections with EC motors, allowing two fans of any size to be connected to a single controller. This feature enhances its adaptability for larger or more complex ventilation systems. The power supply is designed for a wide voltage range (120-240V AC), making it suitable for use in various regions, though a travel adapter or power converter might be necessary outside the US.
Usage Features
The VEVOR Ventilation Fan offers a user-friendly interface with several programming and control features:
Operational Modes:
- ON Mode: The fan runs continuously at a user-defined maximum blowing strength (0-10), regardless of temperature or humidity. This mode is ideal for constant air circulation or setting the fan's peak performance when triggers are active.
- OFF Mode: The fan remains off, irrespective of environmental conditions. In this mode, users can adjust the display brightness (1/2/3/A3) and switch between Fahrenheit (°F) and Celsius (°C) temperature units by holding the up or down button.
- TIMER Mode: Allows users to set a specific duration for the fan to run. Once the timer is set, the fan ramps up to the ON Mode's setting and operates until the countdown expires. Leaving this mode pauses the timer, which resumes upon return.
- AUTO Mode: This is the most advanced mode, enabling automated operation based on environmental triggers. Users can set:
- High Temperature Trigger: The fan activates if the probe's temperature reading meets or exceeds the set value, ramping up to the ON Mode's speed. It turns off if the temperature falls below the trigger.
- Low Temperature Trigger: The fan activates if the probe's temperature reading meets or falls below the set value, ramping up to the ON Mode's speed. It turns off if the temperature rises above the trigger.
- High Humidity Trigger: The fan activates if the probe's humidity reading meets or exceeds the set value, ramping up to the ON Mode's speed. It turns off if the humidity falls below the trigger.
- Low Humidity Trigger: The fan activates if the probe's humidity reading meets or falls below the set value, ramping up to the ON Mode's speed. It turns off if the humidity rises above the trigger.
Triggers can be turned OFF by holding the up and down buttons simultaneously. It's important to note that AUTO mode triggers can activate even if a different trigger within AUTO mode is being viewed.
Alarm Settings:
The controller also includes alarm functionalities to alert users to critical environmental changes:
- High Temperature Alarm: Sets a maximum temperature threshold. If the probe's reading exceeds this, an audible alarm sounds, and its icon flashes. The alarm deactivates if the temperature falls below the trigger or any button is pressed.
- Low Temperature Alarm: Sets a minimum temperature threshold. If the probe's reading falls below this, an audible alarm sounds, and its icon flashes. The alarm deactivates if the temperature rises above the trigger or any button is pressed.
- High Humidity Alarm: Sets a maximum humidity threshold. If the probe's reading exceeds this, an audible alarm sounds, and its icon flashes. The alarm deactivates if the humidity falls below the trigger or any button is pressed.
- Low Humidity Alarm: Sets a minimum humidity threshold. If the probe's reading falls below this, an audible alarm sounds, and its icon flashes. The alarm deactivates if the humidity rises above the trigger or any button is pressed.
Alarm triggers are active only in AUTO, ON, or TIMER modes and require leaving the ALARM SETTING mode to arm the controller.
Calibration and Display:
- Temperature Calibration: Allows adjustment of the probe sensor's temperature reading from -8°F to 8°F (or -4°C to 4°C) to match external thermostats. This is done by pressing the MODE and UP buttons simultaneously in any mode.
- Humidity Calibration: Allows adjustment of the probe sensor's humidity reading from -8% to 8%. This is done by pressing the MODE and DOWN buttons simultaneously in any mode.
- Display Brightness: Adjustable in OFF mode using the up or down buttons, with levels 1, 2, 3, and A3. Setting A3 dims the display to level 1 after 30 seconds of inactivity.
- Controller Lock: The LEAF button can be held for three or more seconds to lock the controller, preventing accidental setting changes. Holding it again unlocks the controller.
- ECO-Mode: Pressing the LEAF button turns off the LCD display while programs, settings, and alarms continue to run in the background. Any button press exits ECO mode.
Alert Icons:
The display features various alert icons:
- Display Lock Alert: Indicates the controller is locked and flashes if an attempt is made to change settings.
- Humidity Alarm Alert: Flashes when a high or low humidity alarm is triggered.
- Temperature Alarm Alert: Flashes when a high or low temperature alarm is triggered.
- Check Fan Alert: Flashes if the fan's probe detects interference, prompting a check for possible issues.
Maintenance Features
Regular maintenance is crucial for the longevity and optimal performance of the VEVOR Ventilation Fan. The design facilitates easy access for cleaning:
Cleaning Procedure:
- Remove Motor Box: Unscrew and loosen the metal rings using a Phillips screwdriver and pliers. Then, remove the motor box from the flange bracket and the wind circle between the motor box and the intake flange.
- Clean Impeller and Fan Blades: Use a damp cloth to wipe away any dust and debris from the impeller and fan blades.
- Clean Stator Blades and Flanges: Clear dust and debris from the stator blades on the opposite end of the fan. Clean the interior of both the output and exhaust flanges.
- Reassemble: Secure the motor box back onto the mounting flanges, ensuring the airflow arrow aligns correctly. Tighten the metal clamps and reposition the metal rings, securing them with screws.
General Care:
- Power Disconnection: Always disconnect the power supply before cleaning or moving the fan to prevent electric shock.
- Power Cord Integrity: Do not damage, bend, forcibly pull, bind, or press the power cord under heavy objects, as this can lead to electrical leakage or fire. If the power cord is damaged, contact a qualified electrician for replacement.
- Environmental Protection: Avoid using the fan in windows where rain could create electrical hazards. Do not spray water or other liquids directly onto the fan, as this can cause a short circuit or electric shock.
- Safe Operation: Never insert fingers, pencils, or any other objects through the guard while the fan is running.
- Long-Term Storage: If the fan is not used for an extended period, unplug the power cord from the socket.
Installation Considerations:
- Mounting: The fan can be mounted in any orientation, including vertically. Ensure the mounting area is structurally sound and free from obstructions.
- Ducting: If installing ducting, use suitable ducts and clamps to ensure a tight seal. Bends in ducting can reduce airflow performance, so straighten the ducting and eliminate as many bends as possible.
- Electrical Safety: When connecting to the power supply, an all-pole power switch with more than 3mm contact separation is necessary. Ensure connections comply with local electrical equipment technical regulations. An earthing device is essential to prevent electric shock in case of malfunction or leakage.
- Airflow: Avoid air reflux via open air flues or other fired equipment.
By following these guidelines, users can ensure safe, efficient, and long-lasting operation of their VEVOR Ventilation Fan.