The VEVOR Truck Air Horn, available in models HS-660, HS-550, HS-661, and HS-551, is designed to provide a loud and clear warning sound for vehicles. This product is part of VEVOR's "Tough Tools, Half Price" line, emphasizing competitive pricing compared to major brands.
Function Description:
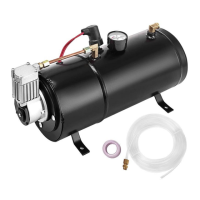
The truck air horn system consists of a compressor, air tank, and one or more horns. The compressor builds and maintains air pressure in the storage tank. When the horn button is pressed, air is released from the tank through the horn(s), producing a loud sound. The system includes a pressure switch to regulate the compressor's operation, ensuring the air tank maintains the desired pressure range. A pressure meter allows for monitoring the air pressure. The HS-660 model features two horns, while the HS-550, HS-661, and HS-551 models feature a single horn or no horn, depending on the specific configuration. The system is designed for vehicle installation, connecting to the vehicle's battery for power.
Important Technical Specifications:
- Voltage: All models operate on a 12V electrical system.
- Power (W):
- HS-660 and HS-661: 190W
- HS-550 and HS-551: 170W
- Working Pressure Range (psi):
- ON: 90 psi (compressor turns on)
- OFF: 120 psi (compressor turns off)
- Storage Tank Capacity (gal):
- HS-660 and HS-661: 1.6 gallons
- HS-550 and HS-551: 0.8 gallons
- Output Sound Maximum (dB): All models produce a maximum output sound of 150 dB.
- Net Weight (kg):
- HS-660: 6.1 kg
- HS-550: 5.45 kg
- HS-661: 4.65 kg
- HS-551: 4.5 kg
Part List (by model):
| NO. |
Name |
HS-660 |
HS-550 |
HS-661 |
HS-551 |
| 1 |
Compressor |
1 |
1 |
1 |
1 |
| 2 |
Horn |
2 |
1 |
0 |
0 |
| 3 |
Air tube |
1 |
1 |
1 |
1 |
| 4 |
Horn connection |
1 |
0 |
0 |
0 |
| 5 |
Horn mount |
1 |
1 |
0 |
0 |
| 6 |
Teflon tape |
1 |
1 |
1 |
1 |
| 7 |
Rubber pad |
4 |
4 |
4 |
4 |
| 8 |
Safety mounting seat |
1 |
1 |
1 |
1 |
| 9 |
Fuse |
1 |
1 |
1 |
1 |
| 10 |
M6 bolt |
12 |
8 |
4 |
4 |
| 11 |
M6 nut |
12 |
8 |
4 |
4 |
| 12 |
M6 washer |
12 |
4 |
4 |
4 |
| 13 |
Air pipe joint |
0 |
0 |
0 |
1 |
Usage Features:
- Installation: The system requires careful installation, including mounting the compressor and horn(s) to the vehicle frame. M6 bolts, nuts, flat washers, and rubber cushion pads are used for secure attachment.
- Air Tube Connection: Air tubes connect the compressor to the horn(s) and the air tank. For the HS-660 model, specific connectors are used to link the two horns. Heating the hose can make installation easier.
- Electrical Wiring:
- Horn Wiring: The horn has two power lines. One connects to a negative terminal (base iron), and the other connects to the positive terminal power supply after the horn switch, using 16AWG or above copper wire.
- Compressor Wiring: The compressor's black line connects to the negative electrode (iron), and the red line connects to the positive electrode of the battery through a 20A power switch and 20A fuse, using 14AWG copper wire.
- Safety Precautions:
- Always read instructions before use to prevent serious injury.
- The compressor can become very hot; avoid touching it with bare skin.
- Install the system in a level, cool, dry place, away from heat and humidity.
- Keep ears away from the speaker due to its very loud output.
- This product is not a toy; keep children away.
- Wear ANSI-approved safety goggles and heavy-duty work gloves during assembly.
- Ensure the assembly area is clean, well-lit, and free of bystanders.
- Do not assemble while tired or under the influence of alcohol, drugs, or medication.
- Assemble on a flat, level, hard, and smooth surface capable of safely supporting the horn system.
Maintenance Features:
- Troubleshooting: The manual provides solutions for common issues:
- Tank pressure drops when compressors shut off: Check for loose drain cock or loose connections. Wrap threads with sealing tape and tighten. Check all connections with soap and water solution and tighten.
- Compressor runs continuously and air flow is lower than normal: This could be due to excessive air usage, loose connections, or a worn piston ring/inlet valve. Decrease air usage, check and tighten connections (using sealing tape), or replace the piston/inlet valve.
- Excessive moisture in discharge: Drain the tank frequently, tilting it to ensure complete drainage. Move the compressor to an area with less humidity or use an air line filter.
- Compressor will not run: Verify the compressor switch is ON. Check for a blown fuse (refer to specifications for correct fuse amperage) and replace if necessary. Allow the compressor to cool for about 30 minutes if the motor overheats, to reset the thermal overload switch. Replace a faulty pressure switch.
- Thermal overload protector cuts: Ensure adequate ventilation around the compressor. Move the compressor to a well-ventilated area or an area with lower ambient temperature.
- Compressor abnormal sound (excessive knocking or rattling): Tighten loose mounting bolts. Replace a worn cylinder or piston ring.
- Drain Valve: The system includes a drain valve (part 11 in the circuit diagram) for removing moisture from the air tank, which is crucial for preventing corrosion and maintaining system performance.
- Fuse: A fuse (part 9 in the part list, part 6 in the circuit diagram) is included for electrical protection. In case of a blown fuse, it should be replaced with one of the correct amperage (20A for the compressor circuit).
Support:
Technical support and E-Warranty Certificate are available at www.vevor.com/support. VEVOR reserves the right to update product technology or software without prior notice.