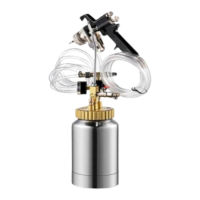
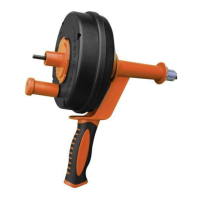
This document describes the VEVOR JY-SS2L Powder Coating Machine, a 2-liter paint pot system designed for applying powder coatings. The system comprises an air pressure regulating valve, a kettle body, a cap, a safety valve, and a sprayer, all constructed from durable materials and subjected to strict quality control. The pot body is polished, and the lid is spray-painted for enhanced durability.
Function Description:
The VEVOR JY-SS2L Powder Coating Machine is used for applying powder coatings. It operates by pressurizing paint within a 2-liter pot, which is then delivered to a sprayer for application. The system allows for precise control over the working pressure and spray pattern, ensuring a uniform and continuous injection of paint.
Important Technical Specifications:
- Model: JY-SS2L
- Capacity: 2 liters
- Maximum Operating Pressure: 45 PSI (0.310 MPa). The maximum allowable pressure must not exceed 50 PSI to prevent personal injury.
- Package Size: 350x230x145mm
- Gross Weight (G.W.): 2.2 KG
- Thread Specifications (North American Standards):
- Air intakes: American style 1/4" self-locking quick plug tubing fitting
- Air outlet (including opening and closing valve): American 1/4", threaded NPS, 18 teeth
- Discharge port (with opening and closing valve): American 1/4", threaded NPS, 18 teeth
- Thread Specifications (European Standard):
- Air intakes: European style 1/4" self-locking quick plug tubing fitting
- Air outlet (including opening and closing valve): European 1/4", thread G, 19 teeth
- Discharge port (with opening and closing valve): European 1/4", thread G, 19 teeth
- Thread Specifications (Australian Standard):
- Air intakes: Japanese style 1/4" self-locking quick plug tubing fitting
- Air outlet (including opening and closing valve): European 1/4", thread G, 19 teeth
- Discharge port (with opening and closing valve): European 1/4", thread G, 19 teeth
Usage Features:
The device is designed for straightforward operation, but safety precautions must be followed.
- Assembly: Assemble according to instructions, wearing ANSI-approved safety goggles and heavy-duty work gloves. Ensure the assembly area is clean, well-lit, and free of bystanders. Do not assemble while fatigued or under the influence of substances. Assemble on a flat, level, hard, and smooth surface capable of supporting a fully loaded Pressure Paint Pot.
- Paint Loading: Before use, confirm there is no residual pressure in the pot. If pressure exists, pull the red safety valve bleed ring on the lid until all gas is released. Rotate the 2L lid (2) counterclockwise to remove it, then pour in the paint.
- Lid Closure: Cover the 2L lid (2) and tighten it clockwise, ensuring it is secure to prevent leaks and ensure safety.
- Handle Attachment: Attach the handle (9) to the top of the hex paint outlet on the lid (6) and lock the nut on the handle.
- Hose Connections: Close all valves. Connect the air supply pipe (17) to the sprayer (16) and the other end to the inlet three-way joint (12) on top of the regulator. Connect the sprayer (16) to the transparent feeding pipe (18), and connect the other end of the transparent feeding pipe to the discharge valve (15).
- Pressure Adjustment: Adjust the intake regulator (11) by rotating it clockwise to increase pressure to the required working pressure. Rotate counterclockwise to reduce pressure.
- Valve Operation: Open the outlet valve (8) and the discharge valve (15).
- Test Adjustment: It is recommended to test the system with water. Adjust the feeding copper ball valve, close the air volume adjustment knob under the sprayer handle, close the spray amplitude adjustment knob above the sprayer, and pull the sprayer switch to observe the discharge from the sprayer head. The nozzle's middle hole paint supply pressure should be uniform, providing a continuous injection at 10-20 cm distance. Slowly unscrew the air volume adjustment knob under the sprayer handle (without releasing the sprayer switch) while observing the water or paint spray point to achieve the desired spray effect.
Maintenance Features:
Thorough cleaning is essential to extend the product's service life, especially after use or if spraying is paused for more than 30 minutes.
- Depressurization: Close all valve switches on the 2L pot lid, remove the quick coupling of the air supply, and pull the red safety valve bleed pull ring on the lid until all gas in the pot is completely released.
- Paint Removal: Unscrew the lid counterclockwise, pour out any remaining paint, and fill the pot with an appropriate amount of diluent (water for water-based paint).
- Cleaning Cycle: Screw the lid back on and connect the air source. Open all valves on the 2L pot lid and spray into a sewer or waste space using the normal spraying method until clean diluent or water is sprayed, indicating the system is clean.
- Air Leakage: If air leakage is detected during use, apply glue evenly along the leakage path, close the barrel lid, and tighten the screws while the pressure reaches 15 PSI. Maintain this pressure for about 10 seconds to allow the glue to penetrate the leakage. Close the intake valve, pull the Red Hat safety valve bleed ring on the lid, and let the device stand for 6-8 hours until the glue is completely solidified before resuming use.
Safety Instructions:
- This product is not a toy; keep children and physically disabled persons from using or operating it.
- Do not exceed the maximum operating pressure of 50 PSI to avoid personal injury.
- The safety valve on the pressure barrel is factory-set to protect against overpressure. Do not remove or adjust it.
- Do not modify the product or perform dangerous operations such as drilling or welding, as this can damage the pressure barrel and affect its service life.
- Use the product only as intended.
- Inspect the product before each use; do not use if parts are loose or damaged.
- Strictly forbidden to pour strong acidic and alkaline liquids into the product to prevent tank corrosion and personal injury.
- Do not spray paint on people or animals.
- Before adding or replacing paint, always close all valves and release all gas from the pot by pulling the Red Hat safety valve bleed pull ring before opening the lid.