This document is a user manual for VEVOR Grease Guns, covering models LD-868, LD-867A, LD-867B, and LD-2710.
Function Description
The VEVOR Grease Gun is a tool designed exclusively for the delivery of grease lubricants. It is used to apply grease to mechanical components, reducing friction and wear, and extending the lifespan of machinery. The manual emphasizes that any use beyond these parameters can lead to serious risks and is contrary to the intended purpose.
Important Technical Specifications
The manual provides a table outlining the specifications for each model:
| Model |
Capacity |
Maximum Pressure |
Grease gun discharge connection |
Grease Filling Options |
Material |
Color |
| LD-867A |
400CC |
6000PSI |
NPT 1/8 |
Cartridge Loading, Suction Fill, Filler Device Loading |
Steel+Aluminium Alloy |
Black+Silver |
| LD-867B |
400CC |
6000PSI |
NPT 1/8 |
Cartridge Loading, Suction Fill, Filler Device Loading |
Steel+Aluminium Alloy |
Black+Silver |
| LD-2710 |
600CC |
10000PSI |
NPT 1/8 |
Cartridge Loading, Suction Fill |
Steel+Aluminium Alloy |
Black |
| LD-868 |
120CC |
3500PSI |
NPT 1/8 |
Cartridge Loading |
Steel+Aluminium Alloy |
Silver |
Components (Vary by model):
All models include a Grease Gun, Grease Hose, Coupler, and User Manual.
Specific models may also include:
- Straight Metal Pipe: LD-867A (1), LD-2710 (1), LD-868 (2)
- Bent Metal Pipe: LD-867A (1), LD-867B (1)
- Pointed Coupler: LD-867A (1), LD-867B (1)
- Locking Clamp Coupler: LD-867A (1)
- Cleaning Cloth: LD-867A (1)
- Leakproof cap: LD-867A (1), LD-867B (1)
- Reinforced Nozzle: LD-868 (1)
- Grease Cartridge: LD-868 (1)
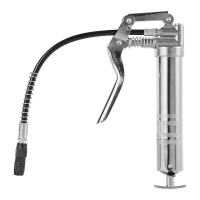
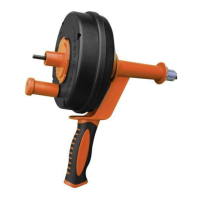
Structure Diagram (Common parts across models, with some variations):
- Head: The main body of the grease gun where the pumping mechanism is located.
- Air Release Valve: Used to exhaust air from the system.
- Movable Handle / Handle: The lever used to operate the pumping action.
- Fix Handle: A stationary handle for grip (on some models).
- Barrel: The cylindrical part that holds the grease.
- Safety Catch: A mechanism to lock the plunger rod.
- Plunger Rod Handle: Used to pull back the plunger rod for loading grease.
- End Cap: Covers the end of the barrel.
Usage Features
The manual provides detailed operating instructions for filling and using the grease gun:
Grease Filling Options:
- Cartridge Loading:
- Unscrew the barrel from the head of the grease gun.
- Pull back the plunger rod handle.
- Remove the plastic cap from the grease cartridge.
- Insert the open end of the cartridge into the grease gun barrel until the rim of the pull-tab end meets the rim of the barrel.
- Assemble the barrel back into the grease gun.
- Activate the safety catch and push the push rod back into the barrel.
- Suction Fill:
- Unscrew the barrel from the head of the grease gun.
- Insert the open end of the barrel about 2 inches into the grease container.
- Slowly pull the plunger rod handle to draw grease into the empty barrel while pushing the barrel deeper into the grease until the plunger rod is completely extended.
- Wipe any excess grease from the outside surface for safety.
- Assemble the barrel back into the grease gun.
- Activate the safety catch and push the push rod back into the barrel.
- Grease Gun Filling Device (for models LD-867A and LD-867B):
- Place the grease gun onto the filling valve of a grease gun filling unit.
- Hold it in place with light counter pressure.
- Fill the grease gun by activating the filling device.
- Assemble the barrel back into the grease gun.
- Activate the safety catch and push the push rod back into the barrel.
Operation:
- Exhaust Air: Press the air release valve or loosen the gun head and barrel (half a turn maximum) or repeatedly actuate the handle to exhaust air.
- Install Fittings: Install the required fittings (grease hose, metal pipe, coupler) as shown in the diagrams. If necessary, wrap 3-5 loops of raw material tape around the joint for a secure connection.
- Greasing: Press the coupler straight onto the grease fitting. Start operating the handle for grease filling.
- Removal: Once greasing is done, slightly tilt the coupler, twist, and pull back to easily remove it from the grease fitting.
Safety Precautions:
- Read and understand all assembly and operation instructions before use.
- Failure to follow safety rules can result in serious personal injury.
- Improper handling can lead to injury and property damage.
- Only qualified and authorized persons should operate the grease gun.
- The grease gun is designed exclusively for grease lubricants; other uses are contrary to its intended purpose.
- Excess pressure can cause the grease gun head and accessories to burst, and can damage grease nipples and machinery.
- Comply with machine manufacturer's maintenance and service instructions.
- Defective accessories (hoses, etc.) must be replaced immediately.
- Do not open the grease gun when it is under pressure.
- When separating the grease gun head and barrel, the push rod must be fully retracted and locked by the safety catch.
- Always use suitable protective equipment, such as gloves and eye protection.
Troubleshooting:
- Grease gun pumps little or no grease:
- Possible Cause: Air trapped in grease, blocked hose, grease too thick or cold.
- Solution: Empty air, clean/replace hose, store gun away from extreme cold or use thinner grease.
- Excessive grease leaks from the back side of the grease gun around the plunger rod:
- Possible Cause: Rubber follower is damaged.
- Solution: Replace the grease gun.
- Grease leaks from the connection between the grease gun head & the extension or between extension & coupler:
- Possible Cause: Loose connection.
- Solution: Tighten the connection using raw material tape.
Maintenance Features
- Pre-use Inspection: Before each use, inspect the general condition of the grease gun. Check for cracked or damaged parts, misaligned or bending moving parts, leaking connections, and any other condition that may affect safe operation. Correct any problems before further use. Do not use damaged equipment.
- Post-use Cleaning: After every use, dry the grease gun with a soft cloth. Remove all grease and debris. Do not use solvents to clean or immerse the gun in any liquids.
- Storage: Store the grease gun in a clean, dry, and safe location, away from children.
- Repairs: All maintenance, service, and repairs not discussed in the manual should only be performed by a qualified service technician.