EasyManua.ls Logo

VEVOR SS-450 - User Manual

VEVOR SS-450
12 pages
Print Icon
To Next Page IconTo Next Page
Loading...
Technical Support and E-Warranty Certificate www.vevor.com/support
DROP SLOT SAFE
MODEL:SS-450
We continue to be committed to provide you tools with competitive price.
"Save Half", "Half Price" or any other similar expressions used by us only represents an
estimate of savings you might benefit from buying certain tools with us compared to the major
top brands and doses not necessarily mean to cover all categories of tools offered by us. You
are kindly reminded to verify carefully when you are placing an order with us if you are
actually saving half in comparison with the top major brands.
Question and Answer IconNeed help?

Do you have a question about the VEVOR SS-450 and is the answer not in the manual?

Summary

Need Help? Contact Us!

Contact Information

Contact VEVOR for product questions or technical support via email at CustomerService@vevor.com.

Instructions

Opening Your Safe for the First Time

Lock Indicator Descriptions

Details the function of lock, unlock, and setting indicator lights for the electronic lock mechanism.

Personal Password Setting

Manage Password Settings

Three Ways to Open the Safe

Opening with Emergency Key

Use the emergency key and knob to open the safe, especially for the first time or when battery is out.

Opening with Password and Knob

Daily unlock procedure using personal or management password followed by turning the knob.

Opening with External Power

Access the safe using an external power box when internal battery is dead or key is lost.

Low Battery Alert

Vigilance Setting and Deactivation

How to Wall or Floor Mounting

Wall;Floor Mounting Procedure

Details on drilling holes for anchors and securing the safe to walls or floors using screws.

Safety and Compliance

Installation and Usage Safety

Ensures safe installation by posting on wall/floor and proper handling to prevent damage or injury.

Warmly Reminder

Important User Reminders

Covers handmade characteristics, keeping keys safe, key compatibility, protective film, and smooth operation.

After-Sales Service

Correct Disposal

Overview

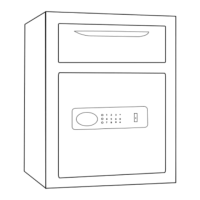
This document provides instructions for the VEVOR Drop Slot Safe, model SS-450, designed to offer secure storage for valuables with the added convenience of a drop slot for deposits. The safe is intended for both personal and commercial use, providing a robust solution for securing cash, documents, and other important items.

Function Description

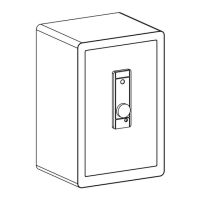
The VEVOR Drop Slot Safe is an electronic safe equipped with a digital keypad for secure access, an emergency key for manual override, and a drop slot for depositing items without needing to open the main door. This design is particularly useful in environments where cash or documents need to be deposited frequently by multiple individuals, while access to the main compartment is restricted to authorized personnel. The electronic lock system offers a high level of security, allowing users to set a personal password for daily operation. In situations where the electronic system is inaccessible due to dead batteries or forgotten passwords, the emergency key provides a reliable backup. The safe also incorporates an alarm system to deter unauthorized access, enhancing its security features. Its construction is designed to be tough and durable, reflecting the VEVOR brand's commitment to providing reliable tools.

Usage Features

Opening the Safe for the First Time:

To open the safe initially, you will need to use the provided emergency key.

  1. Locate the emergency lock cover and press it down to reveal the keyhole.
  2. Insert the emergency key into the keyhole and push it in.
  3. Rotate the key approximately 65 degrees counterclockwise.
  4. While holding the key in position, turn the knob counterclockwise to open the door.
  5. Once the door is open, install four AA (1.5V) alkaline batteries into the internal battery box, ensuring correct polarity (+ and -).

Personal Password Setting:

The electronic lock comes with a default factory password of "123456". To set your personal password:

  1. Press the green button located inside the battery box (this acts as the code switch). The buzzer will emit a beep, and the touch light will illuminate.
  2. Enter your desired password. This password should be between 3 and 12 digits long.
  3. Press the "#" key to confirm your new password. The buzzer will emit a long beep, and the light will turn off, indicating that the password has been successfully set or changed.

Managing Password Settings:

To change an existing password:

  1. Wake up the touch screen by touching it.
  2. Enter "00".
  3. Press the green button inside the battery box (code switch).
  4. Enter your new desired password.
  5. Confirm the new password by pressing the "#" key. Note: It is crucial not to set your personal password to be the same as the management code for security reasons.

Three Ways to Open the Safe:

  1. Emergency Key + Knob (for initial use, forgotten password, or dead battery): Insert the emergency key vertically, turn it to the left, and simultaneously turn the knob to the right to open the safe.
  2. Password + Knob (for daily unlocking): Enter your personal or management password, press "#" or "*", and then turn the knob to the right to open the safe.
  3. Password + Knob + External Power Box (when internal battery is dead and key is damaged/lost): If the internal batteries are completely dead and the emergency key is unavailable, you can use the external power box. Insert the external power box into its designated port, enter your personal or management password, press "#" or "*", and then turn the knob to the right to open the safe.

Low Battery Alert:

The safe operates on four 1.5V alkaline batteries. When the battery voltage is low, the safe will provide continuous reminders. After opening the safe, it will emit "drip, drip, beep" sounds twice. The power indicator light will flash for approximately 30 seconds before turning off, signaling that the batteries need to be replaced promptly. In such cases, you can use the emergency power box or the mechanical emergency key to operate the safe. The electronic lock features a power-off protection function, ensuring that your password is never lost even when the batteries die.

Vigilance Setting and Deactivation (Alarm Function):

  1. To set the alarm: Wake up the touch screen and press the "*" key. The computer board will automatically enter the alarm state. The safe will trigger an alarm immediately upon detecting vibration.
  2. To cancel the alarm: When the safe is in the alarmed state, enter the set password and press the "#" key to open the safe and eliminate the alarm. Tips: The electronic lock has an automatic alarm feature that triggers for 30 seconds or 1 minute after 3 (or 5) consecutive incorrect password entries. Entering the correct password will deactivate the alarm sound.

Wall or Floor Mounting:

The safe can be mounted to either a wall or the floor for added security.

  1. Drill appropriate-sized holes for the anchors you intend to use.
  2. Mount the safe by running screws from inside the safe and securing them to the anchors. Ensure the safe is mounted securely. Note: Use proper drill tools depending on the type of floor (wood, tile, or concrete) you are mounting the safe to.

Maintenance Features

Safety and Compliance:

  1. To reduce the risk of theft, the safe must be securely mounted to a wall or floor.
  2. Always keep the emergency key in a secret location, separate from the safe. Never store the emergency key inside the safe, as it will be inaccessible if the battery runs out.
  3. Avoid placing the product on an unstable overhead surface to prevent it from falling, which could damage the product or injure people.
  4. Do not spill liquid on the control panel, as this could cause an electric shock to the internal electronic components and prevent them from functioning correctly.

Warmly Reminder (General Maintenance Tips):

  1. Due to the handmade nature of the product, minor solder joints or rust stains inside are normal and do not affect functionality.
  2. Always keep emergency keys, secret cabinet keys, and the external power supply box in a safe and accessible place.
  3. The emergency key is unique to your safe and cannot open safes of other brands or even other safes of the same brand. Do not attempt to use an unmatched key, as this could damage the safe and the key may become stuck.
  4. The protective film on the knob cover can be removed.
  5. Before closing the door, ensure that the emergency key is not inserted or misaligned. This prevents the lock bolt from jamming and ensures smooth knob operation.
  6. If the door does not shut, check for any obstructions. If the door bolts are extended, re-enter the user code and turn the knob clockwise to retract them before attempting to close the door again.

After-Sales Service:

VEVOR offers customer support for any product-related issues. If you encounter problems, you can contact online customer service for assistance within 24 hours. The product comes with a 90-day return or exchange policy for any reason.

Correct Disposal:

This product is subject to the European Directive 2012/19/EC. The crossed-out wheelie bin symbol indicates that the product and all its marked accessories require separate refuse collection within the European Union. It should not be discarded with normal domestic waste but must be taken to a designated collection point for recycling electrical and electronic devices.

VEVOR SS-450 Specifications

General IconGeneral
ModelSS-450
CategorySafes
BrandVEVOR
MaterialSteel
FireproofNo
WaterproofNo
ColorBlack
Lock TypeElectronic

Related product manuals