Fingertip Oximeter User Manual
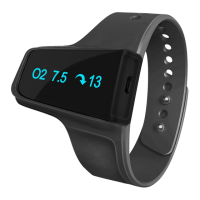
Checkme O2 Max
Smart Wrist Pulse Oximeter
User Manual
1. Introduction
1.1 Intended Use
This product is intended to be used for measuring, displaying and
storing of pulse oxygen level (SpO
2
) , heart rate and motion of
adults. App can show the oxygen level, heart rate; get record,
display results and report.
It's not a medical device. This device is for Sports and Aviation
use only and not intended for medical use.
Note:
The data and results provided by this device are for pre-check screening
purpose only and cannot be directly used for diagnostic or treatment.
The data provided by the APP and PC software (optional) is not intended
for diagnosis or treatment purpose, always consult your doctor for any
health condition.
Warnings and Cautionary Advices
• DO NOT squeeze the sensor or apply excessive force on
the sensor & cable.
Do not use this device during MRI examination.
Never submerge the device in water or other liquids. Do not
clean the device with acetone or other volatile solutions.
Do not place this device in pressure vessels or gas
sterilization device.
Consult your doctor immediately if you experience
symptoms that could indicate acute disease.
Do not self-diagnose or self-medicate on the basis of this
device without consulting your doctor. In particular, do not
start taking any new medication or change the type and/or
dosage of any existing medication without prior approval.
Use only cables, sensors and other accessories specified in
this manual.
Prolonged using may increase the risk of undesirable
changes in skin characteristics, such as irritation,
reddening, blistering or burns.
Check the oxygen level sensor application site every 6-8
hours to determine the positioning of the sensor and the
circulation and skin sensitivity of the user. User sensitivity
varies depending on personal status or skin condition. For
users with poor peripheral blood circulation or sensitive
skin, inspect the sensor site more frequently.
Functional tester cannot be used to assess the accuracy of
an oxygen level sensor or a device.
This device is designed to determine the arterial oxygen
saturation percentage of functional hemoglobin. Factors
that may degrade pulse oximeter performance or affect the
accuracy of the measurement include the following:
- excess ambient light
- excessive motion
- electrosurgical interference
- blood flow restrictors
(arterial catheters, blood pressure cuffs, infusion lines,
etc.)
- moisture in the sensor
- improperly applied sensor
- incorrect sensor type
- poor pulse quality
- venous pulsations
- anemia or low hemoglobin -concentrations
- cardiogreen and other -intravascular dyes
- carboxyhemoglobin
- methemoglobin
- dysfunctional hemoglobi
1.2 Guide to Symbols
1.3 Unpacking
Main Unit × 1
Ring Sensor × 1
Cable × 1
User Manual × 1
2. Using the Device
2.1 Overview
1. Pulse oximeter
2. Wristband
3. Sensor interface / charging interface
4. Power button
5. Oxygen level sensor
Screen display item description:
2.2 Charging
Charge the battery before using.
Use the charge cable to charge the battery of device in the USB
Port of the computer or with USB charging adapter.
After being fully charged, the device will power off automatically.
2.3 Power on/off
Power on:
Press the button for 1 second to turn on the device.
Power off:
Automatically power off: The device will turn off automatically in 2
minutes if no measurement, no operation or without App connection.
Manually power off: You can press the button for about 2 seconds
to turn off.
2.4 Take the first recording
Start. Wear the device and the Ring Sensor, press the button to
power on. And keep yourself in the quiet environment.
(For the sake of clarity, recommended the user wear the device
watch on their left wrist and put the ring sensor on the thumb. If it
is too tight, try another finger. Avoid being loose.)
Stop. After the record, take off the Ring Sensor (and the device),
the recording will be saved after the countdown.
(If the working time is less than 1 minute, the data
will not be saved.)
Note:
• Please avoid excessive motion for the sensed finger during
recording and avoid any strong ambient light condition.
2.5 Stop working & sync data
Take off the sensor, the countdown will begin.
During the countdown, if you wear the sensor
again, the record will be resumed.
After the countdown, the data will be ready for sync.
Note:
The duration of the recording is 1mins~10 hours. And the device
can collect and store maximum 4 recording, when the 5th recording
coming, the first recording will be will covered.
Sync data to the ViHealth App
You can Sync the data to your app after the
countdown or next time after you turn on the device.
Note: Refer the ViHealth app manual for more
details.
2.5.1 How to find the Serial Number?
1)Detach the main unit from wristband.
2)Flip the main unit over, the series number is
printed on the label of product.
Note:
The serial number is on the back of the device.
2.6 How to synchronize the time of the device
The time of the device will be automatically synchronized with the
network time on your smart device after connected with the app.
Note: Refer the ViHealth app manual for more details.
2.7 Reminder
When the device detects low oxygen level or abnormal heart rate, it
supports triggering reminders.
You can customize the reminder after the device power on, or use
the App to configure.
2.8 Download App
App name: ViHealth
iOS: App Store
Android: Google Play
Compatibility
The device is compatible with iOS versions 9.0+ and Android
versions 5.0+. Refer the ViHealth app manual for more details.
2.9 Bluetooth Connection
The device Bluetooth will be enabled automatically when the device
is on.
Note: DO NOT PAIR in the settings of your smart device.
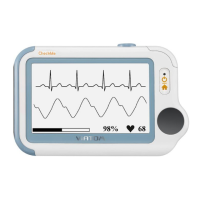
3. PC software
3.1 Download the PC Software
PC Software: O2 Insight Pro
Download from:
https://iwearpulse.com/pages/app- download
Install the software on Windows PC or Mac.
3.2 How to connect the device to PC
1. Turn on device, connect the device to PC USB port with the
supplied Cable of data.
2. Open the PC software, download data from the device.
3. With the optional PC software,You can view and print report,
which can also be exported as PDF or CSV files.
3.3 How to connect the device to Mac
1. Turn on device, and turn on the Bluetooth of the Mac.
2. Open the “O2 Insight Pro” software and click the “Connect”
on the screen. Choose your device to connect.
3. Then click the “download” on the screen. Then the data will
sync with your Mac.
4. You can view and print report, which can also be exported as