Do you have a question about the Victor High Rise DC050 and is the answer not in the manual?
Read all instructions and watch the assembly video for guidance before starting.
Prepare a clean workspace and keep all packaging until assembly is finished to avoid discarding parts.
Adult assembly by two people is recommended; use only the provided screwdriver to prevent damage.
Identify and separate all parts and hardware using the provided lists before starting assembly.
Contact customer service for missing parts, damage, or assembly assistance via email or phone.
Visual list of all product parts, numbered 1 through 9, for identification during assembly.
Details of hardware components including Dowels (A), Cam Locks (B), and Screwdriver (C) with quantities.
Explanation of how dowels and cam locks are used to securely connect product pieces together.
Insert Dowels into threaded holes on parts 2, 3, and 4 using the screwdriver.
Connect Part 4 to Part 5 by inserting dowels and turning cam locks clockwise.
Attach Parts 2 and 3 to Part 5 using dowels and cam locks.
Turn cam locks on Part 5 clockwise to complete the connection of parts 2, 3, and 4.
Use the screwdriver to insert dowels into the small threaded holes on Part 1.
Flip the assembly and attach Part 1 to parts 2, 3, and 4 using dowels and cam locks.
Place the stand on a desk; assemble optional height extenders (6, 7, 8, 9) for added height.
The unit is designed to accommodate up to 50 lbs; do not exceed this weight limit.
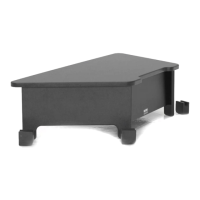
The Victor High Rise™ Monitor Stand with Built-In Shelf, model DC050, is a versatile accessory designed to elevate your monitor and provide additional storage space, enhancing your workspace ergonomics and organization. This stand is engineered to be assembled by two adults, ensuring a safe and efficient setup process. Its construction utilizes a system of dowels and cam locks, which are crucial for securely connecting the various components.
Before embarking on the assembly, it is highly recommended to watch the instructional video available at www.victortech.com/High-Rise. This visual guide can clarify steps and provide helpful tips that might not be immediately apparent from the written instructions alone. To prevent damage to any parts, all components and hardware should be carefully removed from the box and laid out on a scratch-free surface. The shipping box itself can serve as an ideal work surface for this purpose. It is also advised not to discard any packaging materials until the assembly is fully completed, as this helps prevent the accidental loss of small parts or hardware.
The assembly process begins with inserting dowels into designated threaded holes on specific parts using the included screwdriver. It's important to note that power tools should not be used, as they can overtighten and damage the hardware or split the wood components. The dowels should be inserted easily; if significant force is required, it's best to back out the dowel and try again, ensuring all threads are no longer visible once fully inserted. A key aspect of the assembly involves attaching parts using cam locks. These cam locks are inserted into holes on one part, while dowels from another part are inserted into access holes that align with the cam locks. To secure the connection, the cam lock is rotated one-half turn clockwise using the screwdriver. A helpful tip for this step is to ensure the small arrow on the cam lock is facing towards the open hole where the dowel will be inserted before rotating. This ensures proper engagement and a tight connection. It's crucial not to overtighten the cam locks, as this can also lead to damage.
The initial stages of assembly, specifically steps 2, 3, and 4, involve assembling the product upside down. This orientation facilitates easier access to the cam locks and dowel holes. Once these foundational components are connected, the assembly is flipped right-side up to attach the top monitor stand surface. Dowels from the top part are inserted into access holes on the supporting structures, and cam locks are again used to secure these connections.
A unique feature of the High Rise™ Monitor Stand is its optional height extenders. If a taller height is desired for the work surface, parts 6, 7, 8, and 9 can be assembled to the bottom of each leg. These extenders add an additional inch of height, allowing users to customize the stand to their ergonomic preferences. This flexibility helps in achieving an optimal monitor viewing height, which can contribute to better posture and reduced neck strain during prolonged use.
For ongoing maintenance, it is essential to periodically check all screws and cam locks. At least every six months, ensure that all connections are tight. This routine check helps maintain the stability and integrity of the stand over time. If any parts are found to be missing, broken, or worn, it is crucial to stop using the product immediately. Repairs should only be made using authorized Victor parts to ensure safety and proper function.
Should you encounter any difficulties during assembly or if parts are missing or damaged upon arrival, Victor Technology provides customer support. You can email them at victor@victortech.com or call their Customer Service Department Monday through Friday, 8 am to 4 pm CST, at 1-800-628-2420. This support system ensures that users can receive timely assistance and resolve any issues that may arise, contributing to a positive ownership experience. The stand is designed to accommodate up to 50 lbs, and it is recommended not to exceed this limit to ensure its stability and longevity. The Victor High Rise™ Monitor Stand with Built-In Shelf is a thoughtfully designed product aimed at improving workspace functionality and user comfort through its practical features and user-friendly assembly process.
| Product Name | Victor High Rise DC050 |
|---|---|
| Category | Indoor Furnishing |
| Color | Black |
| Assembly Required | No |
| Material | Steel |