EasyManua.ls Logo

Viking YouSafe One - User Manual

Viking YouSafe One
11 pages
Go to English
Print Icon
To Next Page IconTo Next Page
Loading...
VIKING LIFE-SAVING EQUIPMENT A/S
Protecting people and business
User Manual
VIKING YouSafe
TM
One
Inflatable Lifejacket, SOLAS, (PV9342)
DA EN FR
Question and Answer IconNeed help?

Do you have a question about the Viking YouSafe One and is the answer not in the manual?

Overview

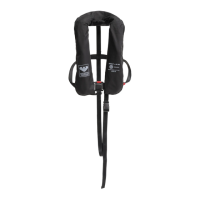
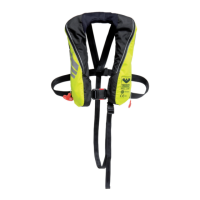
The VIKING YouSafe™ One is an automatically inflatable lifejacket designed for high-quality marine safety. It is available in two versions: 180N (PV9342 A) and 275N (PV9342 B), both of which have been tested and approved in accordance with the EU Council Directive (MED) 2014/90/EU for marine equipment.

Function Description:

The primary function of the VIKING YouSafe™ One is to provide buoyancy and support to individuals in water, helping them stay afloat. It features a buoyancy chamber with two separate compartments, which, when fully inflated, provide either 180 or 275 Newtons of buoyancy, depending on the version. The lifejacket is designed for persons weighing from 43 kg to over 100 kg, with a chest measurement between 60 and 175 cm.

Usage Features:

Before initial use, it is highly recommended to familiarize yourself with the lifejacket's functions and to test it in a swimming pool or other safe conditions while wearing normal clothing.

Instructions for Use:

  1. Donning: Put on the lifejacket like a jacket.
  2. Fastening: Close the front buckle.
  3. Adjustments: Adjust the waist strap and then fasten and adjust the crutch strap buckle.
  4. Inflation: The lifejacket is designed to inflate automatically upon immersion in water. However, it can also be manually inflated by a strong pull of the release line. Once inflated, the integrated light is automatically activated.

Inflation Methods for VIKING PV9342:

  • Automatic Inflation: The buoyancy chamber inflates within approximately 5 seconds after immersion in water.
  • Manual Inflation: The lifejacket can be inflated by a strong pull of the release line located on the right side of the lifejacket. If this chamber fails to inflate, the second chamber can be activated by a strong pull of the release line on the left side of the lifejacket.
  • Oral Inflation: Open the protective cover and blow air into one of the oral inflation tubes.
    • WARNING: Never inflate the lifejacket by mouth prior to automatic or manual inflation, even though it has been tested to withstand excess pressure.

Maintenance Features:

Regular maintenance is crucial for safety. The lifejacket must undergo an annual service at an authorized VIKING servicing station. Information on finding the nearest service station is available on www.viking-life.com.

Halkey Roberts Inflator System:

If the lifejacket is equipped with a Halkey Roberts inflator, the bobbin must be replaced annually after the lifejacket has been put into use. Do not use bobbins that are more than four years old; the production date is printed on the bobbin.

Checking the Lifejacket Before Use:

  1. Inspect for Damage: Ensure the lifejacket is undamaged.
  2. Mouth Inflation (Optional): The lifejacket can be inflated by mouth for inspection, then repacked as described in the packing instructions (4.3). Avoid activating the inflators during this process.
  3. Inflator Check: Open the protective cover and inspect the inflators:
    • The indicator must be green, and the lock pin must be correctly mounted on the inflator.
    • 180 N lifejackets require 38 g CO₂ cylinders, while 275 N lifejackets require 60 g CO₂ cylinders.
    • The opening of the CO₂ cylinders must not be pierced. This can be checked by unscrewing the CO₂ cylinders.
  4. Oral Inflation Valve and Tube: Check their condition.
  5. Light and Whistle: Verify they are functional.
  6. Straps and Buckles: Inspect all straps and buckles for integrity.
  7. Close Cover: Close the protective cover securely.
    • IMPORTANT: If the lifejacket is not intact or shows any signs of damage, do not use it. Ensure the release line is free-hanging and visible outside the protective cover.

Cleaning:

Clean the lifejacket only with mild soapy water.

Packing Instructions (4.3):

  1. Place the lifejacket on a flat surface.
  2. Fold up the bottom section on the left side of the buoyancy chamber.
  3. Fold the inner section of the left-hand side towards the middle.
  4. Fold the outer section of the left-hand side towards the middle. The release unit must remain visible.
  5. Zip the cover, starting from the left side. Remember to pull the release line through the designated hole. Zip up past the marking on the cover and close the hook/loop closure.
    • IMPORTANT: The release handle must be positioned as shown in the packing photo. The release line and handle must hang out from the bottom edge of the velcro.
  6. Fold the left corner so that the welding is on top. Zip the cover up to the middle of the neck.
  7. Fold the right corner of the neck so that the welding is on top. Zip the cover a bit more to cover the corner. Mount the lifting strap.
  8. Fold up the bottom section on the right side of the buoyancy chamber. The release unit must be visible.
  9. Fold the inner section on the right-hand side towards the middle.
  10. Fold the inner section of the left-hand side towards the middle, ensuring the release unit is visible.
  11. Zip the rest of the cover. Remember to pull the release handle through the hole in the cover. Close the hook/loop closure and insert zipper ends into the cover.
    • IMPORTANT: The release handle must be positioned as shown in the packing photo. The release line and handle must hang out from the bottom edge of the velcro.

Packing Instruction for Lifejacket with Sprayhood (275N version only):

If the lifejacket includes a sprayhood, follow the general packing instructions up to step 5, then apply these additional steps: 6. Fold the sprayhood three times. Fold the neck like a fan with the welding visible. Place the sprayhood into the neckfolds, ensuring the welding on the neck remains visible. 7. Fold the left corner so that the welding is on top. Zip the cover up to the middle of the neck. 8. Fold the right corner of the neck so that the welding is on top. Zip the cover a bit more to cover the corner. Mount the lifting strap. 9. Fold up the bottom section on the right side of the buoyancy chamber. The release unit must be visible. 10. Fold the inner section on the right-hand side towards the middle so that the release unit is visible. 11. Fold the inner section of the left-hand side towards the middle, ensuring the release unit is visible. 12. Zip the rest of the cover. Remember to pull the release handle through the hole in the cover. Close the hook/loop closure and insert zipper ends into the cover. * IMPORTANT: The release handle must be positioned as shown in the packing photo. The release line and handle must hang out from the bottom edge of the velcro.

Replacement of CO₂-Cylinder and Bobbin (4.4):

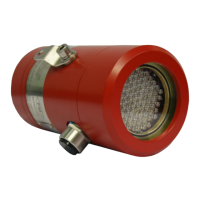
After use, rinse the lifejacket with fresh water (especially if used in salt water) and allow it to dry completely. Empty any remaining air using the oral inflation valve. a. Unscrew the automatic holder (8) and discard the bobbin (7). Rinse the holder carefully with fresh water and dry it. b. Unscrew and discard the used CO₂ cylinder (1). c. Place a new bobbin (7) into the inflator. Screw the automatic holder onto the inflator. d. The service indicator must be green. e. If the release arm (3) has been pulled out, press it back into position and place the indicator clip (4) over the release arm. f. Remove and discard the old gasket (2) under the CO₂ cylinder. Insert a new gasket into the inflator (5), ensuring it is placed at the very bottom of the inflator. g. Install the CO₂ cylinder (1) into the inflator and hand-tighten it.

Spare Parts:

Contact an approved VIKING servicing station for spare parts. Find the nearest service station at www.viking-life.com.

Storage:

Store the lifejacket in a dry place, ideally suspended on a hanger in a wardrobe, at temperatures above freezing. Unintended inflation can occur due to a combination of moisture and vibration. Adhering to annual service reduces this risk.

Applications and Limitations:

The lifejacket has been tested in water temperatures ranging from -1°C to 30°C. At temperatures below 0°C, automatic inflation may be delayed, requiring manual activation. Never wear any clothing over the lifejacket. If worn with an immersion suit or other special buoyancy-equipped clothing (e.g., sailing wear), the lifejacket's functionality may be affected.

Viking YouSafe One Specifications

General IconGeneral
BrandViking
ModelYouSafe One
CategorySafety Equipment
LanguageEnglish

Related product manuals